Friday, February 26, 2010

Tutorial~Reversible Handbag~

Hi everyone! How was your week? Mine was very busy as usual, in a good way though; but I can't wait to slow down a little and spend some more time with my family.

I posted the winner for the Christa's Apron on the sponsors' page. So before you start reading this post head over there to see if you are the lucky winner!

Two weeks ago, I was invited to be a guest blogger for Ucreate. I came up with a tutorial to make a reversable hand bag (Two for One! I love things that are versatile and have more flexibility!). I am going to post the tutorial on my blog today. It is all straight cut, if you have rotary cutting tools, you can finish cutting all the necessary parts in the blink of an eye. If you don't, you can measure it out directly on the fabric and cut by hand.

Sew using 1/4" seam allowance, unless directed otherwise.


You will need:

Fabric 1 (your main fabric) 1/2 a yard.
Fabric 2 (inside fabric) 1 yard. (Includes extra for bias tape)

Canvas (this will go between the fabric 1 and 2 to give body to the bag) (1/2 yard)
matching thread

How to make:

1. Cut all the necessary parts.


From fabric 1 you will cut out: 2- 9 1/2"T x 14"W peices for the bag, 2- 1 1/2"W X 20"L pieces for the handles.

From fabric 2: same as fabric 1, plus 5 1/2"T X 7"W for the pocket. For the bias, if you are not familiar with making it, check here.

From canvas you will cut out: 2- 9 1/2"T X 14"W for the bag, 2- 3/4" x 19"L pieces for the handles.

2. Make the pocket.
a. Use a zig-zag stitch around the edges of the fabric to prevent fraying.
b. Fold the corners, then fold 1/4"of the sides and the bottom. This way the corner is mitered and doesn't get too thick and is easier to sew.
c. Fold the top edge twice, sew 1/8" from the folded edge.


3. Sew the finished pocket onto fabric 2. Fold the bag fabric and the pocket in half and match up the folded line(so, the pocket is in the middle, and measure 2 1/2" from the top. Line the pocket with the 2 1/2" line pin. Then stitch the pocket to the bag. I sew a line on the pocket 2 3/4" from the right to devide the pocket.


4. Lay down fabric 2, measure and mark to make pleats. The mesurments are like this:


Lay canvas on top of fabric 1, and do the same.

5. Using big hand stitches, sew the pleats to hold them in place. Do the same to the rest of the other pieces too.


6. Put the right sides together of fabric 2 and pin. Sew around the edge. Do the same to fabric 1 that has the canvas attahced.


7. To square the bottom of the side, bring the seam together (The sure the seam lines up.) Fold and then as in the picture draw a 3" line and sew on top of the line. Then cut off the fabric 1/4" away from the line.


8. Repeat the same process with fabric 1.


9. Turn fabric 2 inside-out. Insert into the the bag made out of fabric 1. The pin the bias tabe all around the edges of the top. Sew around the folded line.
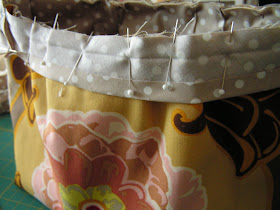

10. Fold the bias tape around to the inside of the bag. Cover the raw egdes, pin and sew. You can use a slip stitch too.


11. Make the handle.
a. Lay fabric 1 and 2 right sides together. Sew around the edges leaving a 16" opening centered on one side.


b. Snip the corners.


c. Turn the handle inside out and fold the open edges about a 1/4" inside and iron. This process will make it easier for later. Slip in the canvas strip. For the corners use a sharp object to push them in place and flatten.


d. Pin the opening and sew 1/8" from the edge all around the handle stip.


12. Attach handles to the bag appoximately 2" from the side.


Now you have 2 beautiful handbags!


If you want a magnet closure, you can with this bag too. You just add the magnet before step 9. A little tip, to pick out fabrics to make this bag, quilt shops carry all sorts of pretty fabrics, also check out Jo Anne's home decorating fabric setion. When you combine larger patterns with smaller patterns you can recreate a similar look to this bag.

Wednesday, February 24, 2010

Tutorial~Tunic Dress for a Little Girl~


I found a purplish-plum color t-shirt at the sales rack in Target the other day, it was $2. I went through my fabric stash, and picked this fabric to make a tunic dress. Well, I wanted to make a dress, but the fabric I had wasn't a whole lot. I thought she could wear this with tights or with pants.

I worked on this tutorial over that last few weeks while I worked on other projects. I thought I took more pictures to explain things better, but I didn't. If there are some areas that you have a hard time understanding, I am sorry. If you need to see how to made the ruffles, please go here, to see the instructions. That might help a little.

{You will need}


One T-shirt

Fabric(if you have 3/4 yd, you should have enough to make this)

Matching Thread(Because the t-shirt and the fabric are such contrasting colors, I had to use two diffrent color threads. If you don't want to do that, I advise you to pick a top and fabric that are somewhat similar.)

{How To}

~The Top~

1. From the fabric cut a 2 1/2" Wide X 44" Long strip. Cut it to three equal pieces and fold the strips right sides together in half and sew using 1/4" seam allowance.

2. Turn the strips inside out. Fold the strips so that the seam will come to the one side and press with an iron. Also, fold in both ends and press.


3. Using the largest setting on your sewing machine, make a ruffle. Sew the ruffle onto the middle of the T-shirt.


4. Repeat the process and add more rulles on both sides(Mine are 1 1/2" a part).


5. Cut 2 1/2" off from bottom of the T-shirt.(or more, if you would prefer a higher waist)


6. From the T-shirt strips, cut two 3/4" X 12 1/2" strips. (Save the rest if you want to make a hair accessory later).


7. Make ruffles and sew them on between the fabric ruffles.


~Skirt~

1. Cut one 5" by the wideth of the fabric strip, cut in half to make it into two pieces. (These will be the top portion of the skirt). Then, cut two pieces of 6" X 36" strips. (These will be the bottom portion of the skirt).

Do zig-zag or use a serger to finish both sides of the strips. With the right sides together, sew both sides and make a big loop.

2. Start with bottom skirt, with the largest setting, sew two lines all around. Pull both threads to gather the fabric. Spread the gather evenly for better results. Gather the fabric to fit the width of the top skirt.


3. Attach the top and the bottom skirt. Pin them together first, and make sure the side seams match up, then sew. After you have attached them, turn the fabric inside out and press the seam. Using 1/8" seam sew on the right side of the fabric.


4. Repeat the process for the top edge of the skirt, then attach it to the shirt. Since I still haven't practiced using my serger (shame on me!), I ironed 1/2" wide strips of interfacing on the wrong side of the t-shirt to prevent it from getting wavy.


~Finish~

After sewing the top and the skirt, turn the dress inside out and sew right side of the t-shirt usign 1/8" seam.


For the hem, I just did a narrow hem since I did't have that much fabric to work with. To do a narrow hem, fold the raw edge 1/4" twice then sew. It is a rather casual look, but I thought it would be ok.

I used leftover pieces and made a matching headband. It is all done, all you need to do is to let your loved one enjoy it.


That's what I did...


Monday, February 22, 2010

Say Hello to Bento


Those of you who have been reading my blog for a while know that I was born and raised in Japan. When we were first married, I was a little worried about how we could combine our two different cultures. My optimistic Mr. layed back said, "Don't worry, we will just take whatever is good from either culture and make it our own."

One of the things our family loves from Japanese culture is "Bento". Bento is a single portion takeout or home-packed meal in a box, and very common in Japanese cuisine. Usually, bento consists of rice, fish or meat and other side dishes.

Normally, I pack sandwishes, fruit and a light snack for my husband's and kids' lunches. (Because it is easier and quicker!!). Every now and then, when I have time I pack a Bento. (Being a night owl, I don't like mornings.)

This morning was the rare occasion. I packed a Bento for each of them.


Inside the bento, there was...

Rice with Furikake(flavor flakes)

Hanbagu (just like meatballs, but I used ground turkey and chopped veggies with teriyaki sauce)

Tamago-yaki (Thin layers of egg rolled into a rectangular shape)

Little sausages (I made two slices from one end to the middle to make it look like flower.)

Sliced apple (looks like a bunny)

Some lettuce.

They loved it. Oh, and I will show you how we wrap our bento box (you know...just a final touch).

1. You can use any square fabric. I used napkin this time. Put the lunch box on the fabric diagnally.


2. Fold the front corner to the other side, cover the container and fold the corner under the container.


3. Bring the opposite corner over the box to the front.


4. Take both right and left corners and tie them together using a square knot.


5. You have Japanese style Bento!


A tip to make bento is to put three basic colors. Red, Green, Yellow in the container. That way it not only looks pretty, you can also get a balanced meal in one box.

Friday, February 19, 2010

Sponsor Giveaway and Latest Basket Make Over

I couldn't help it. I had this basket to pretty up for my etsy shop for a while. When I went through my stash of fabrics, I found the perfect brown that would go with the basket. I had to make ruffles. Usually, my baskets have flower clips, but this time I wanted to do something diffrent.

Here is the before picture...


then after...


I love it. I made a charm with leather string and beads for the basket. My goal was to achieve a feminine look without being too cutsy.

I have been working on a tutorial this week and I was ready to take the final pictures, then it snowed today, ugh! I will post it sometime next week. I am super excited for this, I hope you are too.

I posted an exciting sponsor giveaway at my sponsor's page today! Head over to check it out and say hello to my sponsor, and leave comments to be entered for a chance to win the prize. Good luck everyone!