Monday, October 31, 2011
Tutorial / T-shirt Pillow (just because I found an old t-shirt)
I have been going through my house on and off for the last several months. To get rid of things I usually have a system... There are three piles, such as "Donate", "Sell", "Throw away". Any other place in the house is not hard to do this except in Mr. TRH and my closet.
I have a weakness for fabrics, and there is no exception when I am trying to get rid of some clothes. Even though an item hasn't been worn for such a long time, I start to think "uh, I can use this to make this" or "ah, I bet if I do this and this I can still wear it".
So, this is one of those projects that I just had to try and see. :)
I found this old t-shirt on Mr.TRH’s side of closet. It was in good condition, but he hadn’t worn it AT ALL for several years.
1. First cut it apart.
2. Cut 2 -- 15" X 22" rectangles for the pillow, and many 1" wide strips. If the t-shirt you have is smaller, you can cut smaller rectangles to make a smaller pillow.
3. On one of the rectangles, you can start "drawing". When you stretch the strips, they will curl up; I think this gives an interesting effect to the pillow. I didn't have any plans whatsoever, but I just eye balled the middle, and pinned the first strip and started to sew.
Keep drawing with strips...
4. After I did lots of "drawing" with strips, I made some ruffle strips to fill in some spaces. To make ruffles, sew in the middle of the strips with large stitches and pull one of the threads. Gather the fabric to make ruffles.
5. Put the front and back fabrics right sides together. Pin them and sew all around it with 1/4" seam. Make sure to leave 3" - 4" opening for turning.
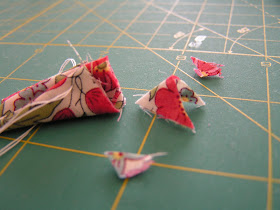
7. Snip the corners for a neat finish.
8. Turn, press the edges with an iron. Stuff, slip stitch closed...and ta-da!
When the kids came home from school, Rachel noticed the pillow right away; the boys couldn’t care less about such minor details in life. I thought it was so funny to see the difference. Although, the pillow is loved by everyone, it is so soft and cuddly and perfect for a pillow fight. :)
Sunday, October 30, 2011
Link Love No.72!
Hello, hello friends, how has your week been? I am still on the path of recovery, but enjoy doing more for my family and of course some sewing now. Where I live, the scenery has changed so much in the past few weeks and I love looking at the beautiful fall colors outside.
There were many fall and Halloween projects and recipes on this week's link party. I enjoyed them a lot, thank you for your participation!
Here are the 5 loves for this week.
I love how pretty and easy it is to make this wreath! Polka Dot Bungalow shared a step by step tutorial on her blog. Great job!
I couldn't resist the cuteness...meet baby princess Leia from Lauren Inspired. Simply irresistible, hands down cute!
First of all, I must say I love unique titles. See Kate Sew shared her "Sweatshirt Liposuction" project with us. At first I thought "What?", then, the picture on her blog post explains it all... funny. The result of this operation is big but "smaller in size" success too!
Our Home's Cool shared this fun scrappy lampshade with us. I love the look of this lampshade, but fell in love with the effect on the sealing when the light is on. Head over to her blog to see what I am talking about.
I have been going through our house to organize for a few months now (on and off). It was pretty easy except for Mr.TRH and my closet. I kept finding clothes that I think I can make it into something and it is just so hard to put them in the "throw away" or "donate" bag. Anyways...Orlosubito did such a wonderful job turning a man's shirt into a pretty tunic. I love the simplicity of it. Thank you for sharing!
See you at the next post everyone!
Thursday, October 27, 2011
Shutterfly Holday Cards Giveaway!
I am doing a giveaways (3 prizes!) for Shutterfly today. Go here to find out more details about the exciting giveaway!
Wednesday, October 26, 2011
Link Party No.72!
Hi everyone, the Link Party is baaack! I am not recovering quickly enough, but I am better enough to host a link party. :) I will take a break from "Untold story of my medical history" today... What do you have up your sleeves this week?
I have a small tutorial that I want to share too!
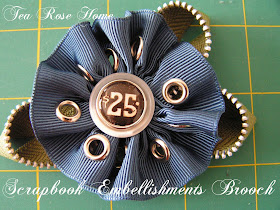
I found this embellishment for a scrap book section at a craft store a while ago, and I think it was 75% off, so it was really, really cheap.
1. Take the navy one and sew with big stitches. Pull the thread to gather the ribbon, and sew the ends together.
2. To make the leaf part, fold one end of the zipper as the picture is showing (about 2") and stitch it to hold it in to place.
3. Take the rest of the zipper and fold it towards the center and stitch.
4. Repeat the process to make the third leaf.
5. Sew the flower onto the leaf portion.
6. Sew large button in the middle.
7. Take the studs and cut off the unwanted part. Flatten the access metal. I used E-6000 to glue it on the button.
8. Sew the pin onto the circular felt and glue that on the back of the flower.
I like the uniqueness of this brooch; I could decorate one of my bags or baskets with it. :)
OK, now it is your turn, go ahead link up, visit each other and have fun! Please play it by the rules, sometimes there is clearly just advertisement for business websites linked up, and that is not fair to others.
1. Please post something YOU made. It doesn't matter if it is crochet, quilt, clothing, anything would be fine. I want to see it! If you use someone's idea or patterns please give them the rightful credit.
2. Link to your specific post, that way it is easier for everybody to find and read it.
3. Please grab the "Tea Rose Home" grab button, and link back from your post. If you can mention the party in your post or place the button on your side bar, that would be great! I want more people to have a chance to come and show off their creation.
Monday, October 24, 2011
Untold Story of My Medical History/ Part 2
Thank you all for your comments on the "Untold Story of My Medical History part 1" Your kind comments energizes me and I feel so blessed to know that I have such supportive readers. Really, thank you! I want to make sure that you know this story happened several years ago. Because I share my procedure and such periodically in my post, I think some of you are thinking that the story is happening right now. The "Untold story of my medical history" is about few years after I came to U.S and got really ill, and found an amazing treatment to control my condition.
In the meantime, I had my procedure done on Thursday, and am recovering. I feel well enough to hit the keyboard today, and decided to tell you what happened after Dr. D's visit... (if you haven't read part 1, please read that post before you start reading this one).
After Dr. D left, I kept on crying. I felt confused and didn't know what exactly was happning with my body. Also, I felt so sad and powerless for what just happened and how I had been treated by the doctor.
The next thing I did was to called Mr. TRH, and wanted him to listen to what happened. "Hello?" the groggy voice answered... I totally woke him up. After I realized it was still very early in the morning, I felt bad, because he stayed with me at the hospital until really late the night before, he must be so tired... He said, "hey sweetie, what's up? Are you ok?".
That did it, a kind and familiar voice... I started crying again. I told him exactly what happened, he told me that he is going to jump in the shower and come right over.
Shortly after that, a young nurse came in to the room. She asked me, "what happened? The doctor seemed upset". She sat down on the chair by the side of my bed trying to comfort me. Between the crying and blowing my nose, I was able to tell her what happened minutes ago. She sighed and told me that it is not the first (or second) time that he acted that way. Thanks to her, I felt slightly better.
By the time Mr. TRH came in to the room to see if I was OK, I was still upset, but talking to the nurse and seeing Mr. TRH made me feel slightly better. After listening to me, he went to the nurses' station to get the phone number for Dr D's himself.
Here is what happened at the nurses' station, while I was lying on the hospital bed and waiting for Mr. TRH...(he told me afterwards)
He went to the nurse station, and the nurses knew he was upset, well...very upset. As soon as he asked for Dr. D, they call the Dr. D's office for him. Here are the conversations they had,
Mr. TRH, "Dr. D?"
Dr. D, "Yes, this is he."
Mr. TRH, "This is Mr. TRH. You just visited my wife a few minutes ago."
Dr. D, "Yes"
Mr. TRH, "I want to know what tests you ran to know that my wife was pregnant."
Dr. D, "Well, uh, I uh, didn't run any test."
Mr. TRH, "So then you did not know that she was pregnant. Did you not look at the chart?"
Dr. D, "I assumed because she said that you guys were trying."
Mr. TRH, "Oh, so you assumed. Is this how you go around making all of your diagnosis? You have people's lives in your hands, you don't have the luxury of shooting from the hip, that's how patients die."
Dr. D, "Well, I uh umm..."
Mr. TRH, cutting off the doctor in mid excuse, "We are getting a new doctor. Do not come by to see my wife again. You are fired!" (now that I think of it, he claimed the phrase "You are fired!" before Donald Trump).
Then Mr. TRH hung up the phone, thanked the nurses, who were giggling (apparently they didn't like Dr. D either) and returned to my room.
After he told me about the conversation with Dr. D, I was bit surprised, but well, not really. My husband and I are a lot alike, but we are very different in so many ways. His normal speaking voice is very loud, people always tell me I talk quietly. He doesn't mind being confrontational if he needs to be, I really don't like to be confrontational.
He is my constant guardian and I know he will do almost anything to protect me...
Side Note: Several years after the incident, we became friends with a couple. The wife and I were talking about our horrible experiences with doctors, and her story was somewhat similar to mine if not worse.
I asked her, "Oh my gosh...what was his name?"...
Yeah, you guess it right, it was Dr. D.
After he fired Dr. D, his partner Dr.T come to see me. He was different from Dr.D.
He was very talkative and friendly. The first impression of him was good, but the more I got to know him, my gut feeling kept telling me that we should switch to another doctor. I have been in and out of the hospital as long as I can remember. I have met so many wonderful doctors over the years, but also, the total opposite too.
After a few weeks of first meeting with Dr.T I found out that he will become one of the worst 5 doctors in my "career" as a patient.
Friendliness can be deceiving. I will tell you about him in Part 3...
To be continued...
Wednesday, October 19, 2011
Untold Story of My Medical history / Part 1
I have been slowly recovering from the angiogram, but I am scheduled for my routine procedure today. Sigh... the pain in my leg is getting worse each day and I know that the procedure will help to relieve some of the pain after the procedure. I will be off soon, but in the meanwhile, I decided to write the "Untold (partial) story of my medical history" while I am recovering and stuck in bed.
I know I have never shared with you exactly what it is that I have, so I have decided that I will tell you about a small part of my medical history. The part that I got extremely sick after being married for few years, to finding the special treatment to improve my quality of life tremendously... let me give you little bit of history, just in case you are here for the first time on my blog.
The medical condition I have is called "venous Malformation" and it is pretty much all throughout my right leg. My leg below the knee was so bad that the doctors told my parents that if I don't have an amputation I will die soon. My parents went to see many different doctors but they all said the same thing. They waited until I was two, and there goes my right leg (below the knee). I still had venous malformations in my thigh but it was not as bad as below the knee, also, if I lost my whole leg, it would have been much harder for me to learn how to walk. So they decided to keep it.
Basically what it is, is that the veins in my leg are very wide, tangled, and have offshoots that I am not supposed to have. When the symptoms act up, my whole leg gets very hard, and I have tremendous pain. It is the kind of pain that I have hard time explaining, because it is not something you will experience from bruises, cuts, burns etc. The best way I can describe it is that it can be a very sharp pain, or dull pain. Also, sometimes I feel like someone is putting their hands around and squeezing everything inside.
It is the kind of the pain where I will be bed ridden, cannot even crawl to the bathroom without crying. Even rolling over cause’s crazy pain so usually I will just stay in one position and pretend that I am dead so I don't feel the pain. I have high pain tolerance, but even then, I can't help the tears flowing down.
Also, for some reasons, I will get extremely anemic to the point that I will need blood transfusions if it's untreated. The pain and the anemia go hand in hand without fail. Even the doctors don't know why they are related.
Growing up there were no treatments, so all we (I mean including the doctors) could do was to wait for that to pass. That is why I was always in and out the hospital, anemic most of the times.
After 3 years of being married and living in America, I became ill. There is a whole lot to this story but I am not going to write it here. Seriously I could write a novel if I go into details! Usually, in two to three weeks I get better, but this time it didn't. We waited, and waited... after three month later it was evident that I was not getting any better. In fact it was getting worse. My hematocrit dropped to the point where I had a hard time breathing on my own. I was hospitalized in a local hospital (not U of U).
There they gave me blood, but my body kept rejecting it. They didn't know why... then, a doctor came in to my room in the morning. Let's call him Doctor D. He was flipping through my chart as he came in to my room. He introduced himself and asked me few questions than said:
"hmm... you are losing blood because you are pregnant."
What?! I was stunned! Mr. TRH and I were trying to start our family and a few month previous to that I stopped taking the blood thinner (Japanese doctor put me on to control my VM somewhat) and switch to daily shots. So it will not affect the baby.
So in an instant I had mixed feeling of joy and doubt. I was thinking "What? Am I really pregnant? But how does he know? They haven't done any tests." I still remember my feeling then, though, I was happy if I was pregnant, but I also desperately wanted to get better to protect the baby.
As I was thinking all these things, I said,
"Am I really pregnant?
Then you know what he said?
"Oh, you are not?"
Then he started flipping through the chart again.
I have been sick for three month. Living in the U.S for about three years, I understand most of what people were saying but still had difficulty speaking and describing exactly what I wanted to say back then. Also I was away from my family in Japan. My stress level just reached the limit when he said "Oh, you are not?" I wanted say to him "What do you mean; oh you are not? I am not pregnant? What are you saying?!"
Instead I just started to cry. The feeling of worry, scariness, sadness, tiredness, frustration and everything... I just couldn't take it anymore.
Dr. D was looking down at me with the chart in his hand and asked me,
"Why are you crying?", in a very strange and cold voice.
I couldn't say anything because of the crying... I didn't even know what to say.
Then, he just grabbed the Kleenex tissue box and threw it on my chest, huffed and stormed out the room...
To be continued....
Monday, October 17, 2011
Tutorial ~ She Wears Flowers
A few weeks ago, I did a guest post for Tatertots and Jello and shared this tutorial. In case you missed it, I am posting this on my blog today. Enjoy! :)
I am sharing a cardigan refashion today. If you have some old cardigans in your closet that needs a little facelift; then, this tutorial is perfect for you!
This is one of my favorite cardigans; I wore it for several years. I love the 3/4 sleeve, the open neckline, and the color... but I had this idea in my head to change the look of it, and I really wanted to give it a try.
{You will need}
A cardigan
100% cotton fabric that would match the cardigan (it doesn't need to be the same color, but it needs to either blend in with the cardigan, or have contrast and match with the flowers that you will accessorize the cardigan with)
Various fabrics, wool, and buttons
Matching thread
{How to}
{Assembly for the cardigan}
1. To make the bottom part, I cut the fabric like I am making bias tape. I used 36"wide muslin. Make a large square, fold it in half vertically. Cut 4 1/2" strips.
2. Piece them together. Fold the bottom less than 1/4" twice and saw.
3. Sew the top with largest stitch setting on your sewing machine. Pull the thread to gather the fabric. For this cardigan I didn't want lots of ruffles, so just a little to have flare. :) The bottom of the cardigan measured 30"all around, so I used 45" long bias and shrank to 30" long.
4. Pin the bias ruffle all around the bottom of the cardigan. I used zigzag stitches to sew it on. Fold the ends and zigzag to finish it off.
5. Add wide lace little bit above the fabric ruffle using the same technique as step 3 and 4.
6. I wanted to give more interest to the back, so I added a second row of lace ruffle. I cut 14 1/2" lace, and folded the both ends and zigzagged them prevent fraying, made a ruffle and added it in the back.
7. Cut 1 3/4" x 6 1/2" lace, and sew it on the waist line too. Make sure to center it so that both step 6 and 7 line up nicely.
8. For the sleeves, mine was 8 1/2" around. I cut 14" long lace and sewed the ends together, zigzag the ends to prevent fraying. Using the same technique as step 3 and 4, make ruffles and sew it on the bottom of the sleeve. Do the same to the other sleeve.
{How to make flowers and Yo-yo's}
*Folded fabric flower
1. Cut 8 - 3" x 3"squares and fold the squares according to the picture.
2. Using two strands of threads, put through each petal, don't forget cut off the excess.
3. Tie the ends to form a circle to make a flower. I like to sew each petal to each other to secure them.
*leaves
Cut 1" x 2" rectangle first, and trim them so they look like leaves. They don't have to be perfectly unified.
*Flat flowers
Cut 1 1/4" x 1 1/4" square and trim it so that it will have four petals. Cut small circles for the middle.
*Felt flower (Light green)
1. Cut 6 - 1" x 2". Trim them so that they have round top.
2. Fold the bottom in half and pull them through the thread to make a flower. I stitched them together several times to secure them better.
*Felt flower (muted pink)
1. Cut 6 - 1" x 1 1/4" rectangles, trim them so that they will have rounded top.
2. Using the same method from step 2 on felt flower (purple), make the flower.
3. Cut circle for the middle and sew.
4. Sew yo-yo on top of the small felt circle
*Yo-yo
I used 3" and 2" circles to make yo-yo's. Smaller ones on the felt flowers are made with 1 1/4" circles. If you need to see how to make yo-yo, you can go to my tutorial.
{Assemble}
In my opinion, this is the most fun part. Just lay down the cardigan and lay down the flowers and yo-yo's to see what you can come up with! It is better to deiced where you want to bigger pieces go first than diced on smaller ones.
Pin them to see if you like the lay out. If you do, it is time to stitch them onto the cardigan.
I used some DMC floss to do fun stitches on the flowers and leaves. I did lots of slip stitches around the yo-yo's.
After you are all done with above, you can add buttons and such.
I had lots of fun making this, but wearing it was even more fun.
Why I am smiling? I have other ideas that I can't wait to try with more fabric and wool flowers, thinking about the possibilities makes me so excited!
I LOVE how it turned out! It will be fun to have some colors under the fall & winter gloomy sky; it is one of my ways to brighten up the day a little. :)
NOTE: Since I am having another procedure this week, the link party is cancelled. Sorry.