Wednesday, March 7, 2018
Tutorial ~ Book Lady's Library Bag
There are many things I love to do. Besides spending my time with my family, I love to design, sew, cook, create and read. I always liked to read while growing up and read several books every day to my children. I know many people love their books in digital form now a days, but I still love the actual books on my shelf.
I love the soft muted color of the new fabric line "Once Upon A Rhyme" from Riley Blake designs. Then, when I saw the book shelf fabric I immediately fell in love with it! There are a couple other color themes I had hard time choosing from, but I decided to go with blue. I thought it would be so fun and fitting to make a library bag with this fabric for my daughter.
*Material and cutting
1/2 yard of Once Upon A Rhyme Books Blue fabric --- Cut 2 pieces of 14"x 16" for the outer bag, 2 pieces of 3"x 20" for the handles, 1 piece of 6"x 9" for the pocket
1/2 yard of Once Upon A Rhyme Toss Blue --- Cut 2 pieces of 14"x 16" for the inner bag
1/2 yard of Pellon fusible interfacing (Heavy weight)--- Cut 2 pieces of 14"x 16", 2 pieces of 1"x 20" strips
1 1/2" x 8" of thin fusible interfacing
7" zipper
Matching thread>
*How to
1.Fuse the thin interfacing to the back of the pocket, 1/2" from the edge of the top of the pocket piece. Draw a 7" line in the middle of the interfacing and from the tip of the line draw short (a little shy of 1/4") diagonal lines to the left and right.
2. Cut on the lines. Then, fold the edges about 1/4" and press with the iron. Be careful not to melt the interfacing.
3. Pin the zipper, switch the presser foot on your machine and sew it on. Trim the excess material from the zipper on the sides and press 1/4" around the edges on the pocket. Set aside.
4. Follow the manufacturer's instructions and fuse the interfacing on the wrong side of the 14"x 16" fabrics to make the inner bag.
5. Sew the pocket piece from step 3 onto one of the inner fabric from step 4. Make sure that the center of the pocket and the center of the fabric matches and place the top edge of the pocket 3" from the edge of the inner bag fabric.
6. Put together the inner fabrics right sides together and sew.
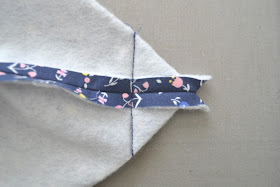
7. To make the boxed bottom, pinch the bottom and side seam together. Make sure the seams line up perfectly. Pin and measure 3" (1 1/2" from each side of the center line) and draw a line and sew. Cut off the excess. Do the same to the other side.
8. Sew the outer bag in the same manner as steps 6 and 7.
9. Make handles. Fold the 3" x 20" strips in half horizontally and fuse the interfacing along the folded line. Sew and turn it inside out. It will make the job easier to use a tube turner. Press with the iron and sew both sides with 1/8" seam.
10. Put together the outer bag and inner bag right sides together. Insert the handles between both layers where the picture is showing, and pin. I left 1/2" out from the edge, so when you turn the fabric inside out and do the top stitches, you will go over the handles again. This way, the handles are more securely sewn.
11. Leaving a few inches for opening, sew the top edge.
12. Turn it inside out. Press the opening, pin and do the top stitches around the edge. Then, sew another top stitch 1/2" from the first top stitches.
I am pretty happy with how the inner pocket turned out. This will be convenient for a library card and some cash.
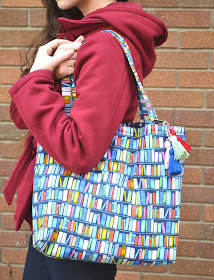
It is finished! I added tassels I made last week to add a touch of detail. If you are interested in how to make them, you can find the tutorial here.
This book shelf fabric is such a brilliant design. You can make so many fun things (skirt, pouch, book cover, pillows for your reading nook and more!) for yourself or your book lover friends. Can you imagine making some Christmas gifts for your book group friends? My daughter, who finally got into reading last year, loves her new library bag and this was a perfect gift for her!


Perfect fabric for a sweet bag!
ReplyDeleteI can think of so many ways to use this fabric. I just love it!
DeleteSuper cute! That inside pocket is brilliant.
ReplyDeleteThanks! I thought that having the pocket with zipper makes the bag more useful.
DeleteLove it, so cute!
ReplyDeleteThank you!
ReplyDeleteHi! Great tutorial. I teach Home Ec and this is very similar to a bag that my high school students make (minus the zipper; that would stress them out, ha.) I was wondering if you could tell me what the final dimensions are? (the height, width and depth of the bag)
ReplyDelete