Monday, December 28, 2015

Book Review ~ The Botanical Hand - Lettering Workbook

This beautiful book was sent to me for a review one day... The Botanical Hand-Lettering Workbook, a step-by-step guide that teaches you how to create pretty letters and different types of flowers. The author Bethany Robertson is a professional illustrator, designer, and typographer based in Brooklyn. She states "I hope this book inspires the botanical letterer in you...". I love doodling, I love flowers; I was so excited to learn from her book!!

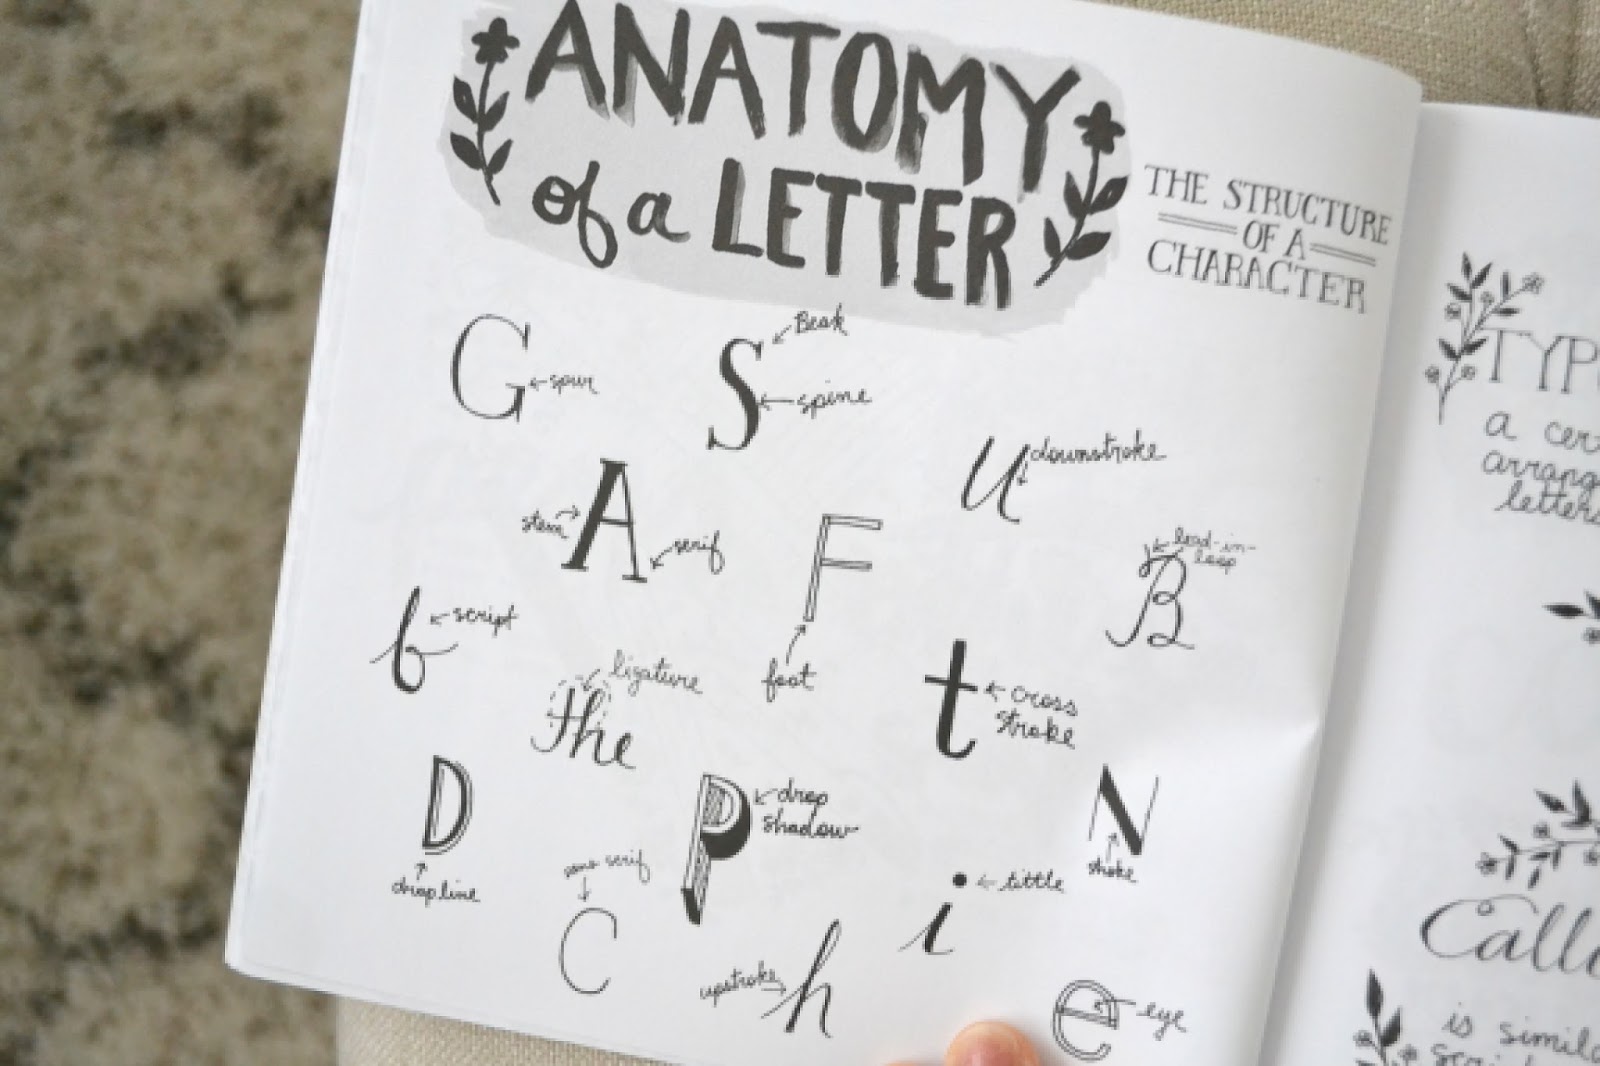
She covers everything from the anatomy of letters to...

How to draw adorable various flowers, leaves and other objects, which leads into...

Creating unique logos with what you learned! How wonderful would that be if you could come up with your own cards, banners, tags and other fun projects?

Intrigued? I can't wait to dig in deeper to the book and practice more once the kids go back to school after the Christmas break. If you are someone who wants to create something beautiful with doodling and drawing, this book will inspire you and help you to learn the skills. I LOVED it! :)

Friday, December 18, 2015

Miniature Quilt Shop Reveal!

While I was working on the miniature Christmas rooms I was also working on a miniature quilt shop. I was thinking about what I could use, how I could arrange things, as I was creating this; it took a little bit longer than I wanted it to... well, I finally finished it!

Just like I did with my miniature sewing room, I am going to share the details of the quilt shop in a few separate posts. Let me talk about the left side of the room...

I couldn't find a perfect table for the cutting station, so I used a wooden box from Michael's. I took the bottom panel off and painted it. In the glass dorm, there are rolled fabrics, I used a large button as the bottom, instead of the metal plate that came with it.

The very last thing I made for the shop was this quilt for the wall. It is 4"x 4", and I am quite in love with it. I like the block so much that I might have to make a real person sized quilt with this block.

I felt like the quilt would set tone for the shop; I had a really hard time deciding the quilt design. Seeing the finished quilt on the wall with the other things makes me giddy.

The sewing machine was originally black, but I painted it white and added a little custom touch with flowers and vines...

The cutting mat is made out of card stock, I just drew some lines. The ruler... it was a piece of clear plastic from some food packaging. I cut a small piece and used a yellow sharpie to drew some lines. Doesn't it look like a real ruler?

As I was putting together this shop, thoughts kept coming to my mind... whoever manufactures the miniature accessories needs to produce quilting gadgets! It would be fun to design many miniature accessories for a modern updated style.

I will be back with more posts about other parts of the room next time, stay tuned! :)


Monday, December 14, 2015

Christmas Miniature Rooms Reveal and Little Thoughts to Share

A while ago, I shared my miniature sewing room with you. You might wonder if my obsession with tiny things has stopped after the sewing room was put together??? The answer is "NO". I have been working on some Christmas rooms lately.

I hosted a potluck/recipe exchange Christmas party last week. As a host, I really wanted everyone to have a good time and enjoy themselves. With good food and company, we played some games and visited with each other and it was so much fun! I was so happy to see a room full of ladies (17 of us! We missed some of them who couldn't make it) just chatting and laughing away.

One of the games we played was a game I found at Happy Home Fairy. It seemed very simple to prepare, and the people in the picture she posted looked like they were having so much fun, I decided to give it a try.

As prizes for this game, an idea popped in my head... miniature christmas rooms!

Are you ready for a closer look?

This one is very close to my color scheme. Lots of white and a hint of blue. I love the fluffy "giant pillow" by the fire place and the cake stand I created with buttons and beads.

Next one has true Christmas colors: Red, Green and white. I love the star in the background by My Minds Eye. Don't you think it adds a vintage feel to the whole room?


The last one is a tiny suite case. I painted the outside with light gray and metallic berry with the words "Joyeux Noel". When you open it up...

There is a fun little tricycle accompanied by a tiny Christmas tree and snow balls inside. Isn't is so fun?


When the party came to an end and people start leaving one by one, I had mixed feelings inside. A sense of relief for the success of the party mixed with a bit of sadness for the fun time coming to an end.

We all are always busy. On top of our own and family members' schedules, and other obligations to meet. Places to go, things to do... I feel like it never ends! After the party I sat in the empty room feeling so grateful for the people for taking the time to come to the party. Above all I was feeling so grateful for my family who puts up with me and my crazy ideas all the time. The big Christmas party is over, but the party I have with my family continues on. I need to remind myself to pay close attention to details and care for them like I did for the Christmas party.

Who are the important people in your life? How are you going to show them that you love them?

Those are the questions echoing in my mind lately.

Let me say thank you to you all, my beloved readers. I hope you are having a great Christmas season filled with love and joy.

LOVE

Sachiko

Tuesday, December 8, 2015

Counting Down to Christmas ~ Advent Calendar


One of our Christmas traditions is doing an advent calendar for the kids. Years ago, when the kids were still small I read about advent calendars and thought, "That is such a neat way to count down to the special day."

Our first year, I got 25 envelopes and wrote numbers 1 through 25. I stuck them onto the pantry door so they would form the shape of a Christmas tree after I filled them with some notes and candies. When I introduced the calendar and how it is suppose to work to the kids the next morning, they were so excited! Every morning, they couldn't wait to open the envelop to see what's inside. I can still remember their reactions and happy faces...

A few years later, the envelopes were replaced with a wooden advent calendar with tiny doors. This year I bought a new one because one of the doors was broken. Instead of doors, this one has deep drawers and I think I like this one better. Rachel couldn't wait for me to fill up the calendar for this year and she volunteered to write all the dates on the drawers.

I feel like it was so much easier and cheaper to please them when they were little. They would get excited about pretty much anything.

I will give you some of the things I used to put in to the calendar:


Mini candy cane
Chocolate coin
small toys from the dollar store

or papers saying things like:

Family movie night
Family game night
Going through the drive through and get donuts, ice cream and such
Going to the dollar theater

A couple years ago, I decided to do things a little differently since my kids are getting older. We had a discussion about the true meaning of Christmas and it is important to be giving rather than just focusing on receiving. They had the look on their faces like, "Where is she going with this?..." and I didn't feel much excitement from them. I explained that there will still be same type of small gifts, or notes with family activities, BUT, I will be putting in some notes with "giving" types of activities and assignments.

I think they weren't so sure about this, but they went along with it. Well, what other choice did they have?? I am the mom, and I am the one who fills up the calendar... muhahahaha

So, here are the examples of some of the notes:

Do something nice to your siblings without them knowing
Open the door for someone when we go out
Say something nice to 5 people today
Shovel the neighbor's driveway secretly

Then this year, I was looking at a box of candy canes and got new idea. I wrote on the note:

Be a ninja. Give candy canes to 4 people (I divided the dozen candy canes amongst my three kids) without getting caught.

I also told them a couple rules: first, they are not allowed to open someones bags to put it in. The people might think they are trying to steal something, that is the last thing you want! Second, they have to tell me who they gave it to and how when they get home. If they were able to witness the recipient's reaction, that would be better.

The kids were giddy about the new assigment and went to school.

The results? It was awesome. Even better than I expected!

I got to hear their stories of who they gave it to and how. The kids were talking and listening to each other's stories and we laughed about their experiences. Sounds like it is very difficult to be sneaky while giving something to someone! Three out of three kids said it was a lot of fun and they loved the assignment.

I think it comes natural to some to be generous and giving. To some, this needs to be taught.

As a mom, I want to make sure that my kids know giving brings joy. Whether tangible items, service or even a kind smile and kind words. Is there a better way to count down to the special day to celebrate the birth of our Savior?

There are 18 more days to go and I know there are more "giving" notes in the calendar. The thing is that I can't remember which drawer I put it in, so every morning it will be equally surprising and exciting for me as it is to my kids! Hahaha :)

Wednesday, December 2, 2015

Marie Callender's Pie Review

I can't believe the major holidays are just around the corner. What comes to your mind when you think about Thanksgiving and Christmas? Friends and family gatherings, big feast, cooking for a big crowd and cleaning up... sounds exciting but a little overwhelming doesn't it? I love to cook but I do not want to get too stressed about get togethers. Marie Callender's ready made pie shells have been a great “go-to” for me for sometime. They are made from scratch, have a homemade quality and taste great. I was given the chance to try some of the Marie Callender's pies. The pies were Coconut Creme, Chocolate Satin Pie, and Dutch Apple Pie. My family and I happened to love all these pies, so we are very excited to try them! Every Monday is our special family night. No matter how busy our life gets, we try not to schedule anything that would keep us from spending time with each other on Monday nights. We had a couple friends visiting us that night and it was just the perfect time to try the pies with them. First of all, I was very impressed when I pull them out of the box. They. Look. Exactly. The. Same. As the picture. I know, it is supposed to be that way, but when you buy something, how many times does the picture looks amazing, but the actual product doesn't look anything like the picture? This isn't the case.

My family LOVES chocolate, so naturally they were drawn to the Chocolate Satin Pie. It was decorated with real chocolate curls (which by the way, my daughter kept eating off of the pie before I could even cut it!). The rich chocolate filling is very smooth and tasty, yep, it was definitely a hit. One of my sons and I love coconut cream pie. Usually though, even in big family gatherings, because it is not as popular as chocolate pie, we don't have it on the table. I realized that with Marie Callender's that problem is solved! The creaminess of the coconut custard with crunchiness of the real toasted coconut created a great flavor and texture in my mouth. Mmm... heavenly... Now, last but not least, the Dutch Apple Pie became one of our favorites. The delicious aroma of fresh Fuji apples and brown sugar streusel filled our house while it was baking in the oven. Even though I said that my family loves chocolate, the dutch apple pie got eaten the quickest! I loved the combination of the extra flaky crust with the filling. Special occasion or not, having a delicious home made quality dessert by Marie Callender's will be a great help to celebrate our everyday lives with our loved ones.

Don't forget to visit their Facebook page and Pinterest to find out more about their products and coupon offers.

Which pie looked more appealing to you? Leave a comment for a chance to win a $100 Visa Gift Card.

Entry Instructions:

No duplicate comments.

You may receive (2) total entries by selecting from the following entry methods:

1. Leave a comment in response to the sweepstakes prompt on this post

2. Tweet (public message) about this promotion; including exactly the following unique term in your tweet message: “#SweepstakesEntry”; and leave the URL to that tweet in a comment on this post

3. Blog about this promotion, including a disclosure that you are receiving a sweepstakes entry in exchange for writing the blog post, and leave the URL to that post in a comment on this post

4. For those with no Twitter or blog, read the official rules to learn about an alternate form of entry.This giveaway is open to US Residents age 18 or older (or nineteen (19) years of age or older in Alabama and Nebraska). Winners will be selected via random draw, and will be notified by e-mail. The notification email will come directly from BlogHer via the sweeps@blogher email address. You will have 2 business days to respond; otherwise a new winner will be selected.

The Official Rules are available here.

This sweepstakes runs from 12/2/2015 – 2/29/2016

Be sure to visit Marie Callender’s brand page on BlogHer.com where you can read other bloggers’ posts!

Be sure to visit Marie Callender’s brand page on BlogHer.com where you can read other bloggers’ posts!

Monday, November 30, 2015

Watercolor Flower


I have been spending a lot of time with family and friends lately. My sewing/crafting had to take a back seat for a few days, but I remembered that I haven't shared this painting that I have done, on my blog.

Ever since I was little I was always drawing. My favorite tool is simply pencil or colored pencils. I tried oil painting in high school and didn't like it much, I think it's the texture that I didn't care for. I like acrylic paint, leather paint is great to paint my shoes with. I have been wanting to get back in to more drawing and decided to try watercolor.

I Love how I can mix colors and water on my palette.

I love how colors move and bleed into each other on the paper and create unexpected beauty.

The transparency and delicateness is something I adore very much.

I think I found a medium I love other than colored pencils!

I just started to learn to paint with watercolor and experimenting with it. My goal is to be good at it so I can draw something beautiful to hang in our home.

A Chinese proverb says:

Learning is a treasure that will follow its owner everywhere

I think learning something new can be intimidating, but fun. Whatever we learn: whether knowledge or skill it becomes part of us. Who knows, if I keep drawing I might get better at it and be able to draw something really pretty for my wall!

I will start posting pictures of my watercolor here and there. I feel like I gained one more thing I can enjoy in the cold winter days at home... I just need a cup of hot chocolate as company. :)


Tuesday, November 17, 2015

Recent Thrift Store Finds


I realized I haven't had a "thrift store find" posts for a while, so let me share some findings from last week...

I quickly stopped by one of my usual shops when I realized I only had a few minutes to spare before I needed to pick up my kids from school. Here are the details:


Large white bowl $X.XX

Metal strainer $1.99

Vintage pillow case $1.99

Book $2.99

I was looking for a large white bowl like this for a while after seeing this on the Pottery Barn website.

It is $79 after the price was reduced from $99. Mine? That's right, it was $4.99! :)

I have been looking for a colorful metal strainer for a while too, but that was something I didn't really need. Nor did I want to spend $15 to $20 on. But if it is $1.99? Now, you are talking.

I have been collecting vintage sheets and pillow cases, and I really liked this one. The book seemed very interesting too and I had to grab it. :)

I would say my quick thrift shop stop was a huge success. You never know what you will find at a thrift shop, but it is always nice to find the items that you were looking for for so cheap. No more garage sales and yard sales till Spring, but thank goodness thrift shops are open all year around. :)

Thursday, November 12, 2015

Big Reveal of Small Sewing Room ~ Part 4

This is the final post about the "Big Reveal of Small Sewing Room" (are you guys tired of the same or similar pictures yet? I promise, there are other tutorial posts coming soon!). There are so many details in this tiny space, I just couldn't explain everything in one post.

Today I am going to talk about how I made the tiny clothes for the mannequin. She is only 3 1/4" tall, and I was contemplating how in the world I could make clothes for her. After thinking about it for a while I decided to do it just like a normal size dress, but with much simpler embellishment and help with glue. :)

{How to make the dress} --- Note: all the sewing was done with 1/8" seam allowance. If your mannequin is different size than mine, you have to adjust the size of the fabric strips.

1. Cut two strips of fabrics. One is for the top and measures 1 1/2"x 3" and the other one, for the skirt, measures 1 1/2"x 4 1/4".


* Top *

2. Take the fabric for the top and fold it in half and press with your finger. Open the fabric and make a small cut on the middle of the folded line. That will be the opening for the neck. Fold about 1/8" around the neck and the arm hole area as shown in the picture. Then sew.

3. Fold the fabric right sides together. Sew the sides.

4. Turn inside out. Press the sides with your fingers.


* Skirt *

5. Take the longer fabric strip and fold one of the long sides, 1/8th inch from the edge. Iron and sew. Then, using bigger stitches, sew the other side of the seam. Pull one thread to gather the fabric.

6. Fold the fabric right sides together and sew the seam. Open the seam and press with a finger.


*Putting it all together *

7. Slip the top onto the mannequin, and put the skirt on. It looks like the top is tucked in. Pull the thread to gather the fabric of the skirt piece and tie the end of the thread together.

8. I went through my laces and trims... in times like this, my tendency to "can't-throw-even-the-tiniest-things-away" comes in handy. I found a piece of lace and tiny ribbon flower. Use fabric Glue to glue them on. Oh! By the way, the pearl necklace she is wearing... I threaded 6 tiny beads to regular sewing thread and tied the ends. To keep the necklace on the mannequin, I used a small dot of fabric glue on the mannequin and set the thread of the necklace on it. In case you were wondering. :)


{Ironing board}

I bought the ironing board at Joann's. I can't remember how much I paid for it, but it was a really good deal. It had blue and white gin-gum check fabric on the board, but it didn't go with the room I was creating, so I peeled it off and added light gray fabric instead. The "quilt block" is 7/8". I guess from the ratio of the room, they are considered "big" blocks.

{Small quilt}

I didn't do a tutorial on this one, but the finished size of the quilt it 3"x 4". I also sewed this with 1/8" seam allowance. I used the same fabrics I used to make the fabric bolts, and they were already in strips, so zip, zap and zip! There is a quilt. I really enjoyed hand quilting this one.

Because I had so much fun doing this, I started looking at small objects such as bottle caps, toothpaste caps, spools... with a different set of eyes. Hmmm... What can I make them into for a tiny room... Ah, so fun!! I hope you enjoyed my posts about this small sewing room as much as enjoyed creating it. :)

Friday, November 6, 2015

Book Review ~ The Knitter's Handbook

It has been so cold where I live the last few days. The hard wood floor is one of my favorite parts of my house, but I needed to find my fluffy slippers. It takes a little adjustment, but the cold season has its own flare and ways to be enjoyed. Around this time I always want to break out my yarn and play with them. I know some basics of crocheting and knitting, but I am self taught and not confident enough to say that I am a knitter.

The book I am reviewing today is The Knitter's Handbook by Eleanor Van Zandt. It's beautiful cover made me excited to turn the pages right away. There I found many useful and comprehensive information for yarns and patterns.

This book will guide you through more than 90 stitches and techniques. Clear and easy-to-follow instructions and 250 step-by-step illustrations are surely encouraging for me to try it. Look at all these beautiful patterns. Wouldn't it be fun to knit a beautiful hat or a sweater using those stitches??

Oh, one more pretty picture from this book... I couldn't resist. :)

Whether you are new to knitting and want to learn more (me!) or an experienced knitter who wants to try advanced patterns, the Knitter's Handbook will be the go-to book.

Monday, November 2, 2015

Big Reveal of Small Sewing Room ~Part 3

It is such a small space, but there is so much to cover! First up, I am going to talk about how to make the fabrics vertically stored on the shelf and fabric bolts.

* Fabrics on the shelf and fabric bolts *

*Note--- the shelf you have might be a different size from mine, so measure the width and depth of your shelf and change the measurements to fit yours.

For my shelf, I cut 3/4" D x 7/8" H reqtangles out of cardstock to be the core of the fabric. Cut fabrics slightly narrower than the height of the cardstock (in my case it is 6/8") x 3". Wrap the fabric strip around the cardstock and put a dab of fabric glue on the edge of the fabric. Glue the edge and done.

It is fun to go through scraps to find colors you are looking for. My advice is to use smaller patterned fabric for most of them and mix somewhat bigger patterns. So there is visual interest when you put them in the shelf. I got carried away and made more than the shelf could contain... oh how similar to my true life!

Some of my beloved Liberty of London fabrics are going to be in the miniature sewing room too.

To make the fabric bolts, cut 1 3/8"x 3/4" cardstock and 1 1/4"x 3" fabric. As you did with the smaller fabric square, wrap the fabric around, glue and done.

There are many times in the past that I love the fabric so much that I wanted to buy the whole bolt instead of a yard or two. Have you ever wished that too? Now is your chance to treat yourself to fabric bolts! (grin)

* Spool of Thread *

I found these spools at a craft store in a bag and I think it was about $1 to $2. I used DMC floss and put a dab of fabric glue on the spool so the beginning of the thread stays. Wrap the thread around until your desired look and cut the thread. To finished it up put a dab of fabric glue, on the thread and glue the end of the thread.

* Wool Cushion on the Chairs *

This one is super simple. I measured the circumference of the seating. Cut 4 circles (I made two cushions, so two circles for each). I used blanket stitches to stitch the two wool circles together. It's that simple.


* Cutting Mat *

This is made out of cardstock. You will be amazed by the possibilities of so many things you can make with simple (and cheap!) cardstock. I chose a very light shade of green and simply drew lines 1/8" apart.
When you put things on the cutting mat, it looks more real. I wish someone sold tiny quilter's ruler and cutting tools. Whoever manufacture things for dollhouses, that might be a great hit item!

That is it for today's post but there are a lot more detail-talk is coming up. Stay tuned!


Blog Widget by LinkWithin