Friday, October 30, 2009

One funny comment

I have been working on two projects for a while, but I have been really busy with life... so I can't share them with you yet. I think I can post at least one of them next week.

Meanwhile, I can talk about one of the reasons why I was busy today...
You know the holiday, yeah, the one where you go door to door and collect candies. Kids wear costumes and get really excited...

Halloween- That's it! Eventhough, Halloween is tomorrow, the school had a Halloween parade and everthing, so, I was there this morning. Then, the company my hubby works at, planned a Halloween party for the families of the employees, so I had to drive 40 min to his work in the late afternoon. There was also a church Halloween party at night, but we didn't make it to that one. I was way too exhasted.

There was a funny story that I want to share with you all though...

I picked up the kids from school and took them to the mall. Earlier while I went through the boys winter clothes, I discoverd that both of the boys hit a growth spurt in the last few month and their pants were too short! I had a pretty good idea which stores might have sales. After I bought some pants, we had to use the restroom. while we were waiting for one another, I found a poster, it basically said, there is 'trick or treating' in the mall at participating stores tomorrow...

I mumbled to myself " Oh, no..."

Then I heard a huge inhaling sound from behind me and Michael said, "What!? There is trick or treat in the mall too?!!"

I am happy that he is doing so well in school that he can read so fast, although, there are a consequence too.

When I turned around, Michael was standing straight with big smile and said, "Mom, I am in!"

I just had to laugh. The way he said it was so cute and funny. They already got plenty of candies, but still, they want to take every oppotunity they can to get free candies.

I told him, "Michael, I am so not in!"

Sometimes I wonder if God created children with a special microchip in them. It releases "cuteness" every so often to remind us parents why we are doing this (I mean the whole raising children thing) eventhough sometimes it is stressful and crazy.

After that I packed three sugar high kids in the car and went home to make a late lunch for them. And, I had a smile on my face.

Wednesday, October 28, 2009

Easy Chocolate Treat

This morning, Rachel and I made this:


I wanted to make something easy, chocolaty and good. So, I looked up some recipes but didn't find anything I had in mind (I know it's out there but I didn't know where to look).

With my little assistant's help, I came up with this treat and it was pretty good!
So, here is what I did

You will need (makes about 5 - 6 dosen)

1 box(17.5oz) of Special K Vanilla Almond cereal
2 bags of chocolate chips
1 Tablespoon of vegetable oil
1 bag of Reese's Pieces

How to make

1. In a big bowl, pour all the cereal and 3/4 bag of Reese's Pieces. Lightly mix.

2. In a separate microwavable bowl, pour in the chocolate chips and heat 1 - 2 min to melt them. The chocolate chips may not look melted, but you need to stir them with a fork and see. If you over heat, they get hard and dry and won't be useable.

3. When the chocolate is melted, add oil to it and mix well.

4. Pour the chocolate over the cereal mixture, with a spatula, mix well.

5. Take a large spoon full of the mixture and place onto wax paper, wet your finger tips and put some pressure, so they will stick together.

6, Before the chocolate gets hard, place 1 or 2 Reese's Pieces on top for some color.

7, When it cools you can remove them from the wax paper. Then, it is ready to eat!

I wanted to be creative and picked Vanilla Almond Corn Flakes, but honestly, the flaver of the Reese's Pieces is very strong, you can't really tell the difference in flavor. So, it is fine to use regular cereal, instead.

Also, when the cereal and chocolate mixture get hard, you can put it in the microwave for 20 second or so, that way, the chocolate will melt again, then the mixture will stick together.

Rachel was so happy to be a special helper for this, she was especially delighted when she could lick the chocolate covered utencils. This treat is so easy to make and it makes a lot. It is perfect for Halloween parties or to share with some neighbors.

I can't believe it's almost Halloween! Once Halloween is over, Thanksgiving is right around the corner! I am thinking about doing a give away in the beginning of November to give thanks to you, my readers. So, check back often and see what I have decided to do.

Ohhh... so exciting!

I hope everone will have a fun and wonderful Halloween!

Monday, October 26, 2009

Bead Jewelries from Japan

In my last post I mentioned my mom and my sister. I am so blessed to have them in my life and eventhough we live thousands of miles away from each other we talk on the phone all the time.

We have a lot in common and there are many differences too. We all love to read and cook (and eat!). My mom is an excellent cook, she likes to travel and LOVES to read. My sister plays guiter and drums and she is good at wood working, and you already know that I love sewing and quilting.

A few years ago, my mom and my sister started making jewely from beads. My mom started first, then my sister, they both make beautiful pieces. Eventually, my sister started taking classes for stitched beads jewely (I am not sure exactly what to call them.) Now, she makes and sells them and also teaches classes.

I will share some of the bead jewelries they sent to me for my birthday and other special occasions.


A ring and earrings, the earrings are one of my favorites! I wear them all the time, the color combination goes with a lot of my outfits.

This is another one that my mom made, I love the light pink and pearl combinations.


This lariat was made by my sister. At first I thought it would be difficult to find clothes to go with it because it is a very unique piece, but surprisingly, it goes with many of the tops that I have.


The last one is also made by my sister. I LOVE the color combinations! I don't know how long it took her to make this but it looks so complicated.


Aren't they amazing? This is just on of the many reasons why I love them.
I wish they lived close to me so that they could teach my how to do these. If I get tired of it, I can just ask them to finish it up for me... (hey, its allowed we are family, right?). I am making a Christmas package for my sister's family and one of her present is a Beadwork magazine I bought for her with some sticky notes of the things I want her to make for me attached. He He He... I can almost picture her shaking her head with a grin on her face.

Friday, October 23, 2009

Recipe---Mom's Pot Stickers---


So many people asked for my pot sticker recipe, so here's the truth...
I don't really have a recipe. This is one of the dishes that I've made so many times with my mom that, I just know how to make them. I don't think my mom has a recipe either.

When I was little, my mom worked at a ramen noodle restaurant for a short while. The owner learned how to make the pot stickers in China and came back to Japan and opened his restaurant. Eventually, my mom learned how to make them.

My mom used to say we're having a "pot sticker wrapping party" and made my sister and I help her wrap them. Although I thought it was forced child labor at the time, I remember that I had enjoyed the time with my mom and sister. We talked and laughed a lot while we wrapped so many of them.

So, I decided to guesstimate the pot sticker recipe for my beloved readers.
You might have to make them several times to get it right. Please give it a try, my mom's potsticker are soooo yummy! You won't want to eat pot stickers from anywhere else. Sorry, I am not going to be modest on this one.

Mom's Pot stickers

ingredients

3 lb Ground pork
1 lb Ground beef
1-2 bunches of green onions---minced
6-7 nappa cabbage leaves---boiled and minced
Fresh Ginger about 3 inches---minced
2-3 cloves of garlic
4-5 Tbs Sesame oil
Pepper
Pot Sticker Wrappers---you will probably need 3-4 packages

How to make

1, Squeeze as much excess water from the minced green onions and nappa cabbage as you can.

2. Combine all the ingredients in a large bowl, grate in the garlic and then mix well with your hands.

3. Wrap them with the wrappers: Prepare a bowl with water and wet your finger tips to moisten the wrapper's edge, so it will stick.

4. If you are lining them on a plate, put Katakuri-ko(Potato flour) so the pot stickers won't stick to the plates. If you don't have this, flour should be fine.

5. In a large skillet, pour 2 table spoons oil and when it gets hot, start placing the pot stickers into the pan.(high heat whole time)

6. When the bottom of the pot stickers are dark golden brown, pour in 1 cup of water and put a lid on and steam cook. do not open the lid!

7. If you listen carefuly, you can hear the difference in sound in the pan. Sorry it is kind of hard to explain...

8, Serve with Soy Sauce and chili oil. I love hot and spicy food, so I pour lots of chili oil. You can also, try mixing in vineger too.


If there is an asian food specialty store in your area you should be able to get everything you need for this. Like I said in the beginning, this is a guesstimated recipe, so, you might have to make it several times to get it right. Let me know how it turns out.

I am planning to start teaching my children how to make pot stickers. I am looking forward to carrying on the tradition my mom started, by having a ... "Pot sticker wrapping party".

Wednesday, October 21, 2009

New Look for Our Kiddie Table and Chairs


Back in March I posted about my $2 garage sale find, a kiddie table and a second hand store chair. I have been wanting to refinish them for a long time and finally, I did it!

I used some left over paint from this project and gave them a new clean look, and I think it makes a big difference!


I know I was the only one in my family who was annoyed by the baby blue chair. I love the color, but I don't have any baby blue colors on the entire first floor. It always looked out of place.

Now, the kids have a pretty place to draw and do some crafts. (They probably didn't care what color the chair was or that the paint on the table was peeling, but I did!)

I cut out a square with pinking scissors from oil cloth scrap to make a little coaster to put under the pencil mug.


Then, some treats for the little artists...


I already see scraches and colors from crayons... There were several times I wanted to say " Ahh!! Don't do that, you will ruin the table!" but I held my tongue. I really want them to enjoy the table and remember it as part of happy childhood memories.

So, I think I am going to make a table cloth or craft mat for the table out of oil cloth, wouldn't it be so cute?

Monday, October 19, 2009

Tutorial ~How I Saved a Dress from being Thrown Away~


This was one of my favorite of Rachel's dresses. It is size 3T and now she is 4 years old. She is small for her age, so, it was perfect for a while. The other day I noticed that the upper part of the dress was too tight on her... so sad...

Also, she drew on the dress with marker and it didn't come off, I can't give it away or sell the dress either. At least, she was considerate enough to use matching colored marker so it kind of blends in.


The bottom part of the dress had planty of fabric, so I decided to make it into a skirt.

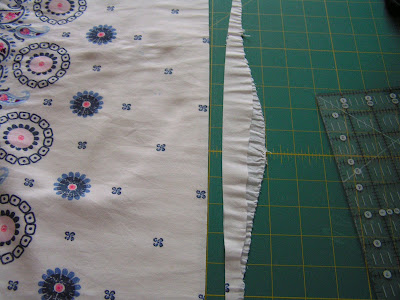
1. Cut off the top portion.


2. Straighten the edges.


3. Fold the edge twice and iron.


4. Leaving a 1" or so opening for elastic, sew the top.


5. Measure your little girl's tummy and cut the elastic, and thread through. Sew the ends of the elastic. Sew the opening closed.


That's it! Less than 20 min, she had a skirt. She can probably wear this for another year or two and I am really happy about that.

Friday, October 16, 2009

258


Yesterday, we invited 6 people over for a potsticker party. With my hubby and I and our kids, I wasn't quit sure how many I should make. It is alway better to have more, than less, especially when you are the one throwing the party.

So, I made a TON of potstickers.

I mean TONS! I set a new record of how many potstickers I made in one day.

Let's throw out some numbers...

I mixed 9 pounds of meat with some vegitables

It took me about 3 hours from start to finish (cut- mix- wrap)

I wapped 258 Potstickers!

5 people showed + our family = 10 people

103 potstickers were eaten

The party lasted close to 4 hours, we played Guitar Hero, Blockus and Apples to Apples. It was lots of fun. I don't know why I thought I needed to make so many but I have lots of frozen potstickers in my freezer now. It is always nice to have something like that for a busy day.

Wednesday, October 14, 2009

Summer to Fall

We had a slow start when it comes to decorating for the fall, but last weekend we finally got our pumpkins! It made me want to decorate my house for the season. Here are the some pictures around my house.

The wreath set the tone for the front of the house...


This is my very first and only black quilt. I think it is the perfect color for the cold season.


I love small pumpkins! I picked out several of them, I decided to put five of them on the fireplace mantle.


I love love small white pumpkins! I had to get some but you know what my 6 year old said? "Mom, white punpkins are dumb. It's not orange."

"Yeah, son I know that... isn't that obvious?"


I was wamtomg to do this ever since I finished making the shelf! During the Summer, I decorated the shelf with lots of whites. Now, I've added some stuff, removed some stuff, and moved some stuff around, and created a fall look.


I am not big into Halloween decorations, but I am all for fall decorations. It is so fun to celebrate and enjoy each season, don't you think so?

I want to pick a perfect day and go on a "leaf hunt" with my children. I think it will be so fun to do some art projects with them. Do you have any fun family traditions or activities that you do during the fall? If you do, please let me know, I would love to hear from you all!

Monday, October 12, 2009

Down Memory Lane---Quilts for Michael ---


A while ago I went down memory lane, remembering the quilts I made for Christopher. I am going to do the same thing for Michael's quilts today.

For the first one, I used a pattern by The Ginger Cookie Company called "X's". I fell in love with the design! I used my scrap pieces for most of the parts. The hardest part was hand quilting it in the areas with seams, it was very hard to quilt. So, if I ever decide to make this quilt again, I would machine quilt it for sure.


The second quilt is my original design. I just drew things that I thought future Michael would like. I also included his initials too. This quilt holds special memories for me. I held him and we pointed out all the things on the quilt and he smiled and giggled while we did that.

I guess somethings are so precious that you will never forget.


The Third one is his circus quilt. I found the design in one of the embroidery books and designed the wall hanging for it. I wanted to do an American Flag theme room for the boys in the future and thought that this might be a good decore on the wall. When I look at it now, I think the animal rights group may not like this though...


And of couse, I did this flannel throw for Michael too. He uses it all the time.


Sometimes I make quilts to put in a show or just to hang it on the wall. I also make quilts that are meant be used. I feel warm and fuzzy when my loved ones are wrapped in the quilts I have made. I feel like I am giving them secret hugs.

In the near future, I will take you down memory lane for Rachel's quilts.

Thank you for coming down memory lane with me!

Friday, October 9, 2009

T-Shirt Makeover and More


I found these t-shirts at Gap when I found the socks I used for the little girls leg warmer tutorial. They were reduced to $4.99 and ON TOP OF THAT, they were having a special sale for an additional 40% off on sale items. I only paid $ 2.99 each.


I didn't buy them just because they were cheap. I had a project I wanted to try for a while. I was inspired by a tutorial on this blog and decided to give it a try.

You will need:

2 t-shirts

Matching Thread (I used DMC floss)

1. Cut circles out of one t-shirt. I made one template out of cereal box. The largest circle is 2 3/4". Then cut two smaller circles to put on top of it. I made 15 sets to cover the whole front neck line.


2. I folded the layered circle in 1/4 and sewed.


3. Then opened it, then sewed in different direction to make a crinkled look.


4. Sew them onto the other t-shirt by hand. Then it is ready to wear!


I saw a pretty t-shirt in the JCrew catalog and have been keeping an eye on them. This is a great way to make a look alike t-shirt inexpensively. I have to tell you though, after I washed it, those flowers layed flat and didn't look the same as in the picture, so, I sewed some of the petals of each flower together so it would hold the open flower look better.

I still have some left over t-shirt. It was really a good amount of fabrics, so I went through all my fabrics and found a match. It was the Amy Butler fabric I used in the headband tutorial. Then, I made Rachel a new tunic dress! I made it a little bigger (well... like 2 sizes bigger) so she can wear it for a while. I had so much fun with those projects.


Six dollars for these two finished items, I am very happy about that. How was my tutorial week? It was a lot of work to do three tutorials in one week but I also had a lot of fun! Especially when I got comments from you all letting me know how much fun you had or that you made the project for your loved ones. It is very rewarding.

Thank you all for enjoying this week with me, I will see you on Monday!

Wednesday, October 7, 2009

Tutorial ~Romantic Cardigan Transformation ~


Do you have a cardigan you have been wanting to spice up a little? I had one in my closet, I was thinking of making a corsage for it... Then, since I have been in a romantic mood lately, I decided to add ruffles and lace. What can be more femanine and romantic?

You will need:

A Cardigan

Cotton Lace

A Roll of Sheer Ribbon

Matching Thread

Fray Check

1. Pin the lace along the button line of the cardigan. Sew. I purposely made the lengths of the laces different. Eventhough I love the romantic look, I also wanted to achieve a "one-of-a-kind" look.


2. I used sheer ribbon for the next row. Make ruffles out of the ribbon (go here for instructions on how to make ruffles). After you decide how long you want it to be, seal the ends with fray check. I also, made the lengh of left and right uneven and shorter than the first row. The trick with this row, as you are pinning the ribbon, is to twist it several times. That way it gives a more interesting look than just sewing them flat.


3. Repeat the prcess. Alternate the lace and ribbon.


4. Test Run-- in my case, I am going to ask my hubby to take me out on a date!


I thought about adding more texture by using different materials, but I didn't. You can totally do that, more mix and match would be fun too! Since I used sheer ribbon, I will probably wash this in the gentle cycle of the washing machine and won't put it in the dryer. The ribbon might shrink. I am not willing to find out the hard way.

There is one more tutorial I want to share this week. I have so much going on this weekend, if I can deliver it I will be so happy, if I can't...Oh well, you have to wait little bit longer.

I hope you are all enjoying this fall weather, what are your plans for this weekend?

Monday, October 5, 2009

Tutorial ~ Little Girl's Ruffled Shirt ~


Have you been to the mall lately? Or, looked through the pages of some catalogs?
There are many pretty clothes out there for this Fall. My favorites are romantic shirts. Lots of ruffles. I was looking through a J. Crew catalog and saw some cute shirts for little girls. If you have been reading my blog, you would know me by now... I am not going to pay $30-$50 on a kid's shirt that they are going to out grow in a few months, even though I love the way it looks.

So, here is the shirt I came up with. Let's have some fun!

I bought this shirt at Wal-Mart for $3.50. I am going to use a camisole that is too low cut for me and I hardly wear. The color matched the shirt, this will be the ruffles.


1, Cut the strips. It is best to have 1 1/2 to 2 more length of where you want to put the ruffle strips. Since this is for a little girl's shirt, I cut the stirps 2" wide. Great thing is, you don't need to worry about the edges with T-shirt material. It will not flay.


2, Using big stitches, sew strips.


3. Pull one string to make ruffles. Even out the fabric to get beartiful ruffles.


4. Place them on the shirt first to see if you need more ruffles and where to place them. When you put the shirt in a dryer, the ruffles will shrink a little, so, it is better to have few more rows than you think you need.


5. Pin a ruffle strip and sew. Sew right next to the big stitches, so, you can pull the big stitches out afterwards. I started sewing from the bottom row and worked my way up. The space between sewed lines is about 1/2"; really I just eye-balled it. if you want a more fuller look, you can place the next row closer to the first one and sew more rows.


6. Done!


I didn't have a chance to let Rachel wear the shirt to take a picture, but I think she would love it.(I do!)

Oh, speaking of Rachel, our little girl debuted in an infomercial! If you are interested, go here and check it out! It was such a fun experience and the whole family (I mean extended families too) enjoyed watching this over and over again. You did such an awesome job Rachel!
Blog Widget by LinkWithin