


A while ago, I mentioned that I was doing a tutorial for a blanket using the self binding method. I have made so many blankets in the past. I think this is one of the most easiest ways to make baby blankets. It might be a little confusing at first, folding the corner, but once you get used to it, you can finish a blanket in no time!
{You will need}

1- 43" X 43" flannel (It was 44" wide flannel, I cut off the sides to get rid of the writings and thickness. This fabric will be the outer border.)
1- 36" X 36" flannel
Matching thread
{How to}
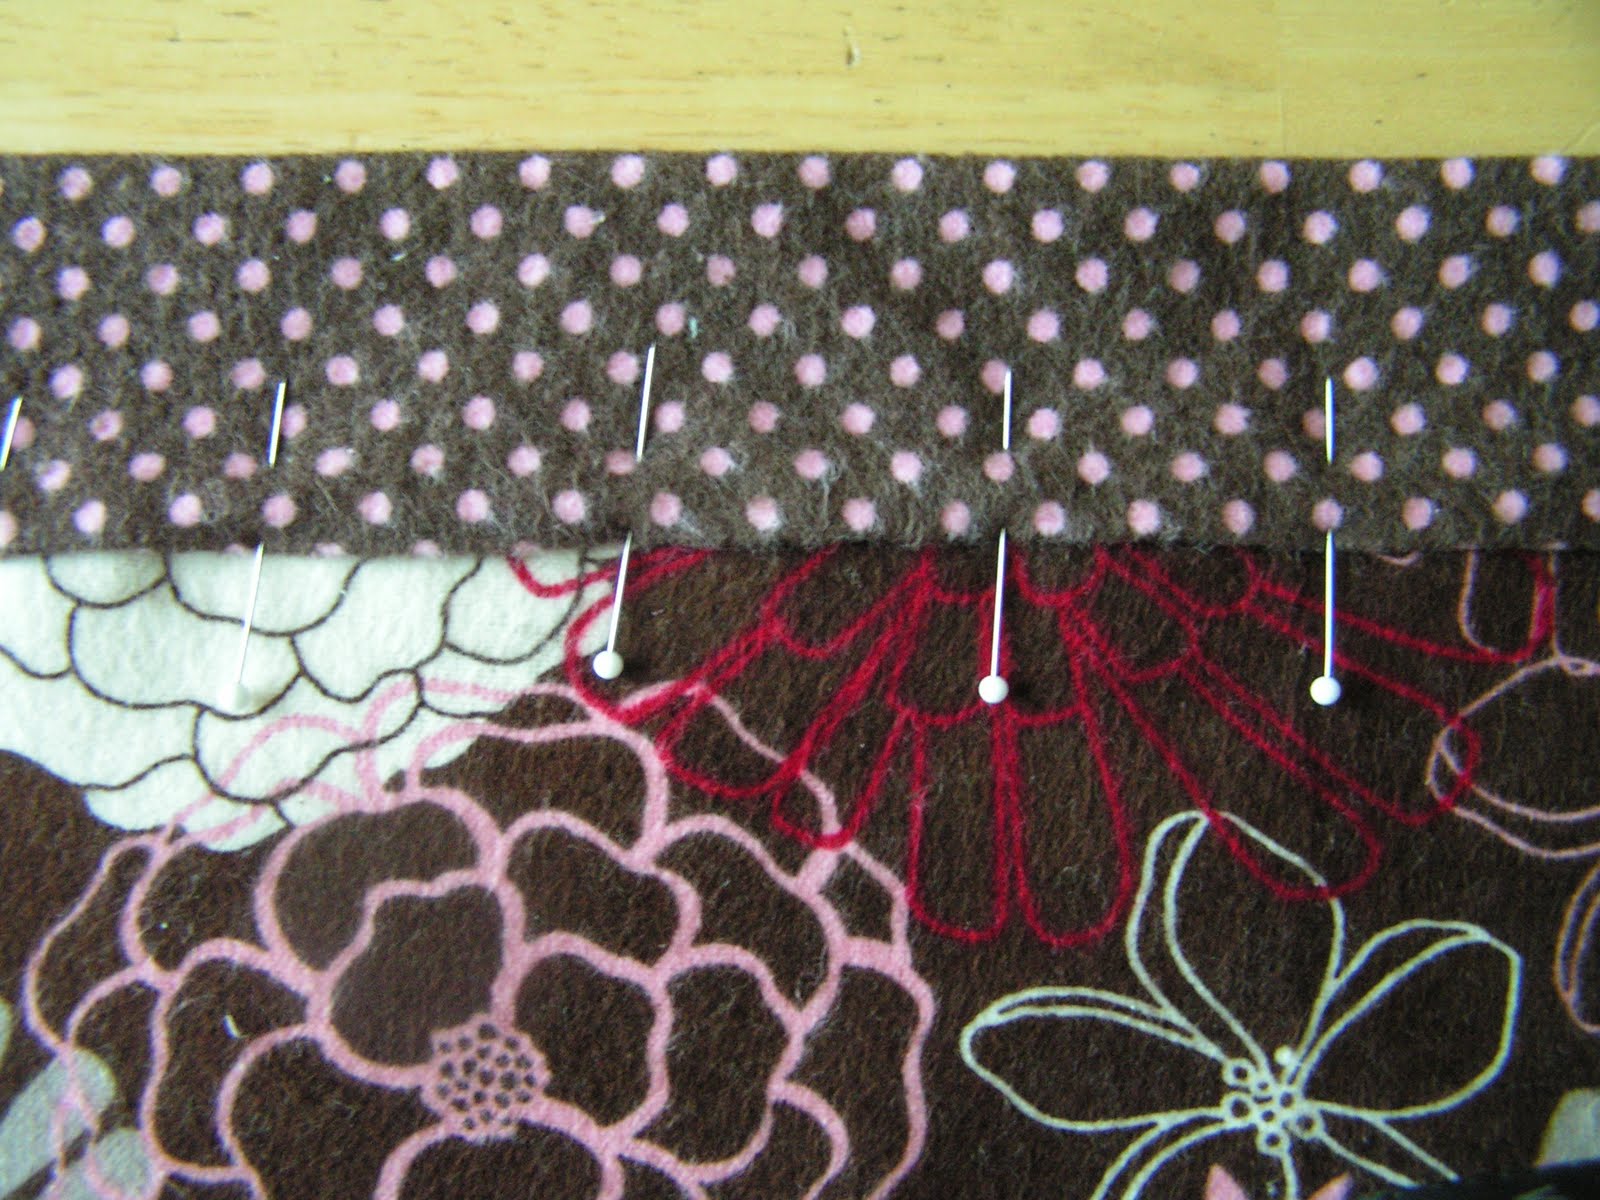
1. Mark the middle for all sides for both fabrics. Lay them together with right sides together. First, pin the middle of the four sides. Then pin the edges starting in the middle make your way outwards to the corners.

2. Start sewing using 1/4" seam allowance. Remember to leave a 5" opening for you to turn the fabric inside out later.

3. Fold the corner. Draw a line to help you to know where to sew. Use the picture as a guide.

4. Cut the excess off. Repeat the process for the other corners.

5. Press the seam towards the outside with an iron.

6. Turn the fabric inside out. Iron. Pin the opening and top stitch all around the blanket.
7. Ta-da. That's it!

Wasn't that fun? I have been going through my stash and made some in the past few weeks. They always come in handy for baby showers and such. I hope you enjoyed the tutorial!


pretty pattern :)
ReplyDeleteIts very nice...tutorial is also good..thanks for sharing...
ReplyDeleteEasy-peasy and fun! Thanks for sharing!
ReplyDeleteYour blanket is gorgeous! I will be adding this tute to my favourites list, Thanks!
ReplyDeleteI'll have to give this a try...I haven't ever thought to do it this way, but it sure seems simple!
ReplyDeleteThank you! My mom was trying to explain this to me and I just couldn't visualize this, but it looks so easy! Your flannel is gorgeous, too -- where do you find such beautiful prints? Everything I've seen is so baby-ish.
ReplyDeleteWhat a wonderfully simple way to finish a quilt. I've added a link to my Sewing 101 collection here:
ReplyDeletehttp://http://pickupsomecreativity.blogspot.com/2010/07/sewing-101-great-posts-on-other-sites.html
Thank you so much!
Thank you!
ReplyDeleteI'll try it!
Thanks for posting this tutorial. I'm always looking for easy baby blankets--they make great gifts!
ReplyDeleteThank you! I just did a blanket for my daughter, and had SUCH a hard time with it. This way gets MUCH better results!
ReplyDeleteAs a regular reader of your blog, I wanted to let you know about Atticmag's new linky party - Giveaway Friday! It's a convenient place for bloggers to link their giveaways each week. Next time you have a giveaway, I hope you'll come over and link it up!
ReplyDeleteWe've kicked it off with a fantastic giveaway of our own. Five lucky winners will win material to do a back splash in their homes. Just leave a comment to register.
Allison
Atticmag
That sure looks easy. Does this method also work for general quilts?
ReplyDeleteThank u so mucht for tutorial :) kisses and good week!! ;)
ReplyDeletetomiannie-
ReplyDeleteI found the floral fabric at Joann
fabrics. The polka dot fabric is something I bought a long time ago, and I don't remember where.
Shelly-
I think this method would work with regular quilts. I would use this method for simple quilts, like bigger pieces with big and simple quilting or even tie quilts, but not with really intricate nice quilts. I guess it is a personal choice... :)
Beautiful! I can't wait to try it. Thanks!
ReplyDeletethank you for your clear instruction & photos :) I'm planning to make one very soon.
ReplyDeleteWhat a brilliant idea! I love easy that looks like difficult. Thanks for sharing.
ReplyDeleteI love it, and it looks super easy and quick. This is really timely too since I have a couple baby blankets that I need to make. Thanks for the tutorial.
ReplyDeleteVery nice! and easy thank you!
ReplyDeleteCan't wait to try this method. Thanks for sharing!
ReplyDelete:-)
love this! and did you see you were featured on Crafzine this morning for this project? here is the link!
ReplyDeletehttp://blog.craftzine.com/archive/2010/08/how-to_self-binding_flannel_sw.html
happy tuesday!
Karina
Project K
This is so well explained! Thanks so much, I'll be linking.
ReplyDeleteThat is genius! Thank you so much!
ReplyDeleteThis is really interesting, i'm gonna have to give it a try! I like the idea of perfect binding everytime!
ReplyDeleteThanks so much for sharing!
my mom made me one of these for my latest little one. i love the technique and the size is swaddle perfect!
ReplyDeleteBeautiful fabrics. Love chocolate brown and pink together and who doesn't love polka dots, right?
ReplyDeleteI am so glad you shared this. I have seen these blankets all over the web and was truly baffled as to how they did the selfbindng, but you have taken the mystery out of it for me.
Thank you. : )
What a gorgeous blanket! I linked to your tutorial over at Craft Gossip Sewing:
ReplyDeletehttp://sewing.craftgossip.com/tutorial-swaddle-blanket-finished-with-self-binding/2010/09/01/
--Anne
LOL your'e right it was confusing at first. I had to read it again to figure it out. But wow that sure makes things easier. Can't wait to get some flannel and start sewing these. Thanks for the tip!
ReplyDeleteI actually had this idea, and did it for my baby's blanket, but could NOT figure out the corners. Thanks for the visual.
ReplyDeleteThanks for the tutorial. My grandma taught me how to make this blanket too. Instead of recreated the tutorial I shared yours on my blog here: http://fararoffplace.blogspot.com/2010/09/baby-big-brother-gift.html
ReplyDeleteThank you!
Hi Sachiko!
ReplyDeleteRevisiting this tutorial as my hubby's cousin is having a baby soon. Want to gift her with some hommade loving things.
I have a question for you. Could we apply this same tutorial to a bigger piece of fabric like a throw size? Would it come out the same?
Hi Cheryl!
ReplyDeleteI bet it will work the same for the throw size blanket. Although, I think it will get harder to maneuver when the fabric gets bigger.(Not to mention the length to pin!)
Good luck with the blanket making.:)
Thanks for the great tutorial! I made a blue and brown version for a shower gift this weekend, and I'm so happy with the result.
ReplyDeletehttp://disfordelicate.com/2010/11/08/tea-rose-homes-self-binding-baby-blanket/
Thanks for the awsome tutorial! I just did a baby bankey (no, its not a blankey or blankey its a bankey lol) for a friend's baby and used this method. Some tips that helped me: before sewing, pinned the middle of the fabrics so that when I layed everything down to do the corners my borders were even, I acutally did it first without pinning the middle and ended up having to take it apart and redo it cuz I couldn't get the borders even for sewing the corners. I sewed it with the smaller peice of fabric on top and completely stopped and started again at each corner instead of just turning the fabric, it was just easier that way. I put a layer of batting in the blanket, after I was finnished sewing, before I turned it right side out, I cut the batting to the right size and then carefully hand-basted it to one layer of fabric, then turned it right side out, took the hand basting out and quilted it. Hope this helps anyone else out there trying to make a blanket like this. All in all it really was easy, now that I got the hang of it I'm definately doing more baby bankeys like this.
ReplyDeleteThank you so much!! It took me two tries to get it right but I LOVE the results. I also blogged about it here:
ReplyDeletehttp://jbeedelightful.blogspot.com/2011/03/i-did-it-self-binding-baby-blanket.html
Thanks!
Jess
I love this idea and have just made two blankets with matching toys! See them here http://www.meggipeg.com/2011/04/boy-and-girl-baby-blankets-and-toys.html
ReplyDeleteThanks, Megan
We are a group of volunteers and starting a new initiative in a community. Your blog provided us valuable information to work on. You have done a marvelous job!
ReplyDeleteBlankets For Baby
Thanks for posting this! A friend told me about it and I was able to finally figure it out! Also, I did a rectangle and it was possible. I figured that if it was just the same width it would work out, and it did!
ReplyDeleteAnnie
Love your tutorial. I make blankets for charities.
ReplyDeleteCan you tell me how to figure the size of the top and bottom? Some fabrics or premade flannel blankets are odd sizes, and I'd like to be able to line them like yours.
Any help would be appreciated. :)
DaisyFroggey- I've made a few blankets with this method of different sizes and the way I figure out the sizes is to first figure out how big I want the border to be, then double that number and that's how much bigger the back/border fabric needs to be on each side. So say you were making a blanket with a white main peice and a black back/border. If your white (main/center) peice is 20in square and you want a 3in border, then the black (border/back) peice needs to be 32in square.
ReplyDeleteHope that makes sense.
I LOVE this tutorial! I know I'm late to the party, but just came across this and can't wait to try it. I'm TOTALLY not understanding the corners. I've read and read and read it over and over, and it's not coming to me. Can you maybe help me out? These are just adorable!
ReplyDeleteIvoryh1632-
ReplyDeleteThank you so much for answering the question from DaisyFroggey for me! Your explanation is perfect!
Carolyn-
Hmmm...I am not sure how to explain more than I already did in the tutorial. It is a bit tricky when you haven't done it before, isn't it? I was like that when I first tried it, but I played with the fabrics for a while and finally got it. Good luck!
I just finished using this tutorial to make a gift. I used quilting cotton and made a lightweight lap blanket for a friend who travels a lot. It turned out so well! Thanks!
ReplyDeleteWould love to try this. Do you wash the fabric before cutting and sewing?
ReplyDeleteIs there a way to print this out that is not 25 pages? I would love to print it.
ReplyDeleteAh! Thank you! So well explained! Ive been breaking my head thinking how I could finish my baby blanket with a nice soft border. I have my answer. definitly following this blog ;)
ReplyDeleteI used your technique on quilts for my grandkids and link it up to my blog. So easy! Thanks! Here's a picture.
ReplyDeletehttp://little-altars.blogspot.com/2012/12/mamie-green-lay-down.html
Starting with the easiest so I would take it all step by step, that 's what I've done before I put all my collections in stockist :D
ReplyDeleteJulia
Choofie – Onwer
baby blanket
ok hmmm where is the swaddle blanket?
ReplyDeleteI used a square blanket to swaddle my babies, but I guess this isn't an accurate name. Sorry.
DeleteI just made on of these! Thank you for this amazing tutorial!!!
ReplyDelete