


I will also list this on my side bar along with my other tutorials.
I have been obsessed with folded fabric flowers and wool flowers lately. I have created a bag and refashioned one of my old cardigans by using the flowers and I LOVE how they turned out.
The love of those flowers didn't end there and I still have a bunch of ideas for them. I am sharing a tutorial for a key holder today and of course it is decorated by fabric folded flower... The key holder is easy to make and you can make a whole bunch of them inexpensively. It is a perfect stocking stuffer, or for a gift exchange with the girlfriends you hang out with.
I hope you will enjoy the tutorial!

{You will need} --- For one key holder

1 --- 2 1/2" x 6 1/2" fabric
1 --- 2 1/2" x 2 1/2" fusible fleece
Matching thread
1 Ring
6 --- 1 1/4" x 1 1/4" fabric squares for making a flower
Buttons and beads to decorate
{How to}
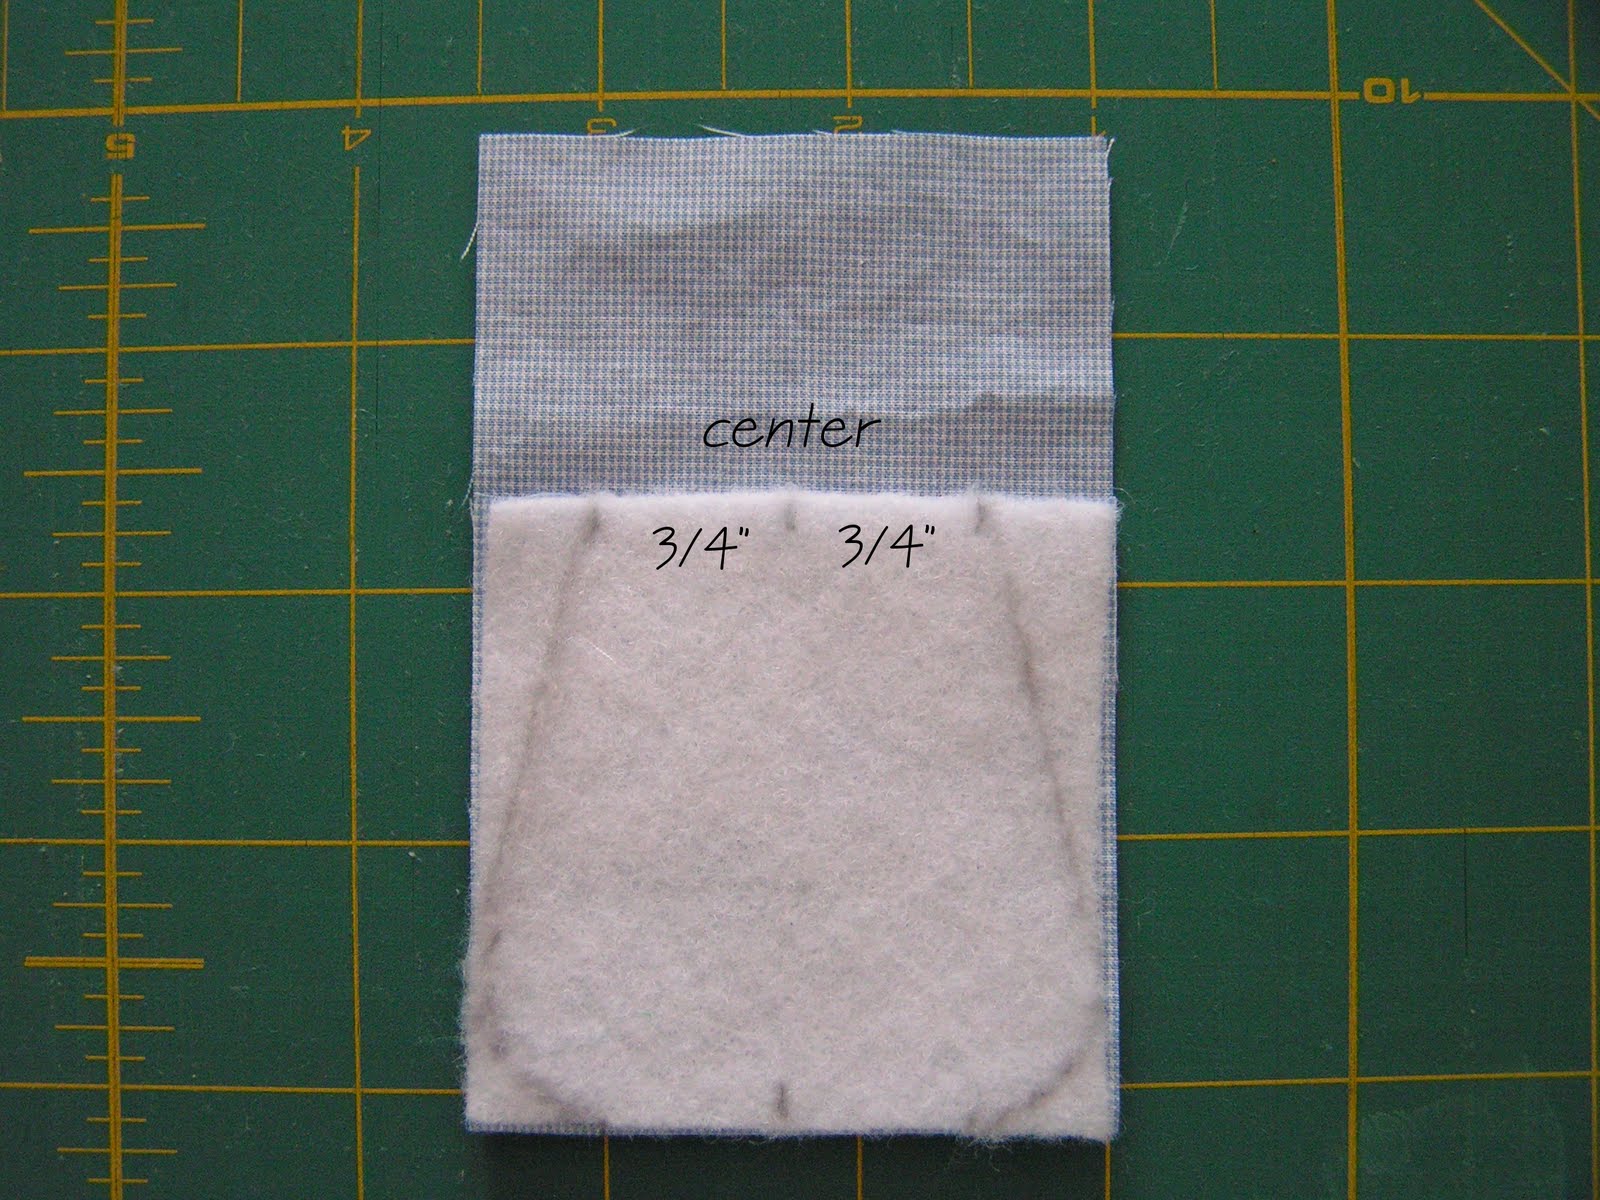
1. Fuse the fusible fleece to the fabric. Follow the instructions that came with the fusible fleece. Fold the fabric at the edge of the fusible fleece. Measure and mark the fleece, according to the picture. If you are making more than one, it will be quicker to make a pattern with a piece of paper and trace it.
2. Sew inside of the line, using 1/4" seam. Cut off the excess and cut small triangles around the corners for a nicer finish.


3. Turn the fabric inside out. It is easier to use scissors or a chopstick to push the fabric out. Fold the top in thirds, and press the whole thing with an iron. Stitch around the edge with 1/8" seam.

4. Fold 1/4" from the top, and put a ring on the fabric and fold the fabric over the ring and sew the ring into the key holder.

5. Sew fabric folded flower, beads, and buttons to the key holder. I did it so that the stitches are not showing on the other side. You can see what I did to make the flower here .

I enjoyed coming up with combinations of fabrics, buttons and beads. It is so funny that a slight change can give each key holder a whole new look.


I hope you have enjoyed my tutorial today. Happy sewing!


I am completely in love with this. It is so sweet and I love the handmade look of it. They are just so pretty and sweet!
ReplyDeleteso pretty .. ;D
ReplyDeleteSo sweet creation...I love it and yes thanks for the tutorial... it makes so easy to follow... thanks for sharing
ReplyDeleteHappy if you come to see me at
http://craftaworld.blogspot.com/
with love from
Farah
Thank you for sharing Sachiko!
ReplyDeleteI imagine it as a pendant of a fabric necklace!! :)
Those are so pretty! I wish I have time to make some before Christmas! I'll have to do some after for next Christmas!
ReplyDeleteThis is adorable! i have made several bags and will now need to make these as well! they make great gifts!!
ReplyDeleteWonderful!!!
ReplyDeleteThank you very much. That is a good idea for Christmas present. I love it. It is lovely and easy to make.
ReplyDeleteGreeting from Spain.
Lovely! Thanks for the share!
ReplyDeleteThank you so much for your tutorials!! I think my daughter and her friends would LOVE these done up in Zebra Stripe and other "in" fabrics to clip on their school bags! Maybe put their initials?
ReplyDeleteSuch a neat idea... you are, as always, so inspiring!
These would be a beautiful and pretty present...thanks for sharing your lovely creation.
ReplyDeleteThat's so pretty and so giftable- I love it! Thanks so much for sharing, I'll be spreading the word.
ReplyDeleteOmg i just love this tutorial, thank you
ReplyDeletebig kisses from serbia <3 ****
perfeito.. ficou muito lindo e super facil de se fazer....
ReplyDeletewery wery good:)))
ReplyDeleteTanks...
fatoscatadlar.blogspot.com
Hi Sachiko,
ReplyDeleteIt is very pretty and intresting. I have tried this and given this for your reference http://craftworksbuddies.blogspot.in/
How do you keep the center of the flower from fraying? I used these flowers on a purse but now they are all fraying. Any thoughts?
ReplyDeleteHow do you keep the center of the flower from fraying? I used these flowers on a purse but now they are all fraying. Any thoughts?
ReplyDeleteCait-
ReplyDeleteWhen you put together all the petals, you want to sew all the petals closer and tighter together, so they won't fray.:)
I love these handbag holder! At least a useful accessory. Christian Dior does a beautiful one with Khabarovsk stones.. vet stylish. I just stumbled upon your blog and wanted to say that I have really enjoyed reading your blog posts. Any way I'll be subscribing to your feed and I hope you post again soon.A fantastic presentation. Very open and informative.You have beautifully presented your thought in this blog post.
ReplyDeleteDefinitely love it!!!! Thank you for sharing this perfect tutorial!
ReplyDelete