Showing posts with label children. Show all posts
Monday, September 11, 2017
Bell Sleeve Dress for My Preteen
I don't know if this is just me, but I feel like there are so many cute baby and toddler clothes everywhere I go, but when it hits a certain age group; preteens is where I have a hard time finding pretty clothes. Especially nice, modest, stylish dresses that don't cost an arm and a leg!
I decided to make one for my daughter, but none of the patterns that I saw caught my eye either. It was time for me to roll up my sleeves and tweak a pattern I already had and create a dress for her.
I found some pretty fabric at Joann's a few weeks ago and fell in love with the color and texture. I thought I could create a feminine & pretty dress with this. The lady at the cutting table told me that the bolt came in earlier that week and it is selling fast... on Friday I finished off the bolt. Phew... I am glad I decided to stop by to check what they had.
I love love the bell sleeve and I am so glad she did too. She came in to my room when I was just finishing up with the sleeves. The first thing she said was "WOW!! This is so pretty, how did you do that?!" (while touching the sleeve)
I was going to bed because I was at a good stopping point, but looking at her excited and happy face made me change my mind. I used up my extra fuel for that day and finished up her dress, so she could wear it to church on Sunday. I quietly went in her room and hung the finished dress where she could see it the first thing in the morning. I was feeling giddy; just like when I am leaving a present in the kids' rooms the night before Christmas. :)
Friday, May 30, 2014
Quiet Book Page ~ Knock Knock, Who is There?
Today, I am sharing my quiet book page at Riley Blake Design! I came up with pages with clear pockets. They will be so fun to pick and choose what pictures to insert and it is so easy to change them once your child gets bored with the pictures.
Please head over to Riley Blake Design and check out my complete tutorial. :)
Have a great weekend everyone!
Please head over to Riley Blake Design and check out my complete tutorial. :)
Have a great weekend everyone!
Tuesday, January 3, 2012
Spider Silk Scarf
Not really. I crocheted this scarf out of regular yarn, but let me tell you why I named this scarf "Spider Silk Scarf".
When I was a little girl, I had a favorite children's book called "Obake-chan to muwa muwa mu"(Japanese title). I read it so many times; the cover became worn and torn. It was about this family of friendly ghosts and the adventure of the child ghost. The funny thing is that I don't remember the detail of the book at all, even though it was my favorite book.
I just remember the happy feeling I got when I read it, and also this one particular page... mother ghost who knits stuff with spider silk. Isn't it funny how a child shows interest in certain things early on?
I went through 4 procedures (and the recovery to go with them takes way too long for my liking!) since October so far, and during those times I couldn't really start a new projects. I have been dying to start designing, drafting and sewing some clothes, but I consider those kind of big projects since they involve lots of standing. But you didn't think I am all defeated and weepy did you? Nope.
I saw yarn in my closet and it reminded me of the "spider silk" the mother ghost was using for her knitting in the book. I decided to crochet in bed. :)
It is just a simple Half Double Crochet Stitch, since I don't know much other than the basics. While I was crocheting I kept thinking about that book and that made me happy.
Wednesday, September 14, 2011
Link Party No.69/ Bracelets for Little Girl
I shared my Liberty of London fabric covered buttons a few posts ago. I am actually making something using them... I will be ready to share the pictures soon.
Meanwhile, I started making something for my nieces in Japan for Christmas. I wanted to make a few things and wrap them up really pretty. One of the things I made was this bracelet. I went through my buttons and beads to color coordinate them. It was such a simple and fun project. You can whip up several of them in no time!
When Rachel came home, she found the bracelets on the table. As I predicted, she grabbed the pink one and said, "What's this for?" blah blah blah, "Why is there so many?" blah blah blah, and she finally got to the point, "I am wondering... is this mine?” (Followed by a grin). Oh fine, have it now; it is so hard to resist the cute smile.
She wore her pink bracelet for the rest of the day and loved it, which made me happy. I hope those bracelets will bring a smile to my nieces’ faces when they open their gifts.
It is your turn to share your creations. Link up, visit each other and have fun! :)
1. Please post something YOU made. It doesn't matter if it is crochet, quilt, clothing, anything would be fine. I want to see it! If you use someone's idea or patterns please give them the rightful credit.
2. Link to your specific post, that way it is easier for everybody to find and read it.
3. Please grab the "Tea Rose Home" grab button, and link back from your post. If you can mention the party in your post or place the button on your side bar, that would be great! I want more people to have a chance to come and show off their creation.

Friday, August 19, 2011
Tutorial ~ Felt Party Favor Bag ~
Last week we celebrated Rachel's birthday. I will share the tutorial for the party favor bag. Did you know that printed felt exists? A few month ago, I was at Hobby Lobby and found this polka dot felt, and it was on sale (normally they are 2 for $1, I can't remember exactly how much they were, but I got it for less than that). I thought I could make party favor bags that would be usdable as a play thing later on for the girls.
{You will need}
1 - Polka dot felt
Two coordinating felt for the flowers (You can make several flowers out of two, depends on the size of the flowers)
Matching thread, button for the middle of the flower
{How to}
1. Cut two 1 1/2" strips for the handle.
2. Fold the strips in half and sew.
3. Mark on the shorter sides of the other piece of the felt, 1 1/2" from both sides.
Lay the handle right next to the mark, and sew the handle on to the felt.
4. Fold the felt in half and sew both sides. I used a slightly wider than 1/8", narrower than 1/4" seam.
5. To make the boxed bottom, pinch the corner and sew. Cut off the excess.
6. For the flowers, I used three different sizes of cookie cutters as templates. I just pressed the cookie cutter really hard on the felt, and cut on the line.
7. Layer them together (make sure that the flower peddles are offset from each other) and sew. I pinched the back and sewed several times, so the flower doesn't look flat.
8. Sew a button in the middle, and sew it onto the bag.
9. Ready to stuff with party favors!
It was a really laid-back and fun party. I didn't even plan games or anything, I just let them play and did a "nail salon" and face painting. We all had a fun time, it was a good day. :)
Thursday, July 28, 2011
Tutorial ~ Five Kitchen Towels Dress ~
I found this kitchen towel bundle for pretty good price (it was originally $16 and I got it for $8!). I had an idea of what I wanted to do with them...
They are 100% cotton and very absorbent. I thought these would make a comfortable summer dress for Rachel!
I will show you what I did. :)
{You will need}
Five kitchen towels (the ones that you see all over the place. Five slightly different patterned ones)
Matching thread
{Before you start}
I used three towels for the skirt, one for the top, and the last one for making bias tape.
Look at the towels and decide how you want to coordinate them first.
{How to}--Skirt
1. Cut off the sides from two towels that you chose for the skirt. Cut them into three equal pieces.
2. Lay them out and coordinate how you want to combine them and sew side by side.
3. Cut the third towel horizontally to make a couple long pieces (4" X length of the towel).
4. Add those long strips to the bottom of the main part of the skirt from step 2. Sew front and back of the skirt together.
5. To make the pockets, cut 2 -- 6 1/2" X 7" rectangles from rest of the third towel. Take care of the edges except the top (6") with your favorite method to prevent fraying.
6. Fold those three sides with 1/4" seam and press with an iron. Fold the top of the pocket two times and sew.
7. Pin the pocket on to the skirt. I placed them a little off to the sides. 5" from the top and the side of the pocket will go to the back part of the skirt by 1 1/2".
Use the picture as a guide.
{How to}-- Top
1. Fold the towel in half with right sides together. Cut off the bottom seams and mark the sides as shown in the picture.
2. Sew the sides.
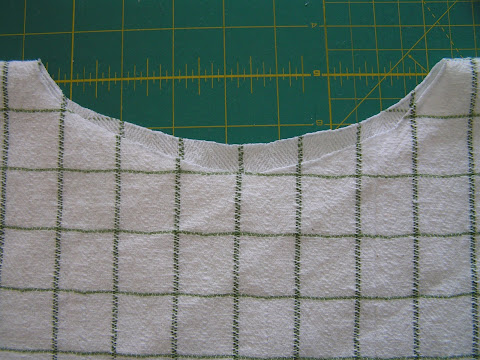
3. Mark the center of the folded part and mark the neckline. After I made mine, I wished I cut the neckline smaller, so it is best to measure your child’s head first.
4. Cut the front of the neckline open, then, mark the line for the back part of the neck. I drew the line higher than the front.
5. Lay the last kitchen towel flat on the cutting mat. Cut seams off and then cut diagonally to make bias tape (I cut mine 1 3/4" wide). Sew them together and press with an iron to make the bias tape. You can also see how I make my bias tape here. The bias tape will cover the neckline, two loops for the belt, and the belt.
6. Pin the bias tape around the neckline. Sew, turn it towards the inside and finish with slip stitch.
7. Now, you have the top.
{How to}--Finishing up
1. Pin the top and the skirt together and sew. I forgot to take pictures on these steps, but basically, you sew the edge of the top of the skirt with large stitches, pull the thread to gather the fabrics. Make sure that the length of the edge of the top and the skirt will match up. Right sides together, pin them, and sew. After you take care of the edge with Serger or zig-zag, press the seam toward the top. Top stitch the seam. You can go here to see what I have done with another project.
2. Cut 2-- 1 3/4" strips for the loops. Sew them on to sides of the dress.
3. Put through the belt to the loops...and it is ready to wear.
My little girl is five going on six soon, but she is small for her age. The dress is a bit too big for her, for now, although, it might be perfect for regular 6 year olds.
The dress is soft, airy, and comfy...it is perfect for a summer afternoon to relax.
Subscribe to:
Posts
(
Atom
)