Summer has been quit busy and I have been away from blogging for a while and I realized that I forgot to post about this quilt.
I have a group of friends that I have been friends with for over 17 years. We used to get together regularly for "project night" before we moved away and our lives diversified. We would work on our own projects (quilting, stitching, crocheting and scrap booking... basically anything goes!). We talk non stop and shared many good treats and fun times together.
This summer, one of our friends got married. She waited for a long time, but she finally met someone special to spend the rest of her life and eternity with. We are all so excited for her!! She is such an amazing person who cares about others so much. Do you have some points in your life you vividly remember when someone impacted your life in a positive way? Well, she is that kind of a friend. Because of her, and all of our friendships, my life is richly blessed. I really wanted to give her a quilt as a surprise gift from all of us to represent our friendship for her special occasion.
I made the quilt top a while ago and I asked my friends if they would like to chip in to have it professionally quilted for her. Well, they all thought it was an excellent idea! Here is the finished quilt (and my boys hands). We knew she would like the traditional look of the quilt, but I was a bit nervous before she opened the bag... but she loved it!! There were some tears and lots of hugs involved and we parted ways.
The back of the quilt, I added a hand stitched label saying "a Sweet friendships refreshes the soul~ Proverbs 27:9". The scripture passage perfectly describes our friendship. Because we couldn't get together before hand, we all signed our names in front of her around the wreath.
Family and friends are vital to our lives. The love we have for each other strengthens us and reminds us that we have a safe harbor in the world. I wish I could be that type of person to the people in my life and be ready to welcome new ones anytime.
Showing posts with label white. Show all posts
Saturday, August 13, 2016
Tuesday, October 13, 2015
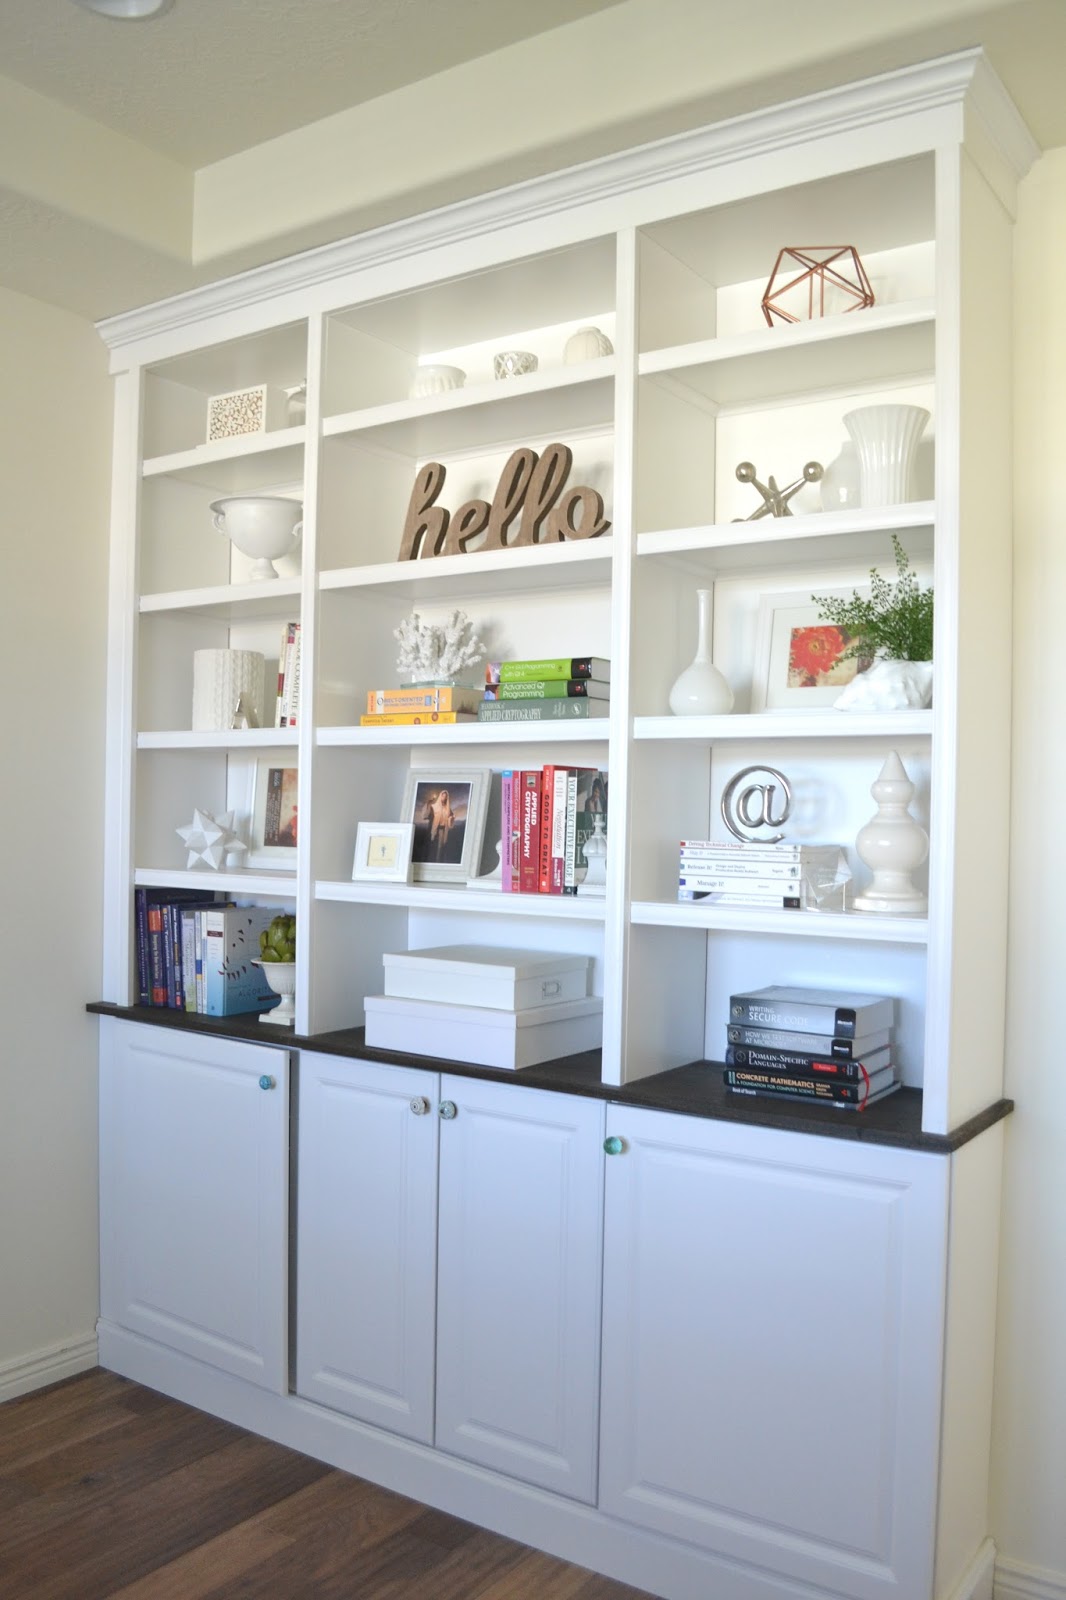
Built-In Bookcase Done!
I was looking for a "before" picture and realized that we started this project back in March. We were trying to do this frugally, waited for a sale and all... it took a long time to finish. Now it is finally done!! I wanted a built-in bookcase in our office space, but to hire someone is way more than I wanted to spend. I understand the hard labor and time that goes in, it is still expensive! I checked other options as well such as buying a bookcase but they were all too short. I wanted something that will actually go to the ceiling. Then, I found this bookcase on Pinterest and it inspired me. I though, "We can do this!"
We bought some kitchen cabinets for the base part of the bookcase in March...
We finally finished it!!
I choose four different knobs for the cabinet. I love them all and couldn't decide on one. Then I thought "Why should I, I can use one of each!" I love the unique look they give to the bookcase.


How Mr. TRH and I work is that I have an idea (well... more like a gazillion ideas in my head and pull them out little by little so it is not so overwhelming for him) and ask him to build it. He does most of the building, and I do the detail work such as hiding nails, painting, and caulking. Then, I get to stage and decorate! I think that is the most fun and rewarding part of it all. When we are working as a team like this, I get a little delusional and feel like we are Chip and Joanna from "Fixer Upper" on HGTV. I know, I know we are far from it and I feel like I am gonna receive hate mail from their fans, but a girl can dream sometimes, right??
Well, I had fun decorating, BUT! I must say that the computer books are not easy to decorate with! We have a lot more books, but they are all hidden in the covers. Since the office is Mr. TRH's room, well, mostly...(since I have my sewing room) I wanted to respect that and tried really hard not to make it too feminine. So, here is what I have done so far.
I keep switching stuff around, so when you come to visit us next week, it might look entirely different. I am so happy that we finally finished this project.
So, honey, are you ready for next project??(grin)
We bought some kitchen cabinets for the base part of the bookcase in March...
We finally finished it!!
I choose four different knobs for the cabinet. I love them all and couldn't decide on one. Then I thought "Why should I, I can use one of each!" I love the unique look they give to the bookcase.


Well, I had fun decorating, BUT! I must say that the computer books are not easy to decorate with! We have a lot more books, but they are all hidden in the covers. Since the office is Mr. TRH's room, well, mostly...(since I have my sewing room) I wanted to respect that and tried really hard not to make it too feminine. So, here is what I have done so far.
I keep switching stuff around, so when you come to visit us next week, it might look entirely different. I am so happy that we finally finished this project.
So, honey, are you ready for next project??(grin)
Wednesday, September 9, 2015
Putting Together a Sewing Room!
I have been collecting miniature furniture and things for a doll house for several years. One day I was re-organizing my sewing room and realized that I have everything I need to do this project.
You read the title and probably thought I am organizing my sewing room, didn't you?... Gotcha! Actually, I am creating a much more smaller version of a sewing room. I don't think I can even call it "a doll house", since I am using a small wooden suitcase as a room. I am going to write several separate posts about the progress for the project, because it would be fun to talk about decorations and details as I put it together. Today, I am going to talk about the base: The room.
I guess you can use many different things as a "room" when you are creating a doll house or display. Remember the Tiny Tin Bedroom I did a while ago? I used a candy tin can as a room.
For this project, I have furniture pieces that I wanted to incorporate. I needed a much bigger base than a small can. I found a wooden suitcase at Hobby Lobby, after 40% off it was about $5.
I covered hardware with washi-tape and spray painted the suitcase first...At the same time I spray painted the furniture and some decorations as well.
Before...
and after... Mmm, much better.
While I was having a blast, my kids came and told me their opinions (wait, did I ask their opinion? No, but they told me anyways).
Michael said, "Mom, why is everything is so white? You can't see anything."
Rachel came in and in a nasally voice, said, "Mooom, this is going to be too white. You need more color." Then she cut herself off, "Oh, oh!", she exclaimed. "They are SO tiny and cuuute!" she said excitedly in a high pitch voice while fawning over the furniture and decorations. Can I have it when you are done??
My response to both was, "I painted them white because I LOVE white! I am going to add colors as I go, now leave me alone, this is my project."
They both laughed. Naughty kids, they love to tease their momma. It is no secret that I love white. When you come to my house you will see lots of white. My friends tease me, but hey, everybody has their preferences right? I love the clean, calm and peaceful feeling I get when I am surrounded by whites. I add colors with decorations, just like painting a white canvas with different colors of paint. I wonder when my kids grow up and they have their own place, will every single room will be painted... hahaha. :)
Going back to the doll house... after the paint was completely dried, I moved on to putting up "wallpaper". I just used a single sheet of scrapbook paper that is white...wait, wait, in my own defense. it has embossing texture. I still wanted a white wall but with texture. In the doll house room, the scale of the floral design is very large. That's exactly how I wanted it. I think it gives a subtle, yet dramatic effect to the room.
What do you think?
I then moved on to do the floor. I wanted the look of hardwood floors, but when I was looking at the "wood floor" at Hobby Lobby in their doll house section, it costs way more than I was willing to spend. Again, I turned to scrapbook paper and I like how it turned out! The width of the planks on the paper was way too wide, so I just drew some lines to make the plank narrower. Simple easy solution, huh?
Now the stage is set I can start decorating the mini sewing room! I will let you know the progress in my next post. :)
Thursday, June 4, 2015
Tutorial ~ Super Easy Quilted Euro Sham
I have been wanting to change the look of our bedding FOR-EVER. Also, we never owned a real bed; it was just a simple frame and mattress and I used Euro pillows to create height in the back with other pillows for years.
I recently came across bedding that took my breath away and bought them, but there was no Euro shams from the same line available. The bedding I bought is quilted with beautiful stitches and there is no way I could recreate that exact same look, but I wanted to carry out the same feel. I looked for white, quilted and Euro pillowcases and I found something very close to what I had in mind. It was $30 each and I needed 3 of them... that is going to be close to $100 after everything... yikes! Quickly I shifted gears from "buy" to "make".
While I was looking for the right fabrics at a couple local fabric stores, I had a light bulb moment.
"Why not use a quilt? They are already quilted and the right thickness, I just need to find the right quilt!"
I like to shop at Ross, or TJ Maxx (I hardly ever pay full price for anything), and when you are at the bedding section, you find lots of quilted bedspreads in bags. Sure enough, I found white twin size quilted bedspread for $30! I was able to make three shams out of one quilt, so I saved 2/3 the cost by making them.
This is SUPER easy, you can even do it with your eyes closed (ok, maybe not literally but it's that simple!). I will show you what I did.
{You will need}
Euro size pillow -- 26" x 26"
Twin size quilt
Matching Thread
{How to}
1. Fold the quilt in half vertically and cut off about 1/2" from the top to have raw edge. Measure 27" from the edge cut, and repeat that twice. Then you will have three 27" tall by the width of the quilt pieces.
2. Open the folded strip and bring both ends to the middle, so that they will overlap. Measure and make sure that the side edge to other side edge is 26". Pin and secure them in place.
3. Sew the raw edges with 1/2" seam and treat the edges with zigzag stitches or Serger.
4. Turn the pillow inside out. Use a pin to help pull out the corners if you are having trouble. Press the seam with an iron.
5. Done! Repeat the process to make two more. :)
I am pretty pleased with how easy it was and I got the look I wanted. Because you are using the side seams of the quilt as is where they are overlapping, the only area you have to sew is the top and the bottom. Now everybody... this post is not quit over yet.
Remember I mentioned that we never owned a headboard or bed? I found a bed I REALLY REALLY love! What? Do you ask if I got the bed? The answer is no, because the bed I fell in love with has a hefty price tag of over $3000. That's not gonna happen with this girl. I took that as a inspiration and did something fun! I will share that in my next post, so stay tuned!
Wednesday, September 2, 2009
Great Finds and Their Transformations
Last Saturday, I just had this urge to go to a thrift store. I felt like there was something waiting for me. I only had one and a half hours until I had a get together with our friends. I hopped in the van and I was gone like the wind.
Yep, I was right, I found some great items! I will not post everything in this post, but I will show you some of the things I found and transformed. All I needed was a can of spray paint.
I found these wooden frames for a dollar each. I love the moulding on these frames.
Before...

After...

I love them! I found mats at dollar store while ago, and they fits perfectly.
There is another find that I am REALLY EXCITED about... take a look at this before picture...

I spotted this with a bunch of junk I mean stuff and loved the detail. I didn't care for the color but I decided to buy it anyways. It was actually made out of plastic but it looked brand new inside and out. I was wondering what this box was originally used for... it looked a little bit churchy to me, so I wanted to make sure that people didn't store ashes or something. If that was the case, I would be a little bit uncomfortable buying this. On the back of the box it said "Mark Clein INC, Baraboo, Wisconsin".
So, I googled the name and after a few tries, I found out that the box was indeed a sewing box! According to the picture I found, my box was missing a tray on the inside, but I didn't mind. I transformed the sewing box my way, with help from a few coats of spray paint, it looks like this...


I have been looking for a sewing box for a while. I have a sewing room on the second floor, but most of the time I work downstairs in the kitchen area. I thought it would be nice to have something beautiful, and functional to store my basic sewing items. And, the box was only two dollars! I love it so much that I can't stop looking at it.
I had some paint left over, so I painted other things I bought a long time ago, and needed some TLC. (White is my most favorite color... I don't mind if everything is white.)
Little piggy bank

The "A"

I just have to say spray paint is the greatest invention of mankind! I wish I could thank and hug who ever came up with this!
Yep, I was right, I found some great items! I will not post everything in this post, but I will show you some of the things I found and transformed. All I needed was a can of spray paint.
I found these wooden frames for a dollar each. I love the moulding on these frames.
Before...
After...
I love them! I found mats at dollar store while ago, and they fits perfectly.
There is another find that I am REALLY EXCITED about... take a look at this before picture...
I spotted this with a bunch of junk I mean stuff and loved the detail. I didn't care for the color but I decided to buy it anyways. It was actually made out of plastic but it looked brand new inside and out. I was wondering what this box was originally used for... it looked a little bit churchy to me, so I wanted to make sure that people didn't store ashes or something. If that was the case, I would be a little bit uncomfortable buying this. On the back of the box it said "Mark Clein INC, Baraboo, Wisconsin".
So, I googled the name and after a few tries, I found out that the box was indeed a sewing box! According to the picture I found, my box was missing a tray on the inside, but I didn't mind. I transformed the sewing box my way, with help from a few coats of spray paint, it looks like this...
I have been looking for a sewing box for a while. I have a sewing room on the second floor, but most of the time I work downstairs in the kitchen area. I thought it would be nice to have something beautiful, and functional to store my basic sewing items. And, the box was only two dollars! I love it so much that I can't stop looking at it.
I had some paint left over, so I painted other things I bought a long time ago, and needed some TLC. (White is my most favorite color... I don't mind if everything is white.)
Little piggy bank
The "A"
I just have to say spray paint is the greatest invention of mankind! I wish I could thank and hug who ever came up with this!
Subscribe to:
Posts
(
Atom
)