I was asked to participate in the Jo-Ann Fabric and Craft Stores National Craft Month Campaign. "What it is that?", you might ask. It's where you can find four types of trends for this Spring on
Jo-Ann Spring Inspiration Website and I will choose one theme (or more) and create something fun. I love doing stuff like that! Sound interesting? Joann makes spring crafting easy during National Craft Month with a $5 off
coupon for purchases totaling $25 or more. You might wanna get your thinking cap on! Before you start getting busy, do you wanna check out what I came up with for the "Geometric" theme?
I have been interested in doing a project with fabric paint for a while, and this idea popped in my head. So, I headed to JoAnn to see what I could find for this project...
My daughter is 8 years old and on the smaller side. So you may need more or less depending on the size you are trying to make.
{You will need}
White cotton fabric 18" and 3 1/4" X 26 1/2" strip to create the waist band
Blue cotton fabric 20" (basically, the blue needs to be longer than white fabric)
* I washed both fabrics the day before without detergent and air dried them, then ironed them. You don't want to make the skirt and then wash it only to find out it shrank!
Craft foam mat 6 mm thick
6 different colors of fabric paint
Paper plates
Paper cups
Double sided tape
Felt
3/4" wide elastic
Ruler, x-acto knife, basic sewing notions
{How to}
1. To create my own homemade triangle stamp, I used craft foam mats. Those triangles are equilateral. I draw horizontal lines 2" a part, then I used my ruler for quilt making to draw the lines.
2. Cut them using the x-acto knife. You need six of them, one for each paint color.
3. I used double sided tape to attach the foam to the plastic cup. Clear cups are better, because you can see the triangle better when you are stamping.
4. At Joann, they had a variety of fabric paints and honestly, I didn't know which one to choose. I just decided to go with this brand and it worked nicely. Follow the instructions on the label.
Squeeze out the paint onto the paper plates. I felt like the paint was a bit too thick, so I added some water and mixed them. Put the felt pieces on the paint. That way it creates a "stamp pad" effect. You should test stamp on scraps to see what thickness you prefer. I also taped wax paper on my kitchen counter, so the clean up was easy afterwards.
5. Before you can start stamping, trim the top and bottom edges a little so the fabric has clean edges. Then, measure 1" from the bottom and lightly draw a line. That will be the guide for you to have a straight stamped bottom edge. I kind of had a pattern going, but I made some areas empty, or rotated the color wheel to have a more "random" look.
6. The next day, I started to sew. This is a very simple skirt, so you can make it in no time! Bring both sides of the fabric right sides together then sew with 1/2" seam. The side seams are already treated, so you don't even have to worry about fraying! That seam will be in the back of the skirt. Press the seam with an iron.
7. Fold the bottom edge of the stamped fabric twice (1/4", 1/4"), press with iron and sew. I used zig-zag stitch to imitate the triangles on the fabric.
8. Repeat steps 6 and 7 with blue fabric. Then, right side of the fabric facing outside, layer both skirts together. Make sure that the seams are lined up and the top edges matches too. Pin them together. Then, using the largest setting of stitches on your sewing machine, sew the top edge twice (1/8" from the edge, then, 1/2" from the first sewed line). Pull one thread from each sewed line to gather the fabric. I gathered it to 13" (well, front and back so it is 26" all around).
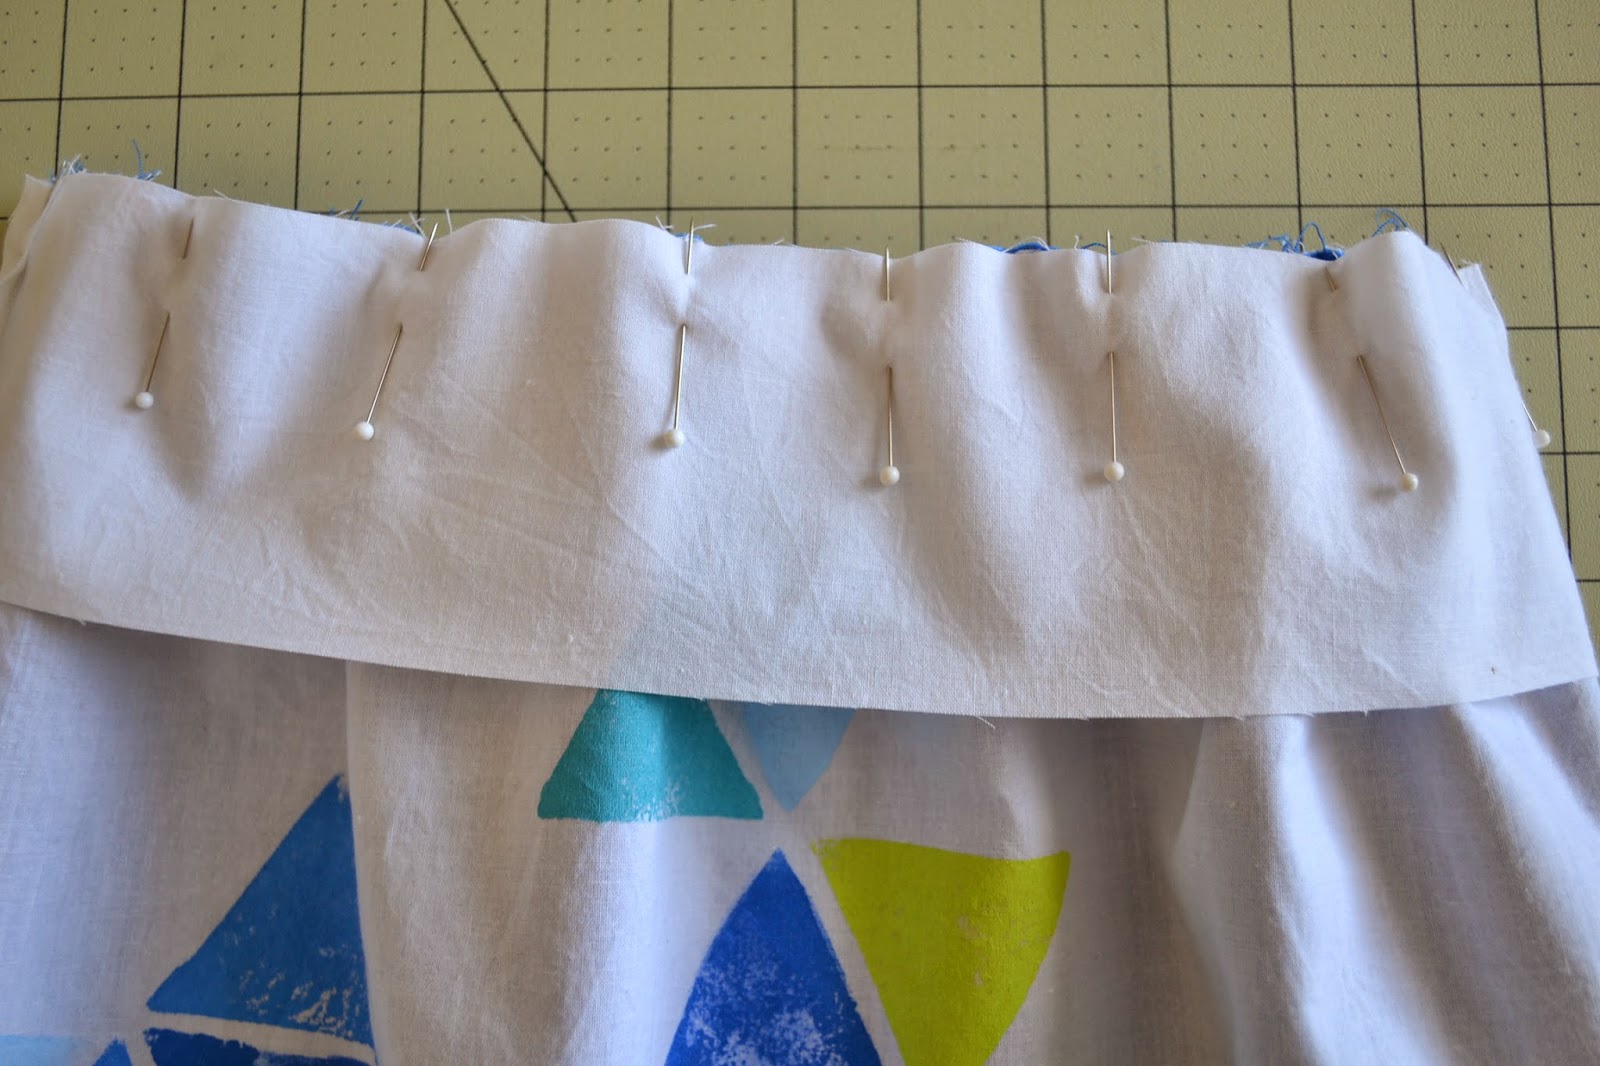
9. Sew waist band. Fold the strip of white fabric in half, and sew them together with 1/2" seam. I included the measurement in the picture, basically you leave some opening for you to put the elastic through later.
10. Pin the waist band on to the top edge of the skirt. fold 1/4" of the bottom edge and press with an iron.


11. Fold the waist band in half towards the inside of the skirt, pin and sew. To create a crisp finish, you want to do top stitch on that top and bottom of the waist band.


12. Before you put the elastic through, measure your little girl's waist. My daughter has an 18" waist, so I cut my elastic 20" long for some overlapping and to sew the ends together. This skirt is designed to have some flexibility in the waist measurement, so make sure the elastic you are cutting is not too short or too long.
Put elastic through and sew. Violà! You have the skirt!
My daughter was cooperating and being such a great model... but it didn't last too long.
She got bored and started doing her own posing... but it is part of a photo shoot with kids, right? We had fun!
Besides, she is so cute and funny, she is definitely a keeper. :)
She loved her new bright colored springy skirt, it is a bit different than her mom would normally choose. I bet this will be really cute with different color schemes too. Have you considered Radiant Orchid (that is the color of the year!) Mmm... that would be really pretty!
Head over to
Joann fabric and craft store to see what you can find today (don't forget your coupon, my friend!) Happy sewing!
* Disclosure/ This review is part of the Jo-Ann Fabric and Craft Stores National Craft Month campaign. I received compensation for this review; however, this is my personal honest opinion based on my experience.


Such a cute skirt, and so creative. Looks wonderful on your daughter.
ReplyDeleteReally cute skirt and the color scheme it´s very fresh and light.
ReplyDelete5*
Very cute, thanks for sharing.
ReplyDeleteFun skirt!! And thanks for the tip for creating ink pads for foam stamps!
ReplyDeleteI've linked to your tutorial on Craft Gossip:
http://sewing.craftgossip.com/tutorial-layered-skirt-with-a-stamped-geometric-design/2014/03/16/
--Anne
Прекрасная работа!!!
ReplyDeleteReally cute the skirt! I love the choice of colours!
ReplyDelete