Wednesday, May 11, 2011

Link Party No. 53!


One day, I was at a thrift store before I had to pick up my kids from school. I scored BIG time on some beautiful vintage pillowcases... not only are they in such good condition, they were only $ 1 a piece! Yea!

I have been collecting vintage pillowcases for a couple of years now with the intention of making something beautiful. The reason why I haven't made anything yet is the thought of cutting them up is hard for me. What if I mess up, it's not like you can just go to a store and buy the exact same one. Well, I guess that is the beauty of vintage items. I have several ideas what I want to do with them; I might actually make something this summer.

Here are a couple of my favorites...


Aren't they gorgeous? I am having fun thinking about the potential projects... should I make a dress, a pair of pants? Bags... it's so hard to decide!
What would you do if you had pillowcases like these? Hopefully I will be able to share the pictures of the finished projects someday. :)

Ok friends, go ahead and link up!

1. Please post something YOU made. It doesn't matter if it is crochet, quilt, clothing, anything would be fine. I want to see it! If you use someone's idea or patterns please give them the rightful credit.

2. Link to your specific post, that way it is easier for everybody to find and read it.

3. Please grab the "Tea Rose Home" grab button, and link back from your post. If you can mention the party in your post or place the button on your side bar, that would be great! I want more people to have a chance to come and show off their creation.


Monday, May 9, 2011

Tutorial ~ Old Cardigan to New Scarf ~


I shared this picture of my favorite cardigan several posts ago...It went through so many wear and wash cycles, the cardigan doesn't hold its shape anymore, and the color has faded.


I thought it looked too worn out to wear, but if I cut it up to small pieces to make something and use the wrong side of the fabric, it is still useful. I just have a hard time parting with my favorite things. I decided to give it new life. :)

I will show you what I did.

{You will need}

100% cotton cardigan or sweater (thin material)
Thread that will match
Fabric to make the strip for the scarf
Three or four different kinds of beads
1 - large sew-on snaps
1 - large covered button kit (mine is 1 1/4")

{How to}

* How to make leaves

1. I made the template for the leaves. First, draw 2" X 3" rectangle and draw a leaf in the rectangle. Then, you will have about the same size leaves I made. Fold the knit right sides together and lay the leaf template, trace the shape and cut out leaves. I made 34 leaves for this scarf, but if you want to make a longer scarf, you will need more.


2. Sew two sides (leave the bottom part, so you can turn inside out), clip the top for a clean finish, and turn. Press with an iron.


* Putting Together the Scarf

1. Cut 4 1/2" X 30" strip. Fold it in half with right sides together. Leaving 2" in the middle, sew both sides with 1/4" seam allowance.


2. Bring the seam in the center, fold one of the ends flat, draw a half circle and sew. Cut off the excess and do the same to the other end.


Turn the strip inside out, press with an Iron.

3. Start sewing the leaves. Start from the ends. Use the picture as a guide. I used zigzag stitches to sew the leaves. Keep in mind where you want to add the buttons and such. Wrap it around your neck and decide where you want to sew on the snaps and the covered button. I have the button 11 “ from one end of the scarf. If that would give you an idea how you want yours to look...


4. Don't forget to start from the other end too. Sew the leaves in a way that they will meet at the center of the flower shaped part.


5. Use the same fabric you used to make the strip to cover the button for the center of the flower shaped part. Sew it on. Then, sew, sew-on snaps to the scarf.


6. Sew beads onto the scarf. The key is to do it randomly.


Now, time to enjoy...


I was so happy with the results; I asked my husband, "How do I look?"

His response: "You look like a forest guardian."

I said, "Hey!"

Well, we joke around like that all the time in our household; he is not being a jerk or anything... just in case you are wondering. I think it would look pretty to make this with different colors too. Unless you happen to have a green cardigan and want to make this, come on; join me in being a forest guardian troop. :)

Sunday, May 8, 2011

Link Love No. 52 ! / Mother's Day Celebration

How was your Mother's day? If you are the "Mother" or the daughter who did something for the special mom in your life, I hope you all had a very nice Mother's day.

My husband had it all planned out, and we celebrated Mother's day on Saturday. We actually did separate things in the morning to early afternoon. My husband took the boys and left. I spent time with Rachel. I had to run some errands, and after we came home, I was busy doing some laundry, and cleaning the house. Those things never end, I feel like if I stop moving for a second, the next set of housework is there and waiting for me.

My family took me out to eat so I didn't have to cook dinner (yea sushi!), and the kids gave me their handmade gifts. They were so sweet and special. I love the misspelled card my youngest gave me too. I could tell that each one of them put their time and effort in those gifts, and it almost made me cry. All the chaos, frustration and the worries comes from being a mother (of course with great joy, pleasure and love) seems so worth it in moments like this. I even forgot the dirty socks they left on the floor for a second. :)

My husband, he was also so excited about his gift he got me. Last week or so, he has been asking me if I found the gift he hid somewhere in the house, or he will ask me if I want a hint about the gift. I always said; "No, I haven't found anything" or "No, I don't want any hint", seriously, I didn't want to ruin the surprise!

Do you want to know what he got me...? It was the lens for the camera (AF-S Nikkor 35mm f/1.8G DX lens) that I wanted to buy! I saved up and bought my camera, and my next goal was to save up for that lens. That lens will supposedly help me to take closer pictures. I was speechless, and SO excited! No wonder he had a hard time shutting his mouth. He knew I would LOVE the gift. The fact that he listens to me and shows support for what I want to do, makes me feel so loved and special.

On the actual Mother's day, we visited my in-laws and had a nice visit. I made her a necklace, but I will share the picture some other time. :)

Ok, that was a long intro, but now it is time for the link love!

Parkers shared this tutorial on how to make Chocolate Covered Oreos. They look so fancy, but when I went through the tutorial on her blog, it looked doable! I have to give it a try, it will be perfect for girls’ night, showers, and any get together!


I love this hanging fabric doily shared by Erin from Lemon Tree Creation. There are many ways to make banners, mobiles and such; this is so beautiful and unique. I love how she combined the doily and fabric.


I couldn't resist picking this pair of baby shoes...look at how pretty they are! Grey Luster Girl did a great job of creating these shoes with a non-babyish color palette.


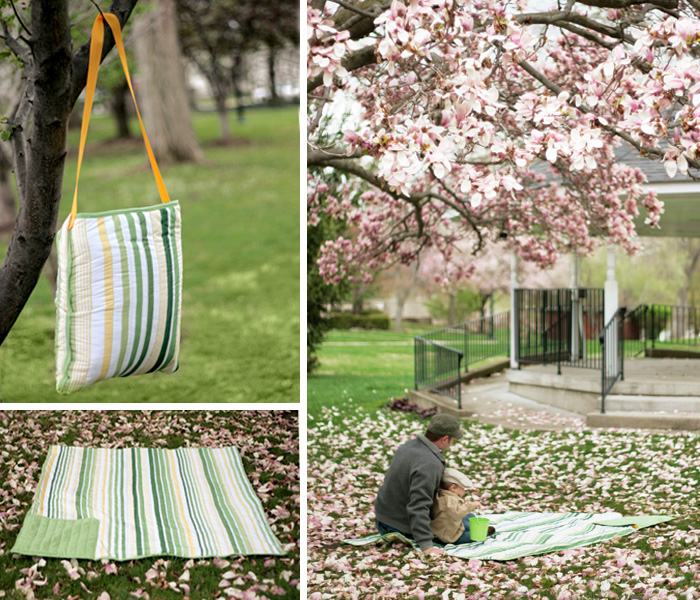
It is getting to the season to go to a park and have a picnic... Craft Buds shared a great project to make an all-in-one picnic blanket tote! Go to her blog to see how she did it, it will make a great gift too!


It is always so nice to see old furniture get new life! Our Daily Obsessions gave a fresh coat of paint to an outdated coffee table and made it look fabulous!


Great projects! Thank you everyone for linking to my party. Have a great week!

Friday, May 6, 2011

Guest Post by Design Shuffle

Hi Everyone! Today I have an exciting guest post by Design Shuffle. You can find great inspiration for interior design and decorating. I love their site. Enjoy the post!

Not many are blessed with the creative prowess and the entrepreneurial skills of domestic celebrity, Martha Stewart. With an unabashed passion for domestic living, or what she terms as “home-keeping,” Stewart has made a multi-million dollar empire out of offering practical and beautiful home solutions to the American public. Her home decorating ideas are legendary and just what one requires to live a design savvy existence. Listed below are some of the best Martha Stewart how-tos. The best thing about these interior design ideas are that they are easy and affordable.

How To Make A Bookcase Armoire:

This rather ingenious DIY involves converting two store-bought bookcases into a charming armoire with a hidden desk. The trick is to purchase a bookcase with shelves and to ensure that the bookcase is not more than 5 feet tall.

Tools required:

2 bookcases with adjustable shelves
Rectangular piece of wood and pegboard
Four 1-by-2-inch boards (for pegboard frame):
Hacksaw or jigsaw with a metal blade
2 piano hinges, 5/8-inch screws, Glass-bead or other molding, 3-D 1-inch finish nails, 5 Plexiglas guard 3/4-inch screws and two 3-inch L brackets.

Instructions:
The first step involves painting the bookcases, the desk extension piece, the pegboard, and the 1-by-2-inch boards and then cutting a piano hinge to height of bookcases.

The next step involves attaching the two bookcases together and placing a hinge between them, and connecting them by inserting the 5/8-inch screws (or included screws) to the predrill holes.

After this, work on the desk extension and position the shelf in the bookcase and secure it to the back panel with screws that are 3/4-inch longer than the thickness of the back panel. Then secure the Plexiglas guards by creating two rows of U-shaped molding that will run along sides and bottom of Plexiglas. On the top shelf, place one shelf-long piece of molding about an inch from the front edge of the shelf and place one 2 1/2-inch piece of molding vertically and secure to bookcase. Repeat this procedure for the three middle shelves as well.

After this, attach the pegboard on top of the rectangular frame and fit the pegboard against the panel behind the desk. Then proceed by closing the bookcase and install a draw-bolt latch or flush-mount lock outside the armoire. For attaching castors, you need to lay the bookcases on the floor and secure the casters about 2 inches from the corners.

The last step involves fixing the desk side of bookcase to a wall, but this is optional. After marking the location of each L bracket on the wall, insert the wall anchors, and secure the bracket to wall with screws.

Read the full instructions here.


Ayosaka (via)


How to Fold a Fitted Sheet:

Sometimes the simplest tasks are the most complicated. Folding fitted sheets is no child’s play unless you are Martha Stewart; of course. Learn how to tackle this rather irksome problem by pointing your mouse here or reading below:

Hold the sheet by the two adjacent corners and make sure the sheet is inside out. Take your right hand towards your left, proceed to fold the corner in your right hand and pick up the corner that is hanging in front and fold it over the two corners in your left hand.

Then bring the remaining corner up and fold it over the other. Make sure that the right side is showing and that it envelops the other corners. Then put the folded sheet on a flat surface and straighten it and then fold your fitted sheet into a rectangle.

Martha Stewart (via)


How To Make A Suspended Shelf:


Bursting with some great bedroom design ideas but cannot decide what kind of shelves to go for? Well, no one can beat the domestic super-achiever when it comes to DIY projects, be it living room ideas, kitchen design ideas, or any other design projects.

The Space-Saving Suspended Shelf makes a spectacularly dramatic statement with its clever design and exquisite form. The shelf gives an illusion of floating in air and is not too hard to make either. To get the full set of instructions, head over here or catch the summary below.

Tools & Materials
Drill
Floating shelf
Four 2-inch loop hooks
Plumb bob
Screw anchors
Decorative chain

Begin by drilling holes in the shelf’s two outer corners, one inch in from both edges. Then proceed by screwing the hooks into each hole. When attaching the shelf to the wall, ensure you are following the manufacturer's instructions.

For accurate measurements, dangle a plumb bob from the ceiling till the tip touches the loop hooks in the shelf and mark the ceiling. Then, drill holes for screw anchors and screw in the two remaining hooks.

After this, measure the distance from ceiling hooks to shelf hooks and purchase two identical chains that fit. Then, hang the chains between each pair of hooks and voila you have pulled a Houdini all by yourself!

Martha Stewart (via)


Tanya is a writer for Design Shuffle, where you can find top tier interior design ideas from around the world – from New York Interior Designers, to Los Angeles Interior Designers, and more. (They’re a fabulous website geared towards promoting interior designers and their work.) Check out the latest at Design Shuffle!

Wednesday, May 4, 2011

Link Party No. 52!

I wrote a post about my motto this year; "keep calm and move on". Along with that, I have another one I have been trying to live by; "Learn new things".
It doesn't matter what it is, new recipe, new tricks in sewing and quilting, AND, the most challenging one for me is to learn new technology.

I have been using the same camera for about eight years, and I felt that it has been limiting me. I have been saving up to buy a new and better camera for a while. Not just for my blogging, I wanted to take better pictures of my never sit still kiddos. They are always on the go, and most of the time, those are the times I can capture their personalities and the precious moments.

I bought the new camera just before the earthquake and with all that was happening I didn't have time to really study and play with it. Last week I finally started using it here and there. I still feel comfortable with my old one, but I figured I have to start somewhere.
Meet my new Nikon D3100.


It is not the top notch camera, but for me it is a HUGE jump. I still don't know what I am doing, but I am slowly learning. I hope I will be a pro in a few months and post better pictures to share with you.

That is my ongoing project that I am sharing with you this link party. :)

1. Please post something YOU made. It doesn't matter if it is crochet, quilt, clothing, anything would be fine. I want to see it! If you use someone's idea or patterns please give them the rightful credit.

2. Link to your specific post, that way it is easier for everybody to find and read it.

3. Please grab the "Tea Rose Home" grab button, and link back from your post. If you can mention the party in your post or place the button on your side bar, that would be great! I want more people to have a chance to come and show off their creation.


Ok, it is your turn to share your project with us!

Monday, May 2, 2011

Same Quilts, Different Personalities


I did it. I finally finished them. I pieced those quilts for my boys years ago, and they were in the drawer patiently waiting to be quilted... I have been in the mood for getting my hands on some unfinished projects, and these were one of them.

I am not really good at machine quilting yet and I didn't want to do tiny hand stitches on those quilts. Seriously, I know the boys will be making fortresses with them, drag each other on the quilts, eat with them; I wasn't going to spend hours and hours of my time.

I decided to hand quilt, but not with tiny stitches. I was inspired by some quilts in the book Material Obsession... I decided to hand quilt with big stitches (in the book, Kathy recommend to use perle cotton No.8 for this style of quilting).
It went fast, and I was able to finish both quilts in a couple weeks!

They are the same quilts, so I decided to do different quilting designs on them to make it easier for the boys to know which one is who's.

For Christopher, I did random circles...


For Michael, I did a cross pattern with quilting on the edges of the rectangles...


It is so interesting to see that the difference in quilting design gave a different feel to each quilt.
People often ask me if my boys are twins(they are two years apart), because they look alike; although, their personality is so different from one another.
Just like this quilt...they look alike, but they have thier own charactor. I think they fit perfectly for them.


They are trying out their new quilts. Don’t they look like a couple birds on a telephone wire? :)

Sunday, May 1, 2011

Link Love No.51!

Over the weekend, our family watched "The Karate Kid"; the one from 80s' and the one that was made a couple years ago. My boys watched the recent one first then, the old version. They LOVE the new version, but when they saw that old one, they were totally into it. Growing up I watched all four of them, and oh how I wished I could do karate and Kung Fu...

Well I guess apples don't fall far from the tree, after watching the old version, my kids were practicing the famous one legged kick, and also, trying to "heal" each other with special hand power used by Miyagi-san in the movie. They were rubbing their hands while walking around the house. Yep, that is one of the parts of my life, when I am not dealing with ruffly, girly stuff. I deal with karate kids and it is fun. :)

I had a hard time picking my favorite five this week! There were so many great links you guys!

Ok, the first one is shared by Two Shade of Pink. She created a very interesting Nest Centerpiece. I love this because of the uniqueness and it is so personal and beautiful.


This Foxy Pillow caught my eye...and I LOVE it! EmmylouBeeDoo created this stylish and fresh looking pillow. I would love to create many of those with different animals for my kids’ room. Wouldn't that be fun?


This is one of the great examples of what Mod Podge can do. The V Spot made over an old chair (her dog had been biting it too!) to a one of a kind beauty! Isn't it gorgeous?


Lemon Tree Creations shared this beauty at Kojo's knock off series, and I fell in love with it! Check out their blog for the great tutorial, and create your own. :)


Then... this one...I have to say, if she was my neighbor, I would be over all the time to just admire the chair. Janet over at The Empty Nest created this beautiful slip over for an old chair and made it in to a gem.


Thank you all for sharing your talents at my party. I hope you will all have a great week!
Blog Widget by LinkWithin