


I have never met her in person but through many emails, she has become one of my blogger friends that I can't wait to meet in person someday. :) She has a fun tutorial to share with you today, get cozy and enjoy!
Hi Tea Rose Home readers! Jessica here from Me Sew Crazy & SewSet. When Sachiko asked if I wanted to do a guest post on her blog while she was in Japan, I was honored. I have been a follower and a fan for a very long time now, and feel blessed to have become friends with the lovely Sachiko along the way. I jumped up and down with excitement for her when I heard she had booked a trip home!
For those of you who know my little place in blogland, I like to make Spring & Fall Collections for my children every year. Its just a little something that gives me joy, beefing up their handmade wardrobe while sharing with you the patterns and tutorials for them!
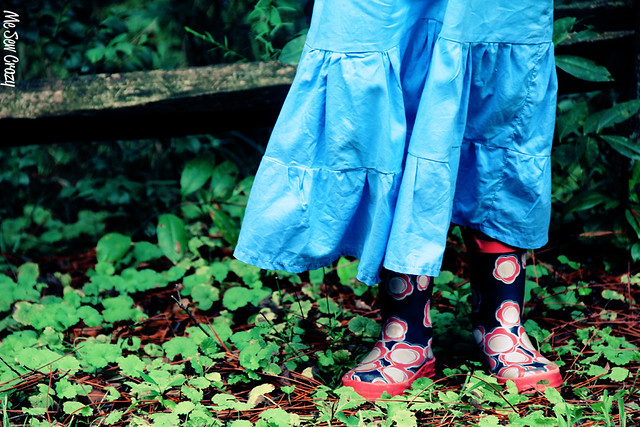
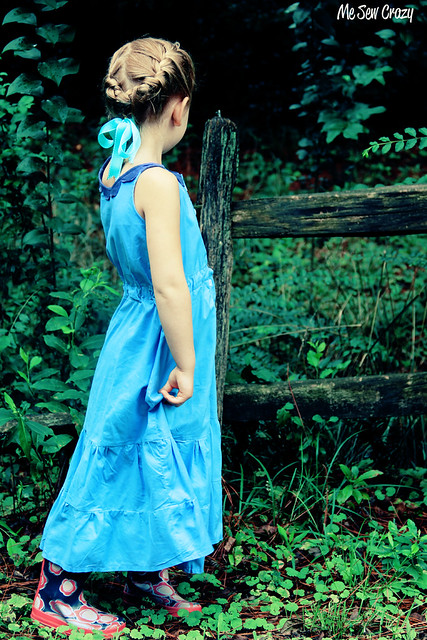
We are currently in the middle of going through my Fall Collection, and I decided to share the Petal Maxi with you...

Something about it is just so lovely, and it seemed like a natural fit for Tea Rose Home.

I chose to make mine a little less than floor length, because I worry about Chloe tripping and falling as she runs around (I have a very active daughter). But to make it an absolute full length maxi - simply add another ruffle on top of what the pattern instructs.

Let's get started, first off you will need to print the pattern pieces for the dress. Size 5/6 is offered for free at the end of this post.
You will also need about 2 yards of fabric, buttons, scrap knit for the petal neckline, and your other basic sewing essentials. A serger is not necessary for this pattern, but as with all sewing projects, you will want to finish your edges with either a zig zag stitch, pinking sheeres, or your method of choice to cut down on fraying.
Once you have your pattern printed & your fabric cut, simply...
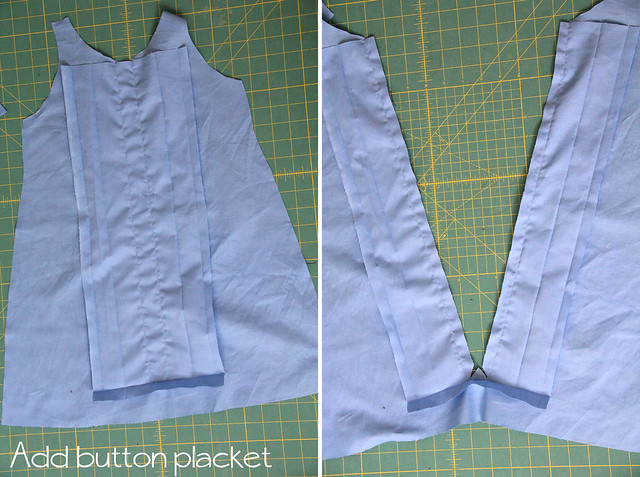
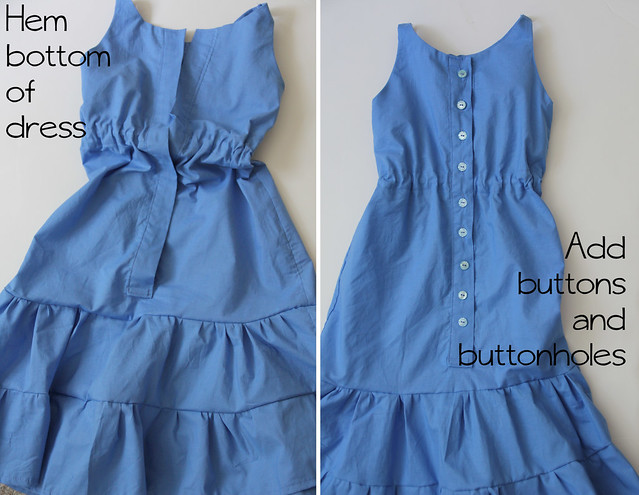
To add your button placket along the front center of the dress, I always use the same tutorial found HERE by Made by Rae. It is easy to follow, and will have you adding button plackets to everything once you master the skill!
When adding the placket and doing the final finished stitches to secure in place. Only sew HALF WAY up from the bottom. That is 2" below the waistline mark in the pattern. Repeat this for both sides of the dress on the placket.

Secure bottom of button placket to dress, as Rae's tutorial suggests.
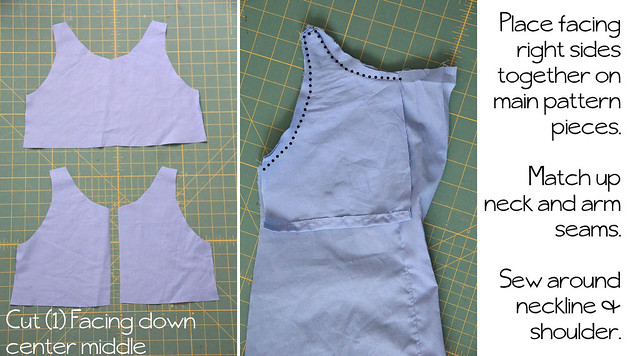
Secure the facing to the top of each dress piece.
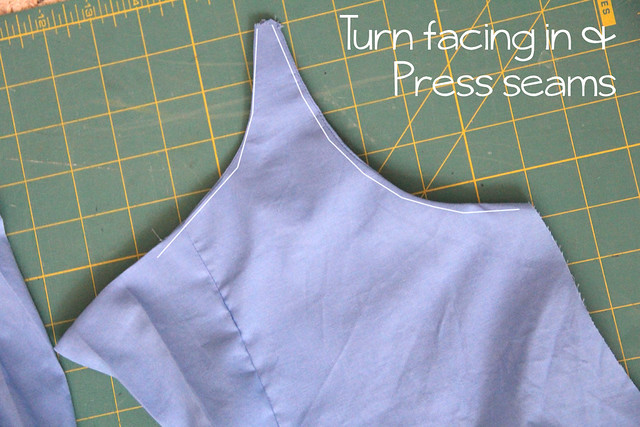
Turn towards inside lining, press and edge stitch around neckline and arm for each piece. Notice how your facing goes over your button placket about 1/2" - that is good!
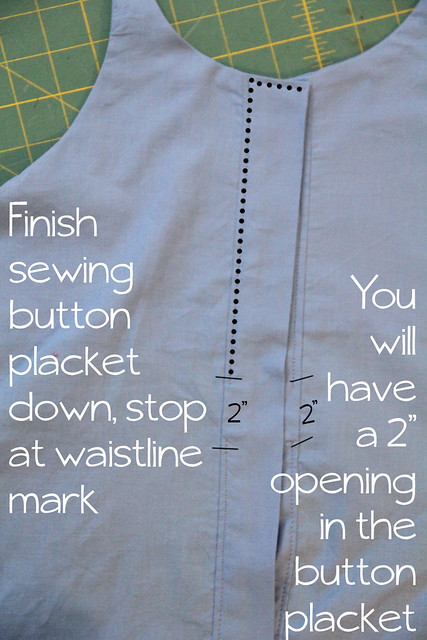
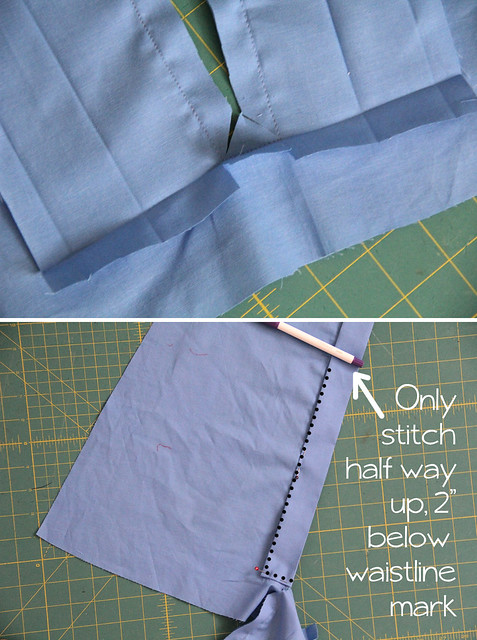
We can finish off the button placket now that the facing is in place. Sew down the top half, stopping at the waistline mark! This will leave you with a 2" opening. Repeat for both sides.
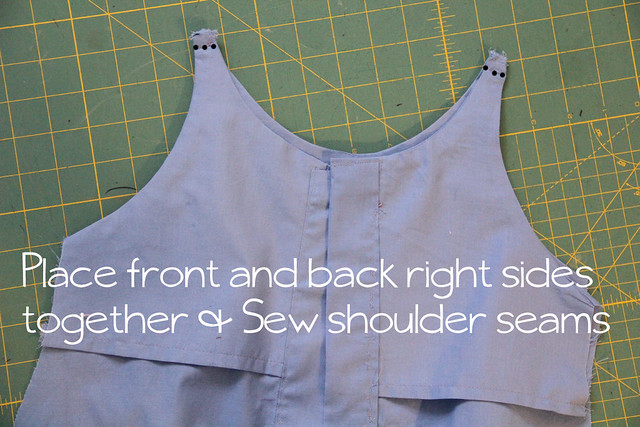
You will want to finish the shoulder seams. I also chose to press them towards the back and top stitch down to secure in place.

Now we will be sewing the side seams in place. You will want to match up all side seams right sides together, including the facing! With dress wrong side out, simply flip up your facing so that they match raw sides together, the center armhole seam should match up and then it continues down to the dress side seam. Sew together and repeat for other side.
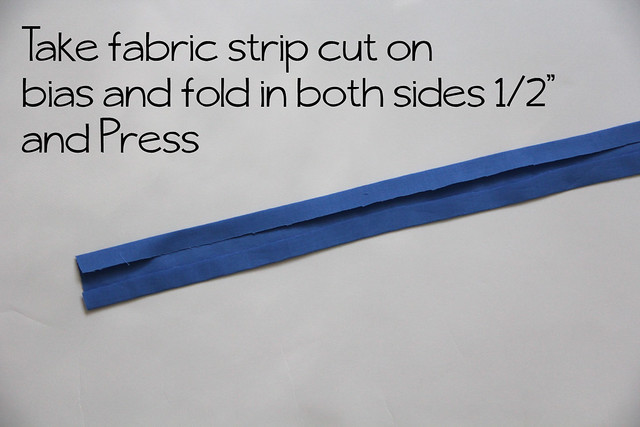
Initially I said in the photo to cut the fabric strip on the bias. Upon further evaluation it is really not necessary. Just follow along with a 2" fabric strip, turning it into what looks like bias tape.

Do this with the bias strip right side up, so that the turned edges are facing your dress.
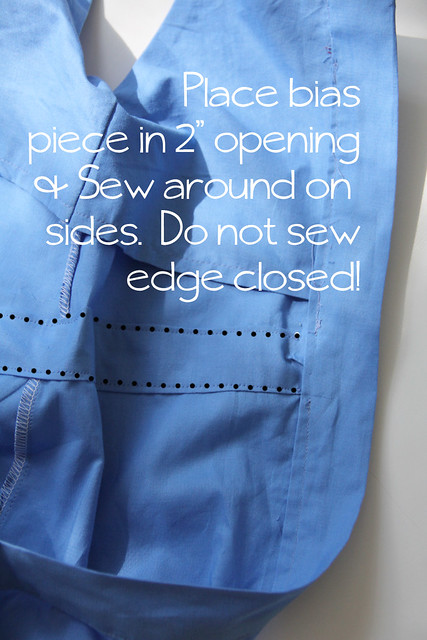
This will leave you with an open edge on both sides, underneath the unsewn portion of the button placket.

You now have a nice cinched waistline.

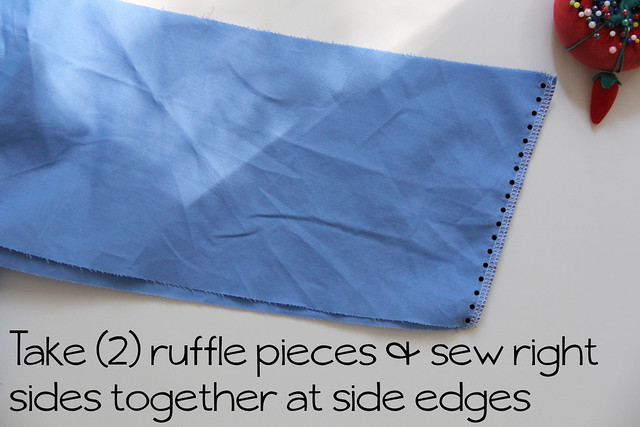
Repeat for other side edge, as well as the remaining ruffle pieces.
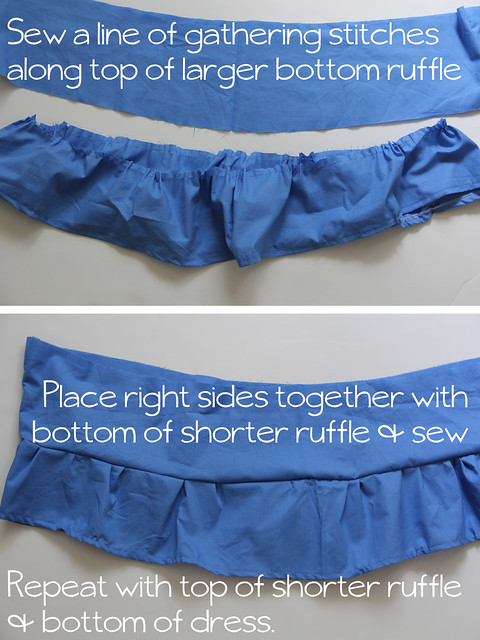
Again, if making this a full length maxi (to the floor), add another set of ruffles even longer than the bottom set! I would do approximately 60" in length (same width) each to give it a really nice full effect.
I was initially done with the dress at this point! But then it looked a little plain to me because I had chosen to do it in a solid color. And here is where the maxi earned its name, the petal dress...
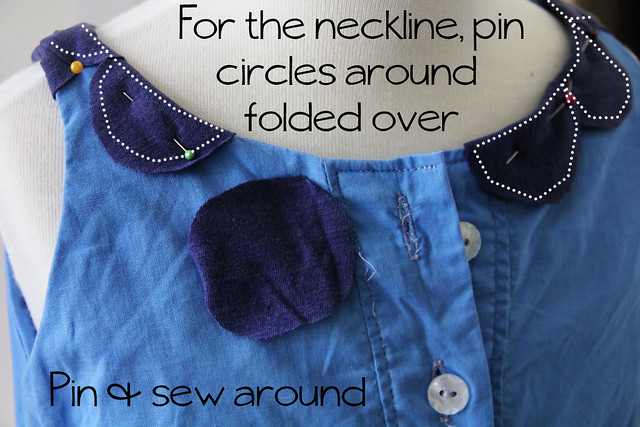
I kept the dress form in front of me one night and started playing with little knit circles. Pinning them around the dress as spots, turning them into flowers. You name it, I tried it. Until I finally started placing them around the neckline as such, and loved how it looked. So by simply stitching around the knit circles on the neckline, the dress suddenly had a beautiful scalloped collar. I love it!

And there you have it, the Petal Maxi - part of Me Sew Crazy's Fall Collection.
I hope you will stop by and say hello sometime, we would love to have you in our neck of the woods!
And be sure to check out my latest endeavor, SewSet! SewSet is a new on-line sewing pattern and tutorial search engine! Where independent designers can upload photos of their patterns & tutorials freely, and users can search and be found. See what you like, save what you love, sew what you need. With over 900 patterns in the directory and counting, you are sure to find exactly what you are looking for!

As promised, the pattern pieces for the petal maxi can be found here:
Petal Maxi Dress Pattern
Thanks so much for having me Sachiko, and ENJOY your vacation!!! Can't wait to see pictures!
Until next time...Happy Sewing!

Isn't her tutorial well explained and easy to follow? Thank you so much Jessica for sharing your talent!


Thank you so much for having me Sachiko! It is an honor to be on your site.
ReplyDeleteHave fun in Japan!
- Jess
It is a cute pattern. I think the ruffles could be done a little neater. The ruffles on the sample and tutorial look sloppy and unprofessional, if you ask me.
ReplyDeleteWow you have some nerve. Do you know how much time and talent it takes to create a tutorial and digitize a pattern? It's HOURS of work. Like 10-20 hours. When someone does all that work and shares their intellectual property with you, FOR FREE, you say thank you or nothing at all.
DeleteFunny thing is...nobody asked Ginger. I love this pattern, and the tutorial is very well put together and simple.
Deletevery lovely, Great tutorial!!!
ReplyDeletexoxo
Titti, with hand, with love
Such a pretty dress! And your daughter's hair looks gorgeous too! Thanks for sharing, I always love your new wardrobe series.
ReplyDeleteI like the waistband -- fun to sew and very pretty!
ReplyDeleteWow! Thank you for this and the pattern! So generous of you. It's beautiful!
ReplyDeleteThis is super darling Jessica!! I love that little circle collar - you always come up with the most creative ways to do things!
ReplyDeleteOh this is such a pretty dress! Thanks Jessica!!
ReplyDeleteLoved the dress. I am a little curious about what fabric you used, it has a nice sheen in the photos. Also wanted to say praying for Sachiko and her family's welfare through the typhoon in that area right now- hope everyone is battened in tight and enjoying some close knit time while you wait it out.
ReplyDeleteSuch a cute dress, Jessica! If only I had a daughter! oh, well...maybe my son won't mind hehehe
ReplyDeleteSuch a cute dress, Jessica! If only I had a daughter! oh, well...maybe my son won't mind hehehe
ReplyDeleteThanks Alida L. for your comment to support Jessica's amazing post. I totally agree with what you said. I just recieved a mean comment on a very old post and it turned my stomach. It's unfortunate that some people don't live by the saying: If you don't have anything nice to say, don't say anything at all.
ReplyDeleteBeautiful!! Love the way you added the elastic on the inside. :)
ReplyDeletevery nice site love your jewelry and baby items soo cute
ReplyDeleteBeautiful dress and beautiful little girl! Her hairstyle looks so perfect with that dress. Perfect combination!! You put a lot of time and effort into providing us a pattern and tutorial for this lovely dress and we really appreciate it. As for the comment that it could have been neater, first of all, RUDE. In addition, I always say my creations might not be absolutely perfect, but if they were, they would look like they were factory made!
ReplyDeleteI linked to this tut on my latest post, I hope it doesn't hurts you :)
ReplyDeleteMammaNene
SergerPepper.blogspot.it