Wednesday, August 29, 2012

Link Party No.82! / Candy bar leigh

I can't believe it is already the end of August. You know what that means right? Monthly link party at Tea Rose Home! It has slowed down by a lot since I switched from weekly to a monthly link party, but I still enjoy looking at your creations. It is fun to have you guys over my place and I hope you feel the same way.

Before we start, I have something small to share...

I had a birthday party for my little girl, and I thought about what to do with party favors. I have three kids ages 11, 9, and 7... a total of 27 birthday parties! I was starting to feel like the party favors were getting boring. I usually get candy with some small toys from the dollar stores and such. The kids used to LOVED them, but now they are getting older, they are not that excited about those small toys.

Besides, this time Rachel invited 16 kids to her party (including her brothers...but still), even if I spent $1 for each child, it is a lot for a party favor for my taste.

Then, I had an idea... make a "Candy bar leigh".

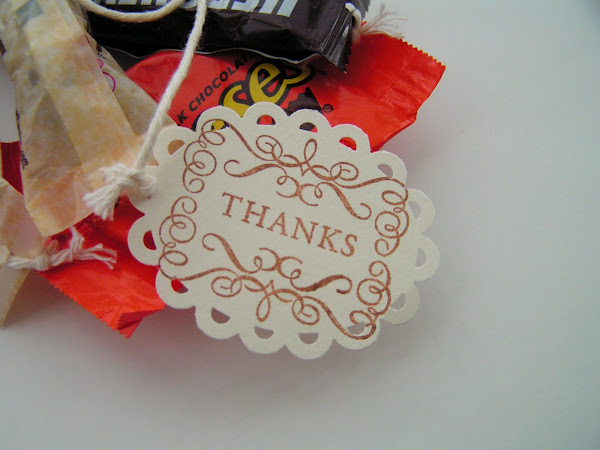
I found a big bag of candy bars at Target for less than 9 dollars. I used a hole puncher to make holes on both sides of the candy, then, tied them with cotton yarn that I already had. I think it would have been much prettier if I used a thin sheer ribbon between the candies, but Oh well. :) and, we didn't forget to "thank" the friends who came to the party.

It was a hit! The kids were really excited about the candy leigh, even my 11 and 9 year olds.

It is now your turn to share whatever you have been creating.  Do you have any craft ideas we can do with our kids?  Very tasty summer recipes?   Well, lets start the party! 
Ok everyone, I bet you have some projects you would love to share.  I am excited to see what you have been working on!

1. Please post something YOU made. It doesn't matter if it is crochet, quilt, clothing, anything would be fine. I want to see it! If you use someone's idea or patterns please give them the rightful credit.

2. Link to your specific post, that way it is easier for everybody to find and read it.

3. Please grab the "Tea Rose Home" grab button, and link back from your post. If you can mention the party in your post or place the button on your side bar, that would be great! I want more people to have a chance to come and show off their creation.


Monday, August 27, 2012

Review: DownEast Home & Clothing

I was asked to do a review for DownEast Home & Clothing, and I am so excited to share this post with you today!

They have been one of my favorite "GOTO" stores for the last few years for their fairly priced, fashionable modest clothing. Did you know that I created the "Ruffle Shirt"from their wonder tees? Their stores are located throughout Utah and Idaho, and I am so glad that I have some stores that are within driving distance from my home! I packed my camera, and headed over to one of the stores last week.

Every time I visit the store, I find several furniture pieces that catch my eye. This day wasn't an exception either... I will share some of my favorites.


I love the colors of these pots. The way they were displayed was pure genius. The shelf caught my eye immediately.

I love the details on the door. Simply beautiful...

I have a weakness for little chairs...

I have been eyeing this chest with lots of drawers. It would be so awesome to have something like this for my sewing room to organize stuff.

This iron union jack table literally took my breath away... and followed by three words, I WANT IT!

Because there are so many beautiful things, I had a hard time getting over to the clothing section. I ended up spending a long time there as well, there is so much eye candy, all over the place, I mean on the wall, racks, display tables... sigh...

Redwood or amber green?

Feminine lacy top or casual border sweater?

Their girls collection is very fun too...

I like this mother & daughter coordination. It is not exactly the same, but there is a link with colors and style. Such a cute dress for a little girl!

I picked some of my favorite accessories for little girls and took pictures. :)

Are you curious what I end up getting that day?

After going back and forth for some time, I found the dresses on the sales rack that I have been eyeing forever!! I had to claim them as mine. :)

I love the simplicity of these dresses, and I was thinking about fall as well. With different types of accessories, I can wear them in so many different ways. For example... purple shoes & scarf? or boots with wide belt and necklace? I mean, I will have so much fun with these dresses this fall & winter.


In fact... I have already started enjoying them. One of the ways to have fun with these dresses for me is to wear it with a petticoat. I think it gives a different look to the dress.


You can connect with DownEast Home & Clothing through Facebook and Twitter and get the latest and greatest scoop!

Thank you Kathy and Cammie for this review opportunity, I had so much fun!

Friday, August 24, 2012

Charm, Cabochon, and Beads

I have been working on a NEW TUTORIAL for a T-SHIRT REFASHION the last couple of days. I think I will be ready to share it by the end of next week. I am in love with this, and I hope you will be too. :)

In the meantime... I will share a couple of pictures of bracelets I have been working on. I am thinking about listing them in etsy before I get too attached to them.

I like this blacelet with random charms...

but I love this green cabachon bracelet acompanied with glass beads.

Which one is more your style? It is hard for me to say, but I guess it depends on what I am wearing that day.

I am gonna get ready for Rachel's birthday party tomorrow, so I am gonna get going. We will catch up later! :)

---------------------------------------------------------------

Note: Microsoft is having a special back to school sale! When you buy Microsoft Office today, you save 15%. Hurry, this promotion ends on 9/14.

Wednesday, August 22, 2012

Vitality Wins Progress


Hi all! I wrote about Vitalty Wins a while ago, and what I was going to do the next 8 weeks.

Vitality wins is a Total Health Game, including all the best strategies for losing weight and improving health. It is a game that you play by yourself or with your friends.

Have I lost weight so far...? Not really, but I am definitely more cautious about the choices I make. I am playing on level 2, which is an easier level. On this level, most of the things I need to be careful of are fairly easy to follow to earn points.

For example, some of the questions are like "Did you drink 56 ounce of water today?" or "Did you sleep for at least 6 hours last night?" They don't sound too hard right? But I am such a night owl, and if I am working on a project, I forget to go to bed and I end up with only 3 to 4 hours of sleep. I know that is not good for the body AT ALL! Since I started doing Vitality Wins, I make sure to get at least 6 hours of sleep each day.

Water intake is the same thing; I make more of an effort to drink plenty of water each day.

The thing that is hard for me the most is the "Exercise" category, because of my leg, I can't do much cardio workout. I think that is part of the reason why I am not losing weight. Although, to balance it out, I am paying more attention to what I eat.

I am actually a very good eater. I am not picky, and I LOVE fruits and veggies...


Tonight, I made some Japanese dishes that are very healthy, along with steamed chicken breast and cucumber tossed-salad with creamy sesame dressing. Mmmm it was very yummy.


I am so tempted to eat chocolate cake or something, but there is a new motivation why I want to not just to lose weight, but want to look my best.
What is the new motivation? Mwuhahaha....I am not telling you that on this post. A hint is "something very exciting for me". :) I will let you know what it is when the date gets close. Hehehe...

I am going to be my best behavior and keep playing the game. Thanks everybody for stopping by, see you at my next post!

Saturday, August 18, 2012

Hexagon Baby Quilt

My sister-in-law just had a baby girl; I wanted to make a special something to welcome the baby... So I made a quilt.

I don't have a half hex ruler, so I used a 60 degree ruler to cut fabrics for this quilt (don't ask me why I didn't write a tutorial for this... I wasn't thinking... I started the project in the middle of the night... who knows why). When I made a hexagon quilt in the past, it was with the traditional paper piecing method, but this is a quick and easy way to create a hexagon quilt.

After I was all done, I washed the quilt, and used the dryer to dry it. I love how shrinking the fabric helps to hide the imperfections of my machine quiling skill. :)

With the leftovers, I made a mini quilt, so the baby's big sister can have the same quilt to take care of her baby dolls.

I like the picture I took inside, but it wasn't showing the true color of the quilt.

I took some pictures outside; this is the real color of the quilt. I have so much to learn in many areas, but photography is one of the thing thats I want to get better at. Isn't it so tricky sometimes?

I am planning to send them soon. I hope the real mommy and the mini-mommy will love and enjoy the quilts.


Wednesday, August 15, 2012

Out to Sea DIY Blog Tour/ Tutorial~ Anchor Pillow

I shared the tutorial of the Narwhal pillow a couple weeks ago, and today, I am sharing the tutorial for the Anchor pillow.

I love the combination of gray and orange, it is so fresh and fun. When I was trying to finalize the design of the pillow, I really wanted to embellish it with something to emphasize the "ocean" theme. I found the shell buttons and the rope that are the exact same color as the gray fabric at Joann's. You don't know how excited I was! To start the project here are the supplies you will need:

Two fabrics for the front
One fabric for the back 15 1/2" x 23 1/2"
Thin quilt batting 15 1/2" x 23 1/2"
8 1/2" x 11" White fabric for the Anchor
8 1/2" x 11" Heat & Bond
Matching thread
DMC floss 347

Gray rope, 6 -- 3/8" shell button (optional)
16" x 24" pillow form or Poly fiber for stuffing

{How to}

1. NOTE: The pillow form I used is 16" X 24". I wanted the pillow to look "full" instead of kind of fluffy, so I cut the fabric slightly smaller. If you like the fluffy look, you can add 1/2" to the measurements.

Cut fabrics.
From gray anchor fabric, cut 1 -- 14 1/4" X 15 1/2"
From White & orange strip, cut 1 -- 9" x 15" 1/2"
Put one of the 15 1/2" edges of both fabrics together on the right side of the fabric and sew them. Lay the seam towards the strip fabric and press with an iron. Set it aside.

2. Make the anchor applique ready. First, download the anchor pattern. Follow the instructions from the manufacturer and fuse the Heat & Bond on the back of the white fabric. Trace the pattern on the white fabric+Heat and bond. Use light box if available, if not taping the pattern and fabric to the window makes this process easier.

3. Cut out the anchor and decide where you want it on the gray fabric. I recommend to place the Anchor slightly off to the right side, because once the pillow form is in, the side of the pillow will puff up and the anchor will look closer to the left rather than the center. Once you have decided the place, peel off the paper from the back of the applique piece, lay it flat on the fabric, and press with an iron.

4. Zigzag around it...

5. Stich 1/4" out around the anchor with 6 strands of DMC floss. Then, top stitch 1/8" from the seam on the strip fabric, and sew 3/4" from the first stitch. Sew the buttons between these stitches.

6. Put the front and the back fabric of the pillow right sides together. Leaving the 5" opening in the bottom, sew around it. Snip the corners for a clean finish, turn the fabric inside out. Press with an iron.

7. Insert the pillow form or stuff it with poly fiber, close the opening using slip stitch. Tie the rope on the pillow, if you know some fancy way to tie it, go for it! :)

I had so much fun working with these fabrics! In fact, because of that I had several project ideas pop in my head that I want to try. Mmmm... My experience with Sarah's new fabric line was fantastic. Remember, there are many others sharing awesome projects at the DIY blog tour. Go check out other fabrics from her new line and set sail for a sewing adventure!

Monday, August 13, 2012

Back to School Shopping Tips

School is starting in less than a month now... I remember seeing a commercial on TV. The father is doing the back-to-school shopping and pushing the cart HAPPILY (not to mention the sad-looking children following him). In the background there was a song--"It's the Most Wonderful Time of the Year!" That commercial gave me a chuckle, but is it really the 'most wonderful time' of the year?

Now that all of my children are in school, I have three separate supply lists that I need to keep track of. I consider myself a savvy shopper--if I am not organized enough, back-to-school shopping can be a frustratingly annoying experience. Forget about wonderful time of the year!

Luckily, because my children wear uniforms, the clothes shopping is simple and easy for me. I will share the few things I do when organizing the school supply shopping, so it is less stressful.

1. Organize the shopping list. When all three of them are in different grades, the things on the lists are slightly different, although, there are some things that are the same too. I make two separate lists--one that has all the common items from each child’s supply list and write down the numbers (for example 1" binder---3). Then, in the other list, I list all the other items from each child’s supply list. After the shopping is done I can divide them up into each of their backpacks as I scratch off of their individual supply sheets.

2. Gather information. I gather ads from all the local stores and see who sells what at what price. I do comparison shopping, but if store A has most of the item on the list for cheap, and store B has one item much cheaper, but only saves me a few pennies, I just stick with store A. Sometimes saving a few pennies isn't worth my time, when I think about all the hustle and stress. Talking to other moms is a great way to know the deals too.

3. Go shopping. If you are able, go WITHOUT your children! For me it makes a world of difference. In my case, my husband loves to spend time with the kids after he gets home from work, so I can just hop out and do the shopping without someone constantly talking to me, needing to go to the bathroom, and so on. I can focus better and the shopping goes by much quicker. If that is not an option, trading with other moms to watch the children might be something you can do.

One of the items that I am looking into getting is Microsoft Office 2010. They have been using computers at school more and more each year. Since my oldest is going into the 6th grade, I think it is a great idea that he is able to do more of his work at home on the computer.

Because I am not tech savvy, I really appreciate software that is easy to use and makes my life easier. Microsoft Office 2010 Word, Excel, PowerPoint and OneNote offer features that help kids collaborate on projects, take dynamic notes and give rich presentations, this year and beyond.

Guess what? Microsoft has a special offer for Tea Rose Home readers! When you buy Office today, you save 15%. Hurry, this promotion ends on 9/14.

I hope some of the back-to-school shopping tips and the 15% off will make your life a little bit easier. Happy shopping!

Be sure to visit Microsoft Office 2010's brand page on BlogHer.com where you can read other bloggers’ posts!

Friday, August 10, 2012

17 and Counting

NO, not what you think, I am not having a 17th baby.


Picture by Rusty Bucket Photography
17 years ago today, Mr. TRH and I got married. You name it, we have been through a lot together... loss of jobs and many medical procedures are the big ones.

The beginning of our marriage was especially hard, mainly, because I just moved from Japan, and didn't speak much English and I was still trying to adjust to life here. He was always there for me, helped and guided me through everything with a tremendous amount of patience and... humor. :)

He kept his promise he made to me 17 years ago… to make me smile every day of my life if I marry him. He would crack a joke or two, or in his quirky way he always manages to make me laugh every single day. I think that is pretty amazing! To me, that is more important than money (it doesn't hurt to have tons but, that is just icing on the cake), or anything else the world has to offer.

Between us, a noisy household with three awesome kids, our faith, and lots of love I think we have a great life.

So, Mr. TRH...

Thank you so much for being there for me, always, always. You are a terrific husband, father and best of all- my best friend.

Thank you for supporting me and encouraging me with whatever I want to do...

When we are gray and old, our grandchildren will see our affection towards each other and might think we are "cute" or "gross". Either way, I can totally picture you giggling because of their reaction.

It is an old saying, but I am going to tell you today:

Grow old with me; the best is yet to come.

Happy Anniversary

Love,

Sachiko

Monday, August 6, 2012

Sweet Escape


I LOVE fruit and vegetables. I just went through my kitchen and realized that I had so many choices of fruit to eat. So, I made a little tray, things like this make me really happy. There were kiwis, grapefruits, apples, bananas, and watermelon that I didn't put on the plate.

Aren't they so pretty sitting together on the plate?

By the way, I have been keeping myself really busy last week by sewing a lot;

I made...

8 baby blankets, 9 bibs

Fixed ...

4 of my clothing

Altered...

5 boys pants with holes in to shorts

They were the kind of sewing projects that needed to be done, and I feel so good having them squared away. There are a few refashioning ideas that I have been kneading in my head for a while, I am hoping to do more creative sewing between all the things going on this week.

So, while I am enjoying the plate of fruit in peace and quiet (which is rare in my household... I mean not the plate of fruit, the peace and quiet. LOL), I am going to
plan out this week.

I hope you are having a wonderful summer, I will see you at the next post.

Friday, August 3, 2012

Fabric Play

Last week, I shared my tutorial for the Narwhal Pillow I did for Sarah's booth. I have one more tutorial that I am going to share soon, but before that let's sidetrack a little...

After I made those two pillows I had some scraps... (grin).


If you have been reading my blog long enough, you would know that I am the type of person that doesn't (can't!) throw away even the scraps of scraps. Looking at the scraps from Out to Sea, I had some ideas that I had to make. There are no tutorials for those, but I wanted to share some pictures with you!

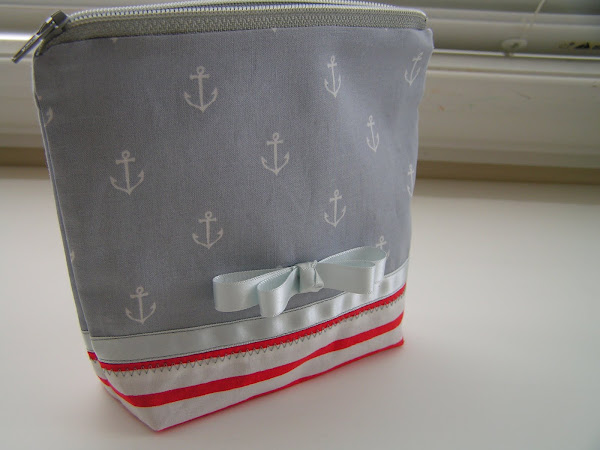
First, a pouch… I love the combinations! I thought this would be perfect to organize things in my purse or, better yet, I might add a strap, and make it into Rachel's crossbody bag.


Speaking of Rachel, I had to make some hair accessories for her...

A hair clip,

Also a headband. She wore it with a light gray ruffle shirt the other day, and it was perfect!


One of the ways to utilize the "scrap of scrap" is to make fabric covered buttons. I made mine into a ring and framed it with small gray pearls. :)


Fabric covered buttons are really useful. I also made a beach-y necklace in Tea Rose Home style.


The last one wasn't made out of scraps. Sarah was generous enough to spare some of this fabric for me because I had this idea.


In case you are wondering how I made these fabric beads... there is a tutorial I did to make a bracelet with the same technique, it is really simple and easy.

I am pretty much all done using the scraps from Out to Sea. It is so much fun to think of what I can do with a limited amount of fabric. No plan, no pattern, and no pain. It is simply playing with fabrics and going with the flow. Do you think you wanna give it a try?
Blog Widget by LinkWithin