My network is having an issue that started last night and I can't add new pictures to my computer... I thought OH NO! I can't write a post tonight!
Then, I realized I had more pictures I haven’t shared with you all and they were already transferred in to my computer. Whew... Thank goodness!
By the way, my sewing machine is safely (and in much better condition) home! I moped about not having my machine in my posts, but I have been busy with other things last weekend, and didn't have a chance to sew.
While my sewing machine was away, I made several jewelries and this post is about one of the necklaces I made.
I don't exactly know what to call these beads, but there is plastic part inside, and crochet around it. I really like the look of it and wanted to make a necklace for a while. Here is what I came up with:
I think the necklace has a whimsical charm to it because of the crochet beads. I wasn't sure if I wanted to tie the lace or not, so I am going to give it a try with lace for a while. What do you think? With? Without?
Monday, February 28, 2011
Saturday, February 26, 2011
Link Love No.43!
I have been quite busy this weekend, and don't have any projects to share. Sorry!
I enjoyed going through the links though...
Here are this week’s link loves.
Cottage Hill shared a tutorial on how to make the perfect silhouettes. I love the silhouettes she created, because they are so detailed and pretty! I meant to work on this project and wall art for my family, but now I REALLY want to do this!
Isn't this adorable? Actually, my little girl saw this picture and fell in love with it, so it is almost like she chose this one as a part of link love. wondrlanding does amazing work, with her crochet skill. Thank you for sharing!
I was at the Anthropology website the other day looking at the necklace Flamingo toes used for this project as an inspiration piece. How unique and interesting! It is so fun to look at each charm on the necklace, oh, I wish I could find some of the pieces! Great job!
The next two projects were from one blog called Polka-Dot Umbrella. Looks like there are 6 contributors to this blog, Monday through Saturday (that is a nice way to do blogging too isn't it? How fun!). The first one is a Baby Quilt. She found this idea at A Pretty Cool Life. I love how Erica added some clouds to make it more personal.
The next one was posted by Carlee, it is a diaper changing pad made out of table cloth she bought for a dollar! I love the print on the fabric, and how compact you can fold it. Very stylish! If I had a little bum that needed to be changed, I would be doing so on this pad. :)
Great work every one! I hope you will have a nice Sunday, see you at my next post.
Wednesday, February 23, 2011
Link party NO. 43 and a New Necklace
In my last post, I used a picture of my Honey Bun Cake. I wrote the post sometime last year, but of course if you are new to Tea Rose Home, you wouldn't know it! Several of you wanted the recipe for the cake (maybe I should have a category for recipes so it's easier for you to find my other recipes too... what do you think?)
Just click here and it will take you right to the post.
It's been a while since I had my sewing machine, I will introduce you to one of the jewelries I have made...
I have been making other jewelries, and they are shorter than this one (more posts to come soon). It is nice to have a variety.
All the flowers are made out of scraps from skirts and such that I had to hem. I kept them for things like this. I really don't like to buy fabrics for small projects such as this. It made me happy that I got to give them new life. :)
Ok everyone; it is time for you to show us your projects. I can't wait to see them!
Here are the rules:
1. Please post something YOU made. It doesn't matter if it is crochet, quilt, clothing, anything would be fine. I want to see it! If you use someone's idea or patterns please give them the rightful credit.
2. Link to your specific post, that way it is easier for everybody to find and read it.
3. Please grab the "Tea Rose Home" grab button, and link back from your post. If you can mention the party in your post or place the button on your side bar, that would be great! I want more people to have a chance to come and show off their creation.
Thank you for your participation, and making this link party successful and fun!
Monday, February 21, 2011
I must have been tired...
Perhaps, I might need more sugar... I will tell you why I think that way in a minute.
Hi all! How was your three day weekend (I guess that's US only)? I had a pretty laid back nice time with my family. Except that I had a few things that are due in a couple weeks, so I took some time to work on them. OH, you would be so proud of me... I was working my tail off to make progress on them.
Usually I am such a short sleeper (and deep sleeper too), and sleep about 5 to 6 hours and I am fine. I can totally function during the day. Last night, I was watching TV with Rachel, and KIND of fell asleep. The next thing I heard was my husband talking to kids and putting them to bed.
Then, he came to me to see if I was ok and he started to tuck me in and I remember saying to him, "I am just pretending to sleep, so the kid will go to bed too. I will get up soon, let’s watch a movie."
Then, when I woke up, it was 9:00 in the morning....
I asked my husband what happened and here is his story.
“After I tucked you in, I went to see the kids off and do last minute conversations. When I came back 10 minutes later, you were snoring. So, I just let you sleep.”
Ugh! I feel like I wasted a night. I can't believe I slept close to 12 hours! That will only happen once or twice a year.
All I can say is; I must have been tired...
Saturday, February 19, 2011
Link Love No.42
It's time for the link love! I am always amazed at what people come up with and create. When you think of all the ideas that are out there, there is always something new.
Are you all ready to see this week’s link love?
Check this out! I totally fell in love with this Owl Pin Cushion by Nette. This is so unique and cute, I need something like this!
Artflly Aterlier Caroline made this amazing purse inspired by Anthropologie. I love the color of the purse, not to mention all the details she captured. Simply amazing!
I have seen floor pillows like this before, but the combination of the colors with the fabric and pom-poms caught my eye. Lindsey from Living with Punks has talent mixing and matching strong colors. So pretty and sophisticated at the same time.
Look at this pretty bird... Can you guess what she is made out of? Try security envelopes! Home Work shared this clever project with us. Isn't it amazing? I never thought to use the back of the security envelope before, but seeing this opened my eyes to more possibilities!
Bubbly Nature Creations turned Good Will find shoes to Anthro inspired master pieces. Looking at these shoes made me long for warmer weather... Very pretty!
Thank you all for sharing your projects! I hope you have a nice weekend!
Thursday, February 17, 2011
Tutorial ~ Square in Square Quilt ~
If you have been reading my blog for a long time, you might remember this picture and the post...
I went back and checked the date, and it was posted on November 4th 2009! Oh…my…gosh…, it was such a long time ago. The post was a sneak preview for the quilt I was working on and I meant to post the finished quilt soon. I am so sorry that you guys had to wait for over a year!!
The problem was I just could not decide how I wanted to finish the quilt. I pieced the quilt top right away and while I was busy working on other things, I kept thinking about what to do.
It's been so long, but I put together a quick tutorial for this quilt. I hope you will enjoy it. :)
Finished size 27" X 30" (it is constructed with 90 3"X3" squares)
{You will need}
I used Honey Buns from Moda, but you can make your own 1 1/2" wide strips by the width of the fabric and use them instead. I also used 6 strips for another project first, so I had 36 strips to make this quilt.
{How to}
1. Sort them and group by color.
2. From light color fabrics cut 90 pieces of 1 1/2" X 1 1/2" squares.
From darker color strips cut;
90 pieces of 1 1/2" X 1 1/2" squares
90 pieces of 1 1/2" X 3 1/2" rectangles
180 pieces of 1 1/2" X 2 1/2" rectangles
My Honey Buns had three main colors: pink, green, and blue. Since I made this quilt with 90 blocks, I made 30 pink blocks, 30 green blocks, and 30 blue blocks. When you are making this from scratch, this will make it easier to pick out the fabrics. You only need four different color schemes, one light, three darks.
3. Piece them together to make blocks. Use the pictures as a guide. Don't forget to press the seam after each step. It will make quite a difference on the finished quilt.
4. Lay all the blocks to see how you want to piece them. Then, piece the blocks side by side first.
5. Then, piece all the strips row by row.
It took me over a year to decide how I wanted to finish the quilt...Here is how I did it. Since I made this for Rachel's room, I appliqued her initial "R" and added small pom-poms around the edge. You will be proud of me (little squeak!) I machine quilted this myself!
Rachel was so excited to see the quilt finished and hanging in her room. It took me long enough, but it's finally finished! :)
Wednesday, February 16, 2011
Link Party No. 42!
Katy from no big dill (she is an AMAZING seamstress by the way) is going to do something very exciting the whole month of March. It is called "Once upon the Thread" and she will have guest bloggers to share a project they have made inspired by children's books.
And guess what...she asked me to be on this fun event!! I love children's books, and right away I started thinking about what I can do with this theme. Doesn’t it sound fun? I gladly accepted the offer.
A few days later, when I found out who else is participating, I almost passed out in my computer chair. BIG NAMES! I mean really talented awesome bloggers.
I get nervous at times like this, and I just want to run away.
But Tea Rose Home 2011, is going to be a little different my friends. I want to be better at what I do and stretch myself a little. So, I decided to do my best and have fun.
I am actually almost done with the project, but the last bit is a little tricky. Please cross your fingers for me that I will make it.
Although I am not telling you what I am doing... :) (Big grin)
Meanwhile, I am happy to say one of my tools, yes, linky tools is back! Show me what you have been working on, and let the party begin!
Here are the rules:
1. Please post something YOU made. It doesn't matter if it is crochet, quilt, clothing, anything would be fine. I want to see it! If you use someone's idea or patterns please give them the rightful credit.
2. Link to your specific post, that way it is easier for everybody to find and read it.
3. Please grab the "Tea Rose Home" grab button, and link back from your post. If you can mention the party in your post or place the button on your side bar, that would be great! I want more people to have a chance to come and show off their creation.
Thank you for your participation, and making this link party successful and fun!
And guess what...she asked me to be on this fun event!! I love children's books, and right away I started thinking about what I can do with this theme. Doesn’t it sound fun? I gladly accepted the offer.
A few days later, when I found out who else is participating, I almost passed out in my computer chair. BIG NAMES! I mean really talented awesome bloggers.
I get nervous at times like this, and I just want to run away.
But Tea Rose Home 2011, is going to be a little different my friends. I want to be better at what I do and stretch myself a little. So, I decided to do my best and have fun.
I am actually almost done with the project, but the last bit is a little tricky. Please cross your fingers for me that I will make it.
Although I am not telling you what I am doing... :) (Big grin)
Meanwhile, I am happy to say one of my tools, yes, linky tools is back! Show me what you have been working on, and let the party begin!
Here are the rules:
1. Please post something YOU made. It doesn't matter if it is crochet, quilt, clothing, anything would be fine. I want to see it! If you use someone's idea or patterns please give them the rightful credit.
2. Link to your specific post, that way it is easier for everybody to find and read it.
3. Please grab the "Tea Rose Home" grab button, and link back from your post. If you can mention the party in your post or place the button on your side bar, that would be great! I want more people to have a chance to come and show off their creation.
Thank you for your participation, and making this link party successful and fun!
Monday, February 14, 2011
Sugar, Sugar
Today was Valentine's Day. I knew the kids were exchanging candies at school, and that is way too much sugar than they need, but I just could not resist making cupcakes...
When I asked them what kind of cupcakes they wanted, Rachel was the first one to exclaim "PINK CUP CAKES!!!" The boys complained a little, but I made Pinkaliciouse cupcakes.
Christopher made this "Candy Monster" for school (he got the "most shiny" award by the way), and had lots of candy in the monster. Hmmm... I bet, lots of kids looked like this today.
We celebrated Valentine's Day as a family tonight, and it was fun.
Honestly, being a mom is not easy some days, (oh, don't tell me I am the only one thinking this!) Mommyhood never ends. But watching their faces light up for something as simple as a cupcake that I made, made me so happy. I almost wanna say, "What? What about the hard days? I have never had one of those." with a smile.
I guess moments like these, keep me going. My family is my sweetest treat.
I was having a heart felt moment while I was guzzling down two cupcakes in a few minutes. I will avoid the scale for a couple weeks... Oh, sugar sugar!
Saturday, February 12, 2011
A Perfect Night Out
Last night, Mr. Tea Rose Home surprised me with an early Valentine date. He took me to see “Sleeping Beauty”! The kids were supposed to sleep over at Grandma and Grandpa's last week but couldn’t; it worked out perfectly. Thank you Mom & Dad for watching the kids!
I have many things that I wish I could, ballet is one of those. I was so excited on the way there. I could hardly wait, in fact I might have squealed a few times.
Besides the dance, the music, the stage setting and the costumes (I was soaking up all of that), it was so nice to be away from reality for a while (you know, the dirty dishes, piles of laundry and all...) and totally immerse myself in a beautiful world.
Although, I realized I was starving after the show. I guess beauty doesn't fill my stomach... He took me to my favorite restaurant. What a nice husband.
It was the perfect, perfect evening. Thank you so much honey!
Thursday, February 10, 2011
Anthro Inspired Necklace
This has been my most favorite necklace for the last several months. Surprisingly, this necklace goes with many different outfits, and when I bought it, I didn't know I would love it this much.
There is one thing...when I bought it, there were two kinds. This gold one AND they had a silver one. I stood there for a while, trying to decide which color I should go for. Seriously, it took forever for me to decide!
Then, a few weeks later, when I went back to the store, the silver necklaces were gone. I searched online too...gone...ugh!
I have been thinking about the one that got away, I mean, didn’t buy.
About a week ago, I found these pair of earrings at a discount store for $5.99. Then, I had Light bulb moment.
I decided to take them a part, and use them as a base of the necklace. The metal parts on the original necklace are either soldered or brazed to join them together. I don't have tools to do that, so I just used jump ring to connect the parts. Here is the necklace I came up with...
I love it! It is not same as Anthro's but I think it's not bad for 5.99 (well, technically, I only used one, so more like $3.00 to be exact) plus whatever the parts I had on hand.
I am feeling that I will be using this a lot in Spring and Summer. :)
Alert; I am making lots of jewelries (remember I don't have my sewing machine!) watch out for more jewelry posts to come!
Wednesday, February 9, 2011
Two Weeks without My Sewing Machine
Hi everybody! I have bad news. My linky tool is not working. I paid for the subscription but it was still disabled. I'm working with them to restore this, so there is no link party this week.
I did something hard for me today...I took my sewing machine in for service. They are two weeks out, and they will ship the machine to a different location for service. I won't have my machine back for at least two weeks!
I have my old sewing machine, but that one needs TLC too. Two weeks without my beloved sewing machine. I should have planned this better...sigh...
Oh well (one of my few good qualities are, I recover quickly from sad situations).
I was thinking about what I can do during those two weeks.
Some of the things came to my mind are;
* Finish a couple quilts --- one quilt needs to be finished by hand quilting, the other one need to be finished putting on binding.
* Baste two quilts for the boys.
* Make lots of jewelries that I have been wanting to make.
* Work on the hexagon quilt
* Do a total makeover in my hobby room.
* Sand, paint the dining table and chairs. ---this one, I probably won't do. It is still too cold outside!
* Read some books from the "read when I have time" pile by my bed.
* Do some cutting for the clothes I wanted to make, so when I have my sewing machine, I can start sewing immediately.
* Sew some badges on boys’ Cub Scout uniforms. ---yes, I will do this one definitely. I promise.
* Organize all the design ideas. Draw them out and document them.
* If I can finish ALL these things, I might twiddle my fingers and stare up at the ceiling while I wait for my sewing machine to come back.
Boy, this will be a long two weeks!
See you at the next post.
Monday, February 7, 2011
Tutorial ~ Felt Banner ~
I showed you my collection of felts, several posts ago. Looking at them made me wanna make something to display the beautiful colors.
I have decided to make a banner. Now, this is nothing new. You might have seen something similar at other places. What I wanted to share with you is how I made the cuts. I did something a little different. I used rotary cutting tools, I would recommend to use old mats, that you are thinking about getting rid of. The fiber from the felt tends to get left between the cuts and it is hard to get it out.
{You will need}
Felt in several different colors
Thread
Rotary cutting tools
{How to}
* Cut
1. Trim a felt to 9" X 9" square.
2. Cut from corner to corner, and horizontally, vertically in the middle (4 1/2").
3. Mark 4 1/2" on the diagonal lines from the center.
4. Line up the ruler from the marking you made at step 3 to the tip of the horizontal and vertical lines. Cut using the picture as a guide, if my explanation was not clear.
5. Take two large triangles lay them together. Use the picture as a guide and cut the felt. You should have 8 triangles. Repeat the process with the rest of the triangles. This way, you will end up with 32 triangles. If you want to use the strip you trimmed off at step one, you could have some more.
* Sew
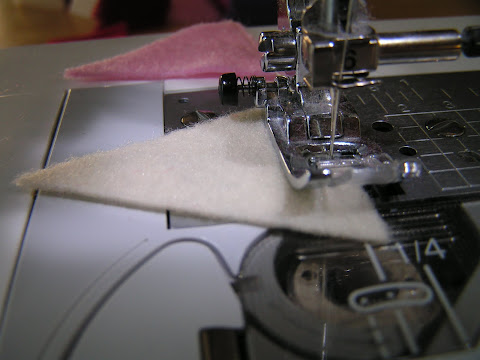
1. Use scrap felt to start sewing first. Keep stitching until you have the desired length of the thicker thread (you will need this part, to hang the banner later).
2. Start feeding the felt triangles. It is better not to space them too much, if there is too much space between the felt, the thread tends to tangle easily.
3. Keep going...
Ta-da!
I made some mini banners from the scraps for my display shelf too.
This is very easy and inexpensive project. I want to make some for my boys' room now.
Subscribe to:
Posts
(
Atom
)