


I am sharing a cardigan refashion today. If you have some old cardigans in your closet that needs a little facelift; then, this tutorial is perfect for you!

This is one of my favorite cardigans; I wore it for several years. I love the 3/4 sleeve, the open neckline, and the color... but I had this idea in my head to change the look of it, and I really wanted to give it a try.

{You will need}
A cardigan
100% cotton fabric that would match the cardigan (it doesn't need to be the same color, but it needs to either blend in with the cardigan, or have contrast and match with the flowers that you will accessorize the cardigan with)
Various fabrics, wool, and buttons
Matching thread
{How to}
{Assembly for the cardigan}
1. To make the bottom part, I cut the fabric like I am making bias tape. I used 36"wide muslin. Make a large square, fold it in half vertically. Cut 4 1/2" strips.

2. Piece them together. Fold the bottom less than 1/4" twice and saw.


3. Sew the top with largest stitch setting on your sewing machine. Pull the thread to gather the fabric. For this cardigan I didn't want lots of ruffles, so just a little to have flare. :) The bottom of the cardigan measured 30"all around, so I used 45" long bias and shrank to 30" long.


4. Pin the bias ruffle all around the bottom of the cardigan. I used zigzag stitches to sew it on. Fold the ends and zigzag to finish it off.


5. Add wide lace little bit above the fabric ruffle using the same technique as step 3 and 4.

6. I wanted to give more interest to the back, so I added a second row of lace ruffle. I cut 14 1/2" lace, and folded the both ends and zigzagged them prevent fraying, made a ruffle and added it in the back.

7. Cut 1 3/4" x 6 1/2" lace, and sew it on the waist line too. Make sure to center it so that both step 6 and 7 line up nicely.

8. For the sleeves, mine was 8 1/2" around. I cut 14" long lace and sewed the ends together, zigzag the ends to prevent fraying. Using the same technique as step 3 and 4, make ruffles and sew it on the bottom of the sleeve. Do the same to the other sleeve.


{How to make flowers and Yo-yo's}
*Folded fabric flower
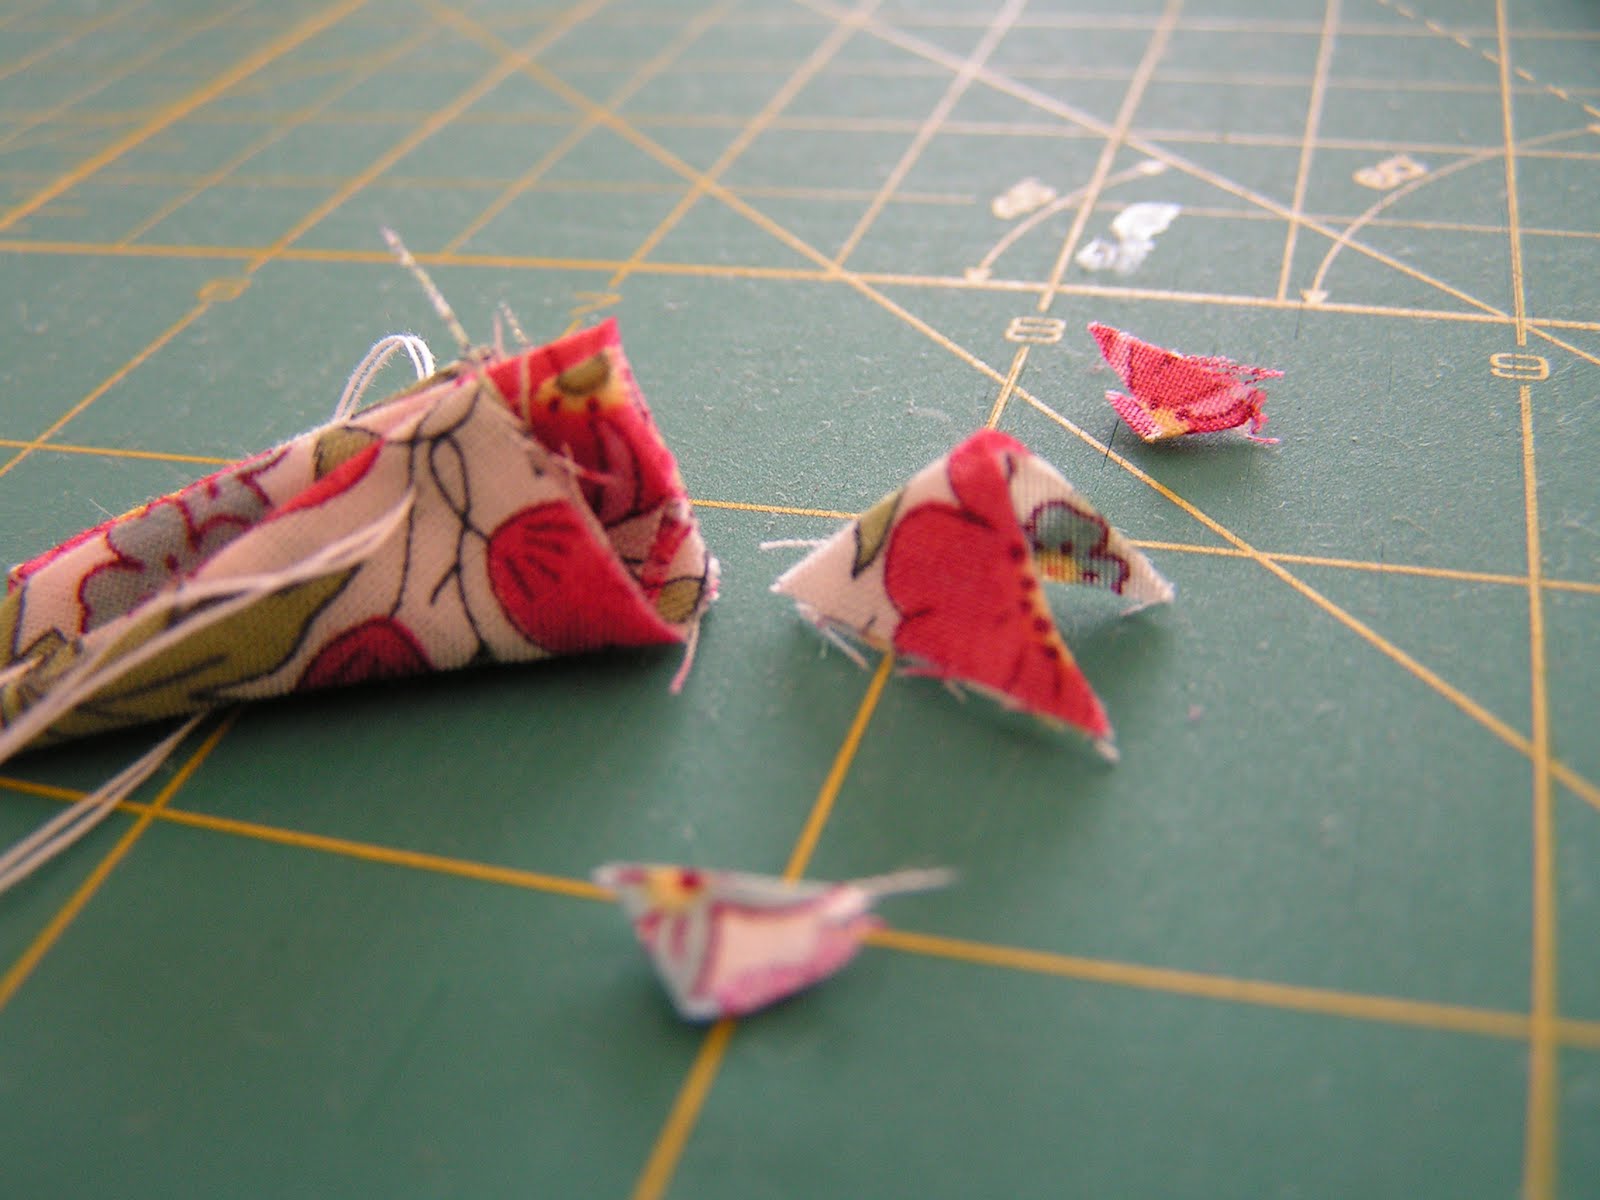
1. Cut 8 - 3" x 3"squares and fold the squares according to the picture.


2. Using two strands of threads, put through each petal, don't forget cut off the excess.

3. Tie the ends to form a circle to make a flower. I like to sew each petal to each other to secure them.

*leaves
Cut 1" x 2" rectangle first, and trim them so they look like leaves. They don't have to be perfectly unified.

*Flat flowers
Cut 1 1/4" x 1 1/4" square and trim it so that it will have four petals. Cut small circles for the middle.


*Felt flower (Light green)
1. Cut 6 - 1" x 2". Trim them so that they have round top.

2. Fold the bottom in half and pull them through the thread to make a flower. I stitched them together several times to secure them better.


*Felt flower (muted pink)
1. Cut 6 - 1" x 1 1/4" rectangles, trim them so that they will have rounded top.
2. Using the same method from step 2 on felt flower (purple), make the flower.
3. Cut circle for the middle and sew.
4. Sew yo-yo on top of the small felt circle


*Yo-yo
I used 3" and 2" circles to make yo-yo's. Smaller ones on the felt flowers are made with 1 1/4" circles. If you need to see how to make yo-yo, you can go to my tutorial.
{Assemble}

In my opinion, this is the most fun part. Just lay down the cardigan and lay down the flowers and yo-yo's to see what you can come up with! It is better to deiced where you want to bigger pieces go first than diced on smaller ones.
Pin them to see if you like the lay out. If you do, it is time to stitch them onto the cardigan.
I used some DMC floss to do fun stitches on the flowers and leaves. I did lots of slip stitches around the yo-yo's.


After you are all done with above, you can add buttons and such.

I had lots of fun making this, but wearing it was even more fun.


Why I am smiling? I have other ideas that I can't wait to try with more fabric and wool flowers, thinking about the possibilities makes me so excited!


I LOVE how it turned out! It will be fun to have some colors under the fall & winter gloomy sky; it is one of my ways to brighten up the day a little. :)
NOTE: Since I am having another procedure this week, the link party is cancelled. Sorry.


Now that is a real transformation!! It looks fabulous!
ReplyDeleteBest of luck with the procedure. Wishing you a speedy recovery.
Oh Sachiko, that is a beautiful makeover! The 'new' cardigan suits you and will get plenty of wear again now, I'm sure. All the best for your procedure.
ReplyDeleteQue idea tan genial!!!! me encanta!!! me guardo el tutorial, gracias por compartirlo, besos
ReplyDeleteI adore this! Your attention to detail is amazing - I particularly love the little lacey frills on the back.
ReplyDeleteI've been following your blog for a while and am always blown away by your creativity.
Chris x
WONDERFUL! I LOVE IT OHHHHHHHH GOD!!! Thank's for the tutorial!!!!
ReplyDeleteSo feminine and pretty!
ReplyDeleteThats absolutely gorgeous!! I love LOVE the lace around the bottom and sleeves and the flowers are so bright and cheery!
ReplyDelete- Ellie @ Mammy Made
So wonderful!!!
ReplyDeleteInese:))
Beautiful work on the cardigan. Love the placement and color of your handmade flowers! Best wishes on your procedure and a quick recovery!
ReplyDeleteYou and your sweater are adorable! You're so creative. Thanks for the tutorial.
ReplyDeleteI LOVE LOVE it!!! Wow what a beautiful sweater and an awesome tutorial ~ You are so talented!
ReplyDeleteThank you for sharing it with us!
Very pretty! All the best on your procedure
ReplyDeleteI just love what you did with this sweater-just absolutely beautiful!! Enjoy it!!
ReplyDeleteWow! I love how it looks! Nice makeover! thanks for sharing!
ReplyDeletemaravilloso!!! me encanto la idea.
ReplyDeleteenhorabuena por tu trabajo
gracias por compartirlo
besosss
wowww was wonderful!
ReplyDeletelove Dolly
Love it! Running out to raid some closets!!!
ReplyDeleteThis is really cute. Great job.
ReplyDeleteLinda! Parabéns!
ReplyDeleteLindíssima!
ReplyDeleteI love this sweater!!! So beautiful
ReplyDeleteWhat a beautiful sweater! I absolutely love it.
ReplyDeleteIf you describe this to me I would have said "yuck, sounds so country-ish" but it is absolutly charming and awesome…I saw it on TatorTots and actually showed my mom I was so taken with it. Really a great job with the flowers, the colors, the style, everything. The alterations really did freshen it up. Again, another stellar project, well done by you.
ReplyDeleteThis is absolutely beautiful! Great job!
ReplyDeleteJust beautiful! I love it!
ReplyDeleteFicou maravilhoso!!! Amei!
ReplyDeleteBeijos
Beth
(coisinhasdatita.blogspot.com)
Wow! That is fabulous! I LOVE it :D one question... is it safe to wash this in a machine?
ReplyDeleteSo great. I am going to make lots of flowers and see what they land on. I think I'll be wearing flowers too.
ReplyDeleteWonderful! I just pulled out a black cardigan I'd bought on sale last spring. I can just see it made over now. Thank you.
ReplyDeleteLOVE this, it looks so cute and very pretty on you
ReplyDeleteI DID miss this at TT&J -so glad you posted here too! Thanks. :)
ReplyDeleteGorgeous!! Now the real question: how many hours did all those flowers take?!?!
ReplyDeleteAmazing outfit! Love your jacket. thank you sharing us.
ReplyDeleteSame day delivery Flowers
Dana-
ReplyDeleteActually, I don't know how long it took me to make all the flowers.
What I usually do is, cut all the materials and put them in a container. I take them everywhere I go. As a busy mom, I have a little bit of time here and there while I am waiting for my kids in the carpool lane at school and their extracurricular activities and such. Those short minutes adds up to make all these flowers and yo-yo's but I don't feel like I spent so much time on them.
Sachiko, i think that has got to be the loveliest sweater I have ever seen! Im going to try it and if its only half as nice as yours I will be happy!
ReplyDeleteSo pretty! I love all the different flowers
ReplyDeletex
Wow--you did an amazing job on this! I love how it turned out---gorgeous! Saw via One Pretty Thing.
ReplyDeleteKate of www.avery-anderson.blogspot.com
Beautiful! I love your comination of lace, cotton and felt!
ReplyDeleteThis is so ULTRA cute! I'm gonna have to try it too! Thanks!
ReplyDeleteThis is so ULTRA cute! I'm gonna have to try it too! Thanks!!
ReplyDeleteSo very cute! I saw this in CraftZine today & had to stop by, to take a look. Thank you for sharing your adorable project with us!
ReplyDeletethis is so awesome. my mom has ozens of cardigans, which are too plain jane now. i'm gonna pruce them up with lace trimmings. and since i am not that great with sewing, i'll buy colorful buttons and use them instead of flowers :)
ReplyDeleteStunning detailing.
ReplyDeletewww.katiescreative.blogspot.com
I love , love your blog! Remind me of my time in Japan.
ReplyDeleteMay I ask where you bought the felt?
ReplyDeleteMay I ask where you bought the felt?
ReplyDeleteShy&:steve-
ReplyDeleteI used wool instead of felt. They are available at various quilt stores. You might find them online as well. I also buy wool skirt and such at thrift stores, and make wool felt sometimes.
It is so beautiful!!!!!!
ReplyDeleteI absolutely adore it. Simply stunning.
ReplyDeleteThis is the best one I have ever seen and so easy. I can't wait to do it!
ReplyDeleteBrilliant. What a difference it makes, wowwwwwwwwwwwwwwww
ReplyDeleteXXXXXXXXXXXXXXXXXXX
Lovely! How would you recommend caring for it afterwards? Do you think it'd do okay in the machine if it's stitched up well enough, or hand wash just in case?
ReplyDeleteJust stumbled across your blog and your tutorials are like heaven-sent to me right now, I absolutely love re-purposing old things. But this sweater DIY blew me away... I don't think I can rest now until I try my hand at something similar it's too pretty!!
ReplyDeleteNeedless to say, I'm very excited haha.
Awesome site!
ReplyDelete:)
What a neat idea, and a great way to expand the life of old clothes in your closet too:) Thank you!
ReplyDeleteVery Pretty !
ReplyDeleteTake care :)
I just have to tell you how much I TOTALLY LOVE THIS!!!
ReplyDeleteI loved it so much I had to try it for myself. Check it out here
ReplyDeletehttp://larras.blogspot.se/2012/06/natt-helt-annat.html
What a beautiful pair.....you and the sweater!! My brain is already working on conjuring one up from my stash of fabric and a cropped sweater that has begun to wear out.......flowers can hide the little holes and cascade down the front! You are truly an inspiration to explore one's creativity!!!
ReplyDeleteFantastic ,, and you make it so easy to follow even for those of us who have done many other things
ReplyDeletethank you
mirjam
This is sooooo beautiful! I found your tutorial via Pinterest, and I do hope you don't mind me sharing this over on my blog. I have done a post on cardigan make-overs, and have included this one as my favourite, with a link back here! :) Tania x
ReplyDeleteohhhh such a lovely cardigan with great creation! I am just love it:)
ReplyDeletewearing a cool color
cardigans with stylish footwear gives you stunning look!
So beautiful and inspirational. I'll be making my own flower sweater soon! Thank you for taking the time to post the tutorial.
ReplyDeleteWOW, this is awesome. I love the detail and the pretty flowers and how you laid them out. What a cool project which I'm going to attempt to try one. Thanks for sharing!
ReplyDeleteSüper bir iş olmuş. Harika.
ReplyDeleteI just stumbled across your blog looking for a tutorial for this sewing project. Thank You! Wonderful directions and easy to follow......Love your blog!
ReplyDeleteBeautiful project! So easy yet it looks like you did a lot more! Thanks for sharing
ReplyDeleteI like it ,you have nice ideas . Please come and my hobby crocheting ,you are Welcome ...
ReplyDeleteEs muy hermoso!
ReplyDeleteI love this idea but am having trouble with the first flower. I can do the 1st and 2nd fold of the fabric but I don’t understand how it gets to the next phase. Please help. I have my fabric cut but can’t finish it. Thank you.
ReplyDeleteI made a video on how to fold the square fabric. Here is the link to the video. I hope it helps. :)
Deletehttps://www.instagram.com/p/CCWth_GlzXB/?utm_source=ig_web_copy_link
This is the cutest thing ever! You could sell these. !!
ReplyDeleteGorgeous and so creative.
ReplyDeleteGorgeous and so creative.
ReplyDeleteWell!! 🤗. I am artsy but am just moving into stitching and working with felt
ReplyDeleteand needlecrafting. I saw this sweater and was dumbfounded at the originality and fun in it! ❤️ But after reading your instructions i absolutely believe i can do it, create my own!! I hope you know what an INSPIRATION YOU HAVE BECOME in making a skeptic into a believer!! …. From my heart, thank you!
Unbelievably creative and so unique! Wonderful idea I wouldn't have ever thought of but I'm ecstatic that I happened to see your beautiful handiwork on your sweater! Thank you for sharing as well as providing such detailed instructions. ❤ I can't wait to give this a try. Again, many thanks to you!
ReplyDelete