8. Pull out the corners. Use a pin or other tools to pull out the corners to have a nice crisp finish. Press with iron.
9. Fold the seams on the middle part of the notebook cover and press with iron. To secure the seam, you could either handstitch, use fabric glue or stitch with a sewing machine. I didn't want the stitches showing on the front of the notebook cover; I decided to hand stitch.
10. Insert the covers of the notebook to the sleeves and you are ready to enjoy the notebook with personality. I fell in love with this Windham Fabric Lush Life designed by Jennifer Moore.
There are other methods to create book covers, but I love how easy and quick my version is. Using my Baby Lock Victory definitely speeds things up and I love how clean those serged edges look.:)
Showing posts with label handmade. Show all posts
Wednesday, April 29, 2026
Fabric Notebook Cover with Baby Lock Serger Victory
I was going to buy a notebook, then I saw a good old partially used notebook laying around in our office. I decided to whip up a notebook cover to make it more pretty. When I say "whip up", it literally means quick and simple and it was possible with my Baby Lock Victory. I didn't exactly time myself, but I would say this whole project took me 30 minutes or less. If you are looking for an easy peasy, pretty and practical sewing project (and gift) idea, this is it!
* You Will Need
Notebook - The notebook I used was 9 3/4" x 7 1/2" x 1/2"
Main fabric (at least 24" wide and 11" tall and it goes for the liner and interfacing too)
liner fabric
Fusible Interfascing (I used Pellon 950)
14" long ribbon that is complimentally to the front fabric
* How To
1. As I mentioned on the supply list, the notebook I used is a pretty standard size. If you are using a smaller or larger notebook, please adjust your fabric measurement accordingly. Cut the main fabric, liner fabric and fusible interfacing to 10 1/2" x 23 1/2".
2. Fuse interfacing to the main fabric by following the manufacturer’s instructions.
3. Lay the fused fabric with liner fabric wrong sides together. Make sure the corners and seams are perfectly matched and pin.
4. Use the serger to sew the edges of the 10 1/4" seams on the both ends.
5. Lay the Main fabric side up on the table. Fold 4" from the ends and pin. Pin the Ribbon in the middle. I am showing the ribbon up, but you want the ribbon attached onto the top middle under the fabric going towards the bottom. I am showing what not to do in the picture. haha. I cut off the ribbon at the first attempt and realized I did it wrong.
6. Hide the thread ends for a clean finish.
7. Fold the ribbon out and give some stitches to make it more secure.
Friday, June 27, 2025
Sewing with My Baby Lock Victory ~ Skirt
As I mentioned in my previous post, all my projects in 2024 were quilts. After receiving the Babylock Victory serger, my desire to sew more garments increased by 100%! I have many Japanese sewing books and American patterns I bought from Joann's. I have many apparel fabrics and knits for future projects. I have no shortages there. All I need is to just start. I guess the hardest part for me is deciding the perfect match of sewing pattern and fabric. Sometimes this process takes months and years for me, because I see many possibilities with the fabric piece and I have a hard time making a decision. I don't want to cut into the fabric and go "oops, I should have used this for something else". But, I am starting to think differently… saving the fabrics for a "special" occasion or purpose doesn't do any good for me or the fabric. I am not getting any younger and I should just sew something I want, wear them and enjoy them while I can!
My first project with my Victory was a simple white t-shirt. Today, I am sharing a skirt I made.
Nani Iro Sewing Studio is a great sewing book and it is translated into English. If you are interested in trying Japanese patterns, this is a great one. I thought this skirt was totally my style and such a great design for day to day living.
After I traced the pattern pieces, it was time to start cutting into the fabric! I just needed to get over the fear of messing it up and just enjoy the process.
This is a pretty simple pattern to follow, but having a nice and dependable serger makes the process so much faster. I love to look at the clean edges too.
I love the waistband of this skirt, the front is smooth...
and has elastic on the back. I think it makes a little more elevated look.
The skirt was done in one afternoon.
Mr. TRH and I took a quick trip to southern Utah and I decided to take this skirt with me. Cotton skirts are always my favorite. Even in hot weather, it was breezy and comfortable. I love how this skirt fits me, so I will definitely repeat this one. I already sewed a couple garments after I sewed this skirt and I am going to share them soon. :)
Labels:
baby lock ambassador
,
Baby Lock Serger
,
baby lock sewing
,
handmade
,
sewing
,
skirt
Friday, September 30, 2022
Scrappy Strip/String Pillow ~ Two Versions!
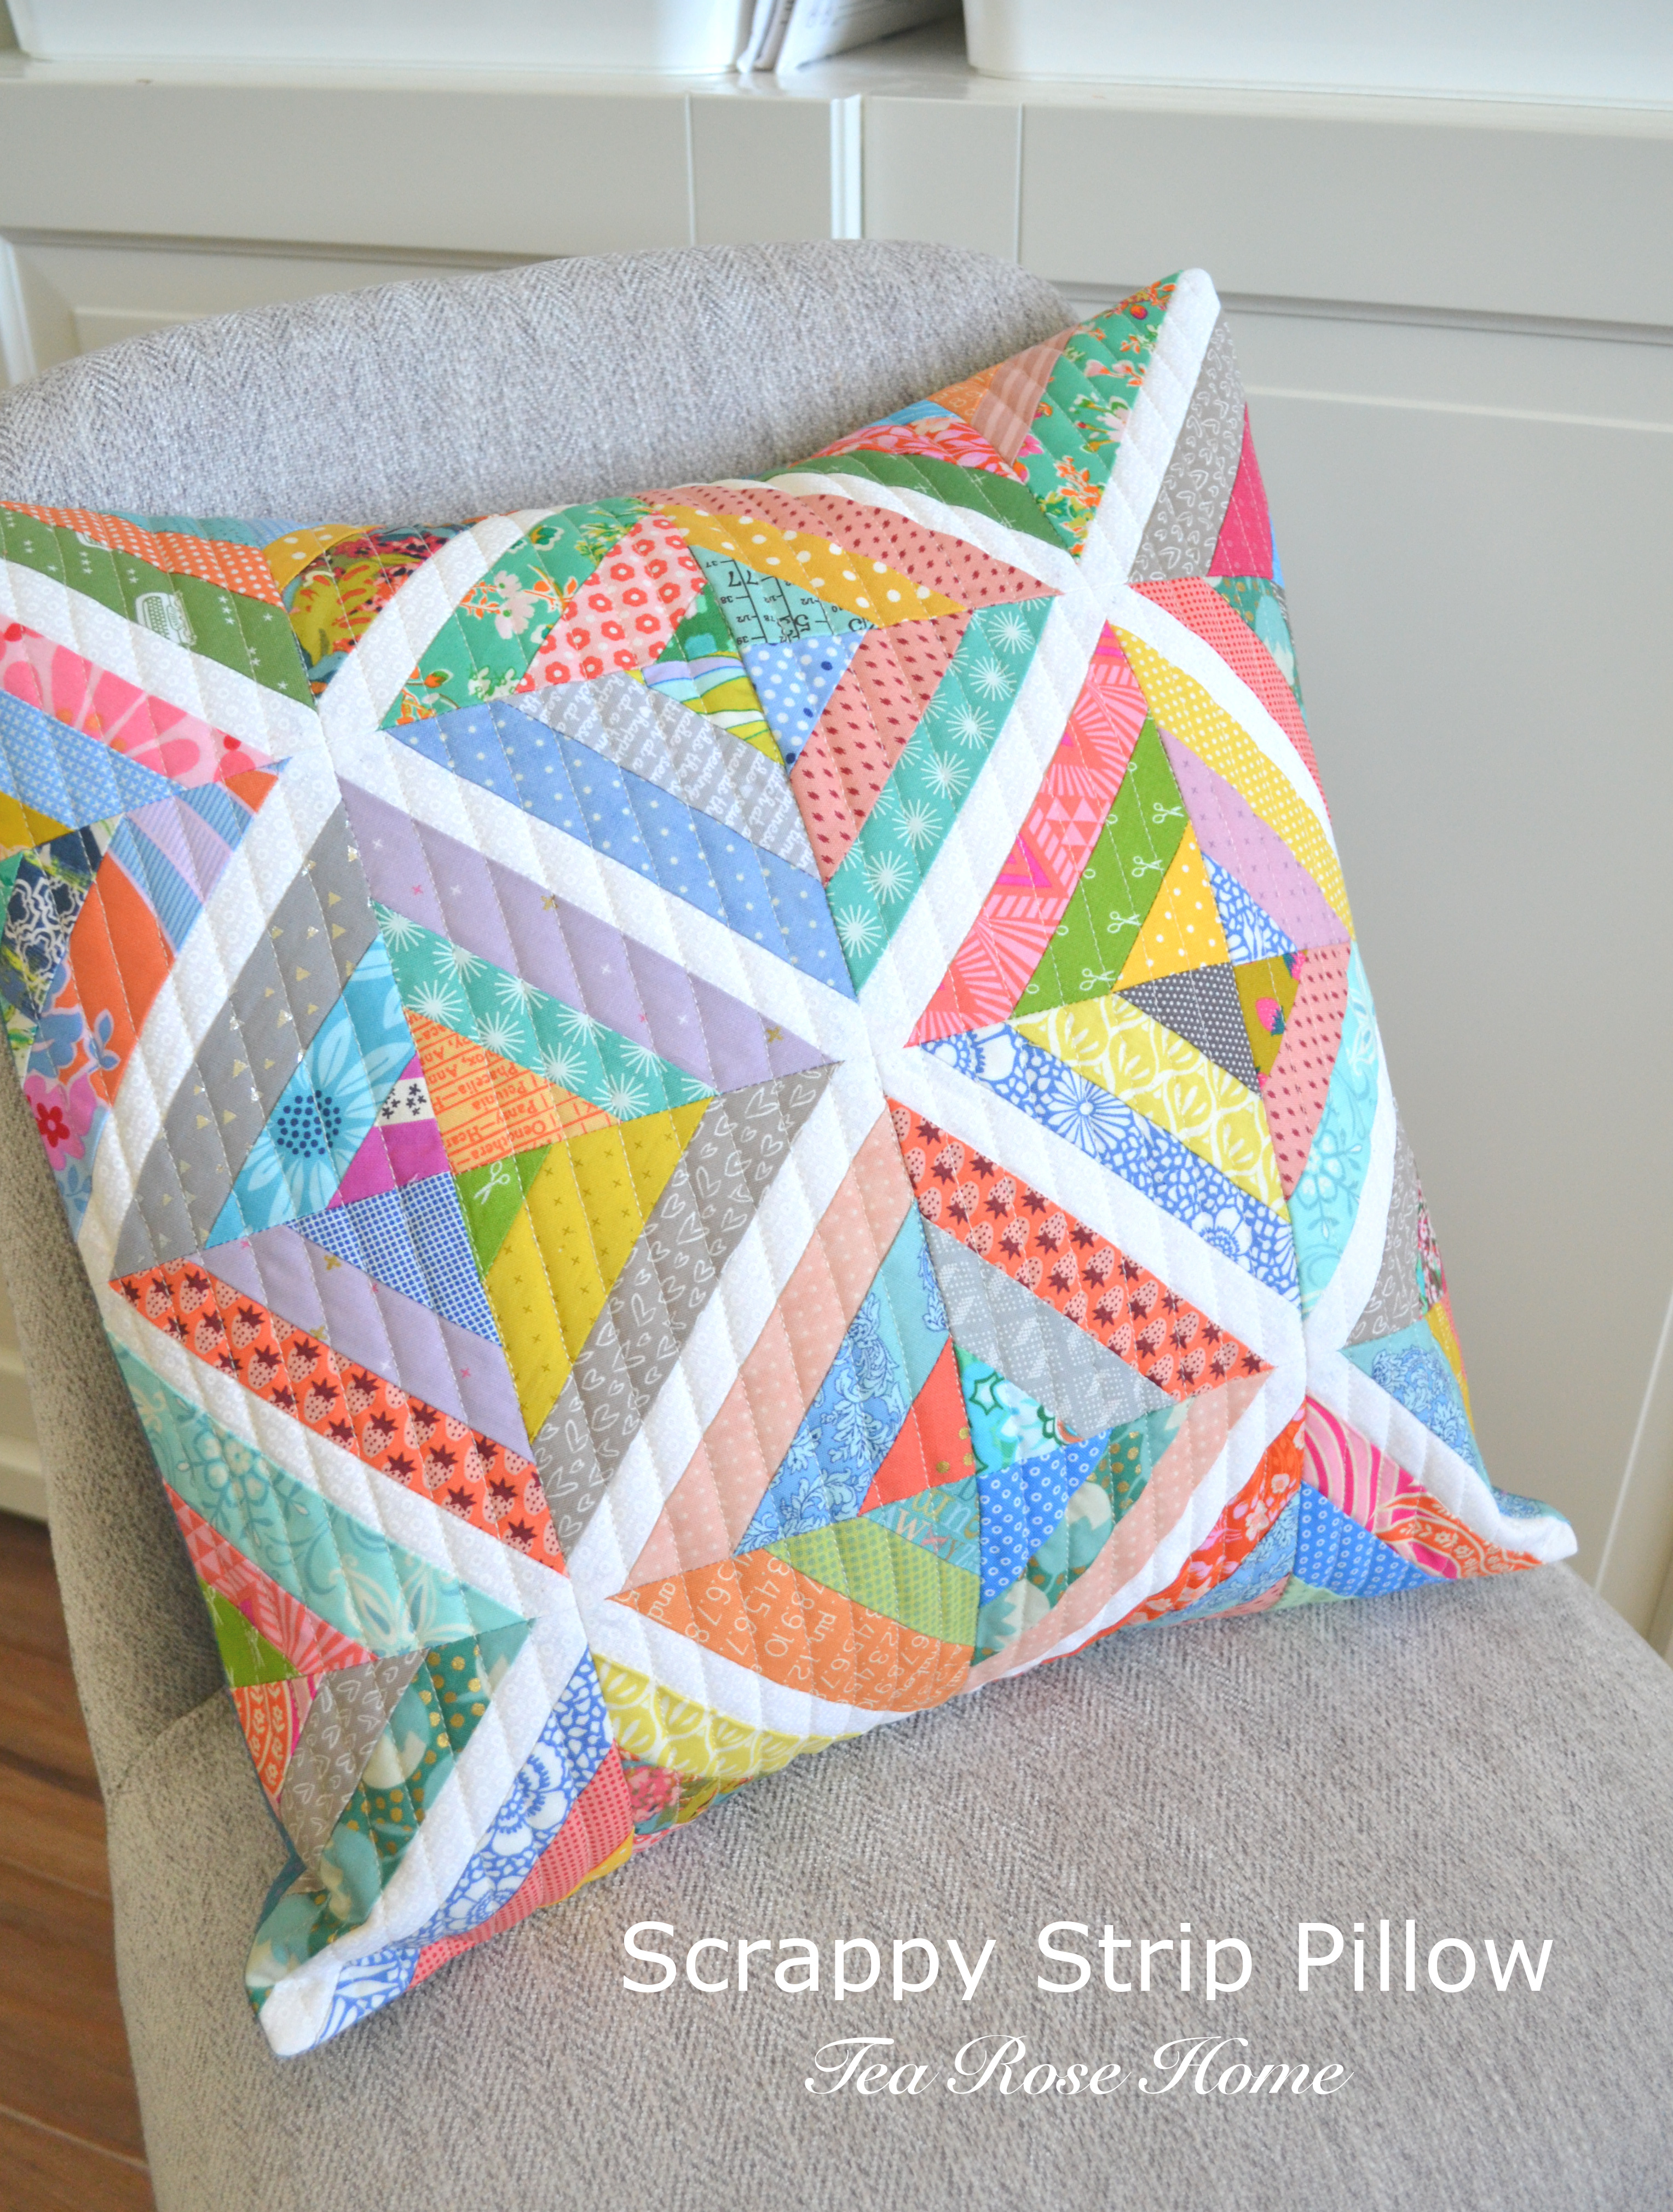
There are many scrappy strip/string quilt tutorials out there. Some tutorials suggest using white fabric as a foundation and some use different types of papers. I wasn't sure if I wanted to use fabric and have an extra layer in my pillow. So I used tracing paper I had at home and it was too thick to peel off after the strips were sewn. I know there are special papers available online, but I wanted to start making the blocks right away. Yes, I was in the mood that I had to start the project at that moment and couldn't wait for an extra few days for my order to arrive at my doorstep. I looked around my room and found tissue papers for gift wrapping and decided to give it a try. Because this project doesn't need specific design on the paper and random piecing, simple tissue paper did the trick. Peeling it off was a breeze too.
Before you start, you want to Iron your tissue paper to smooth out any wrinkles and cut them to the size you want. I used cutting tools to do this and it went so fast. Also, sorting your scraps by color (if you already organized them that way you are good to go!) speeds things up while you are choosing and mixing colors as you are piecing.
Let's begin!
Scrappy Strip Pillow --- finished size 16"x 16" * YOU WILL NEED
12 pieces --- 4 1/2" x 4 1/2" tissue paper
12 pieces --- 1' x 7" (or longer if you prefer) white fabric strips
Various scrap strips
1 --- 18"x 18" Batting
1 --- 18"x 18" backing(I used muslin. It is going to be in hidden inside of the pillow)
2 --- 11"x 16 1/2" fabrics for the back panels to create the pillow
* HOW TO
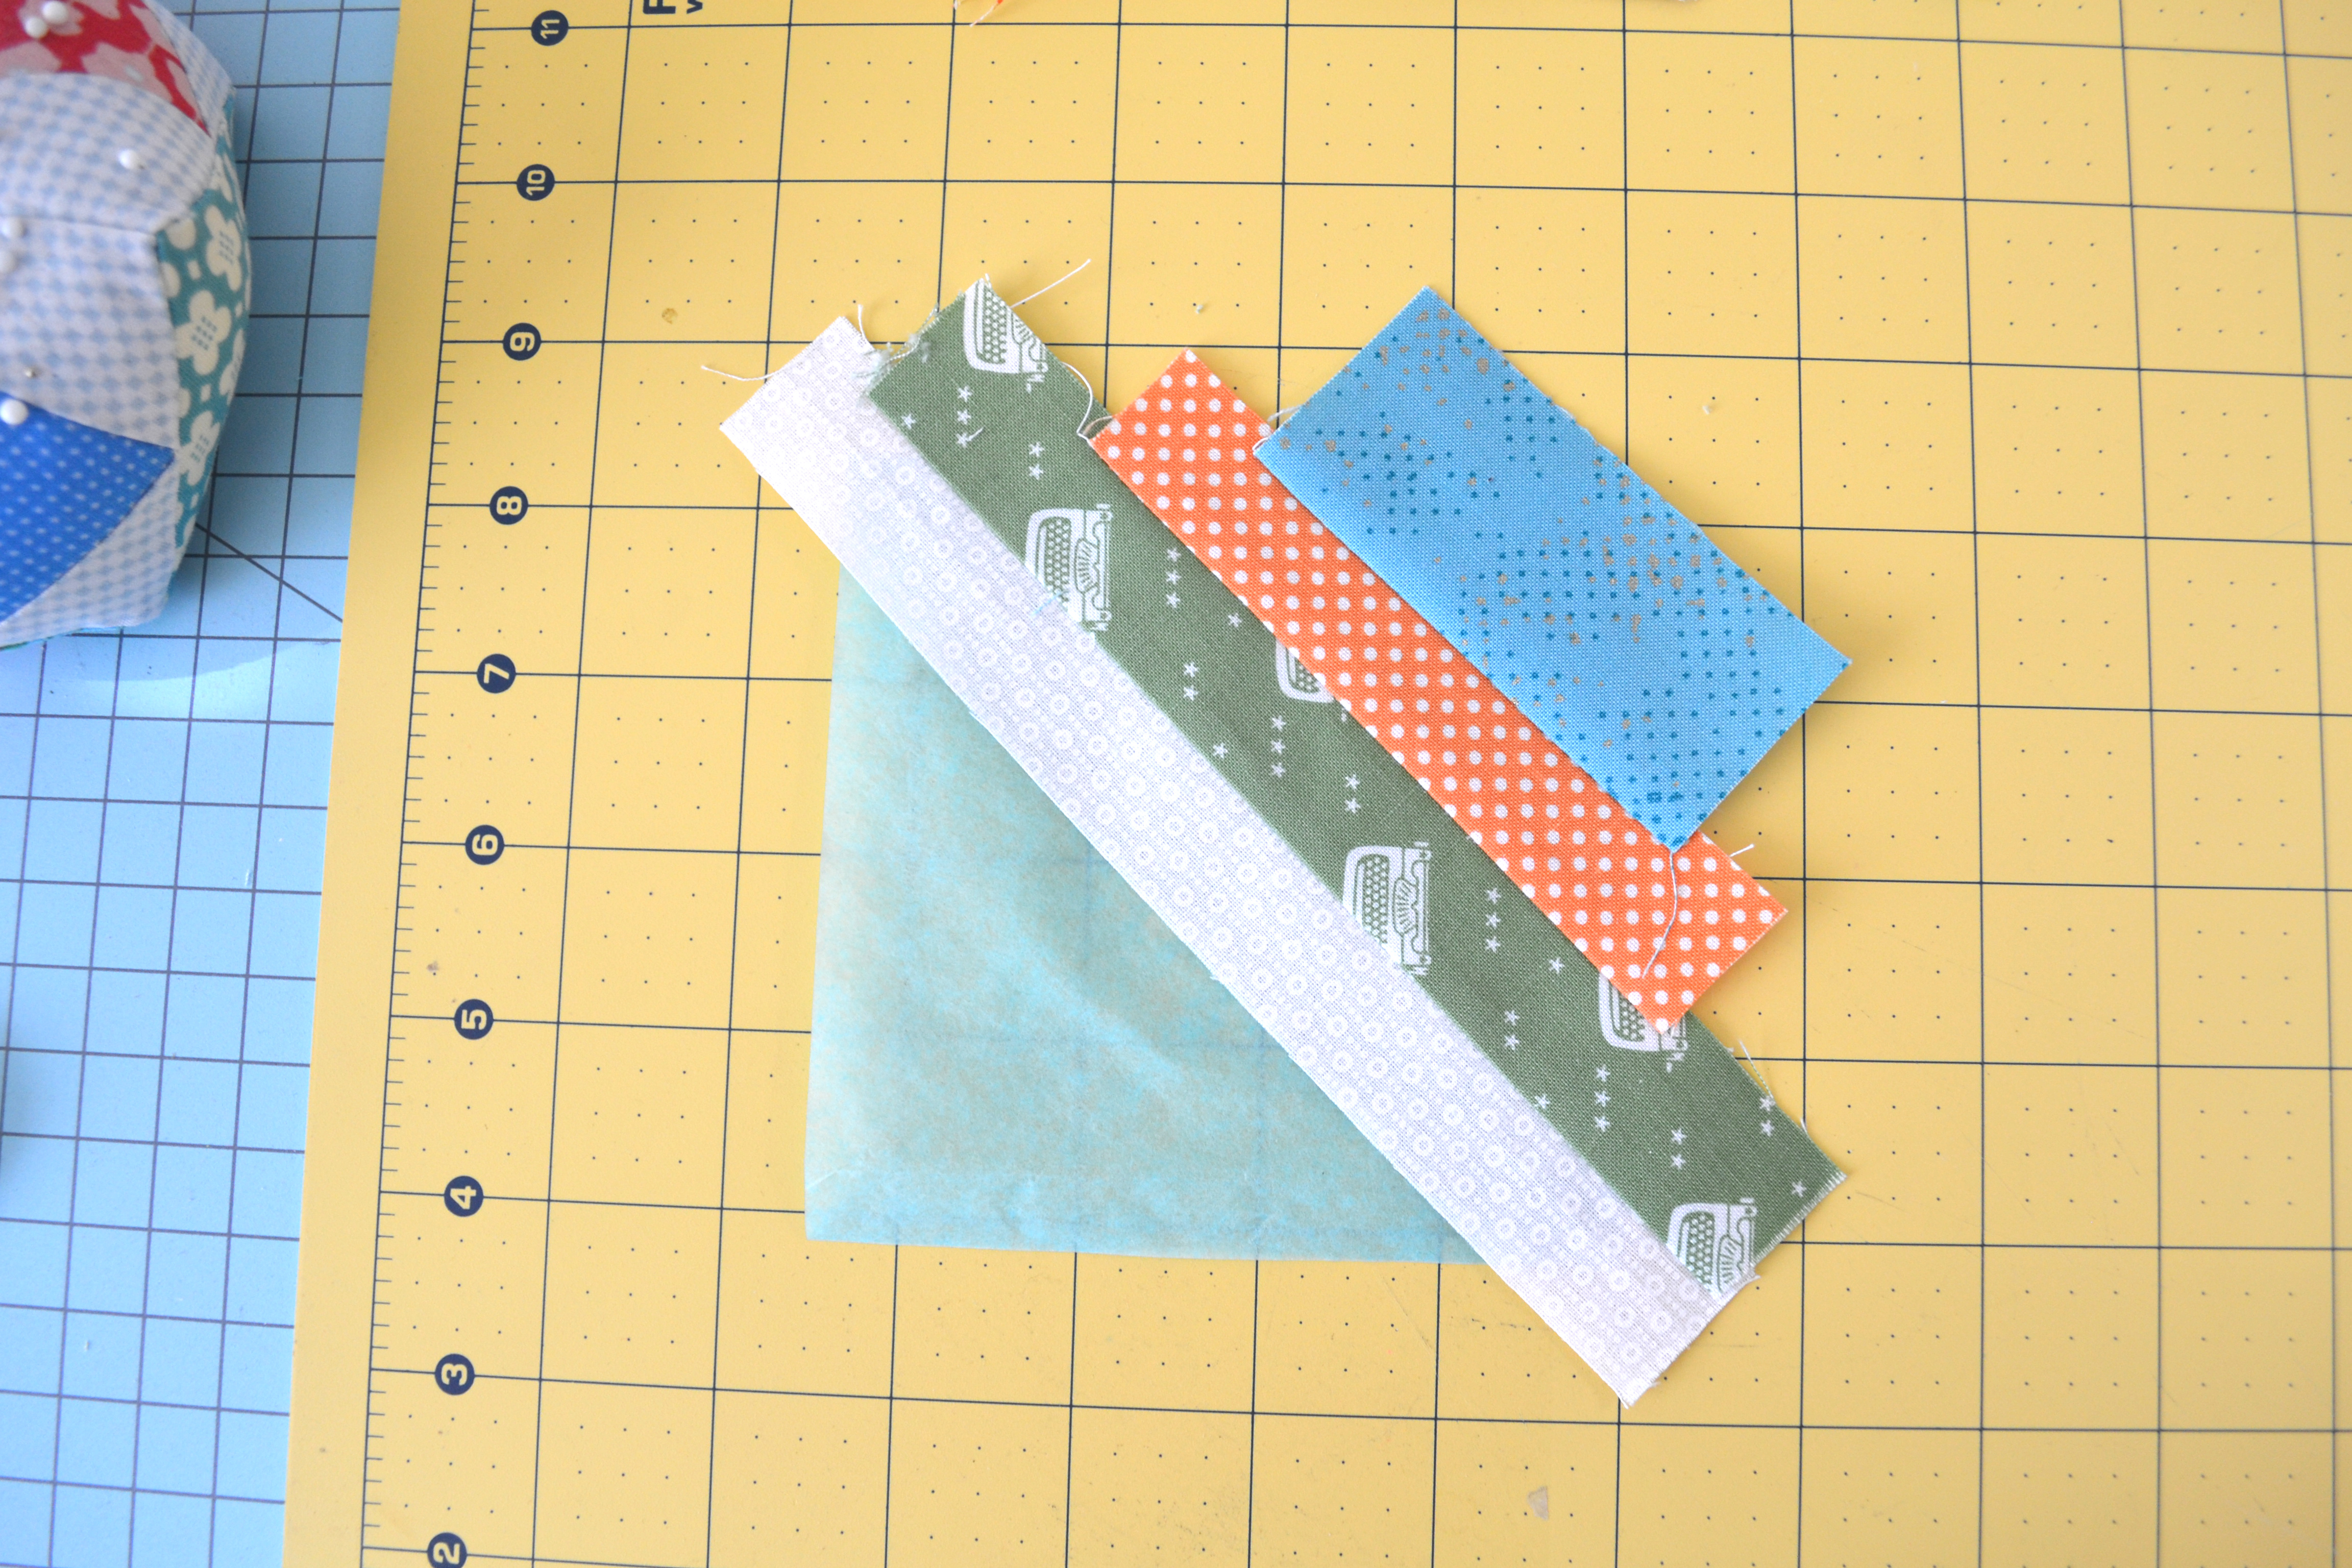
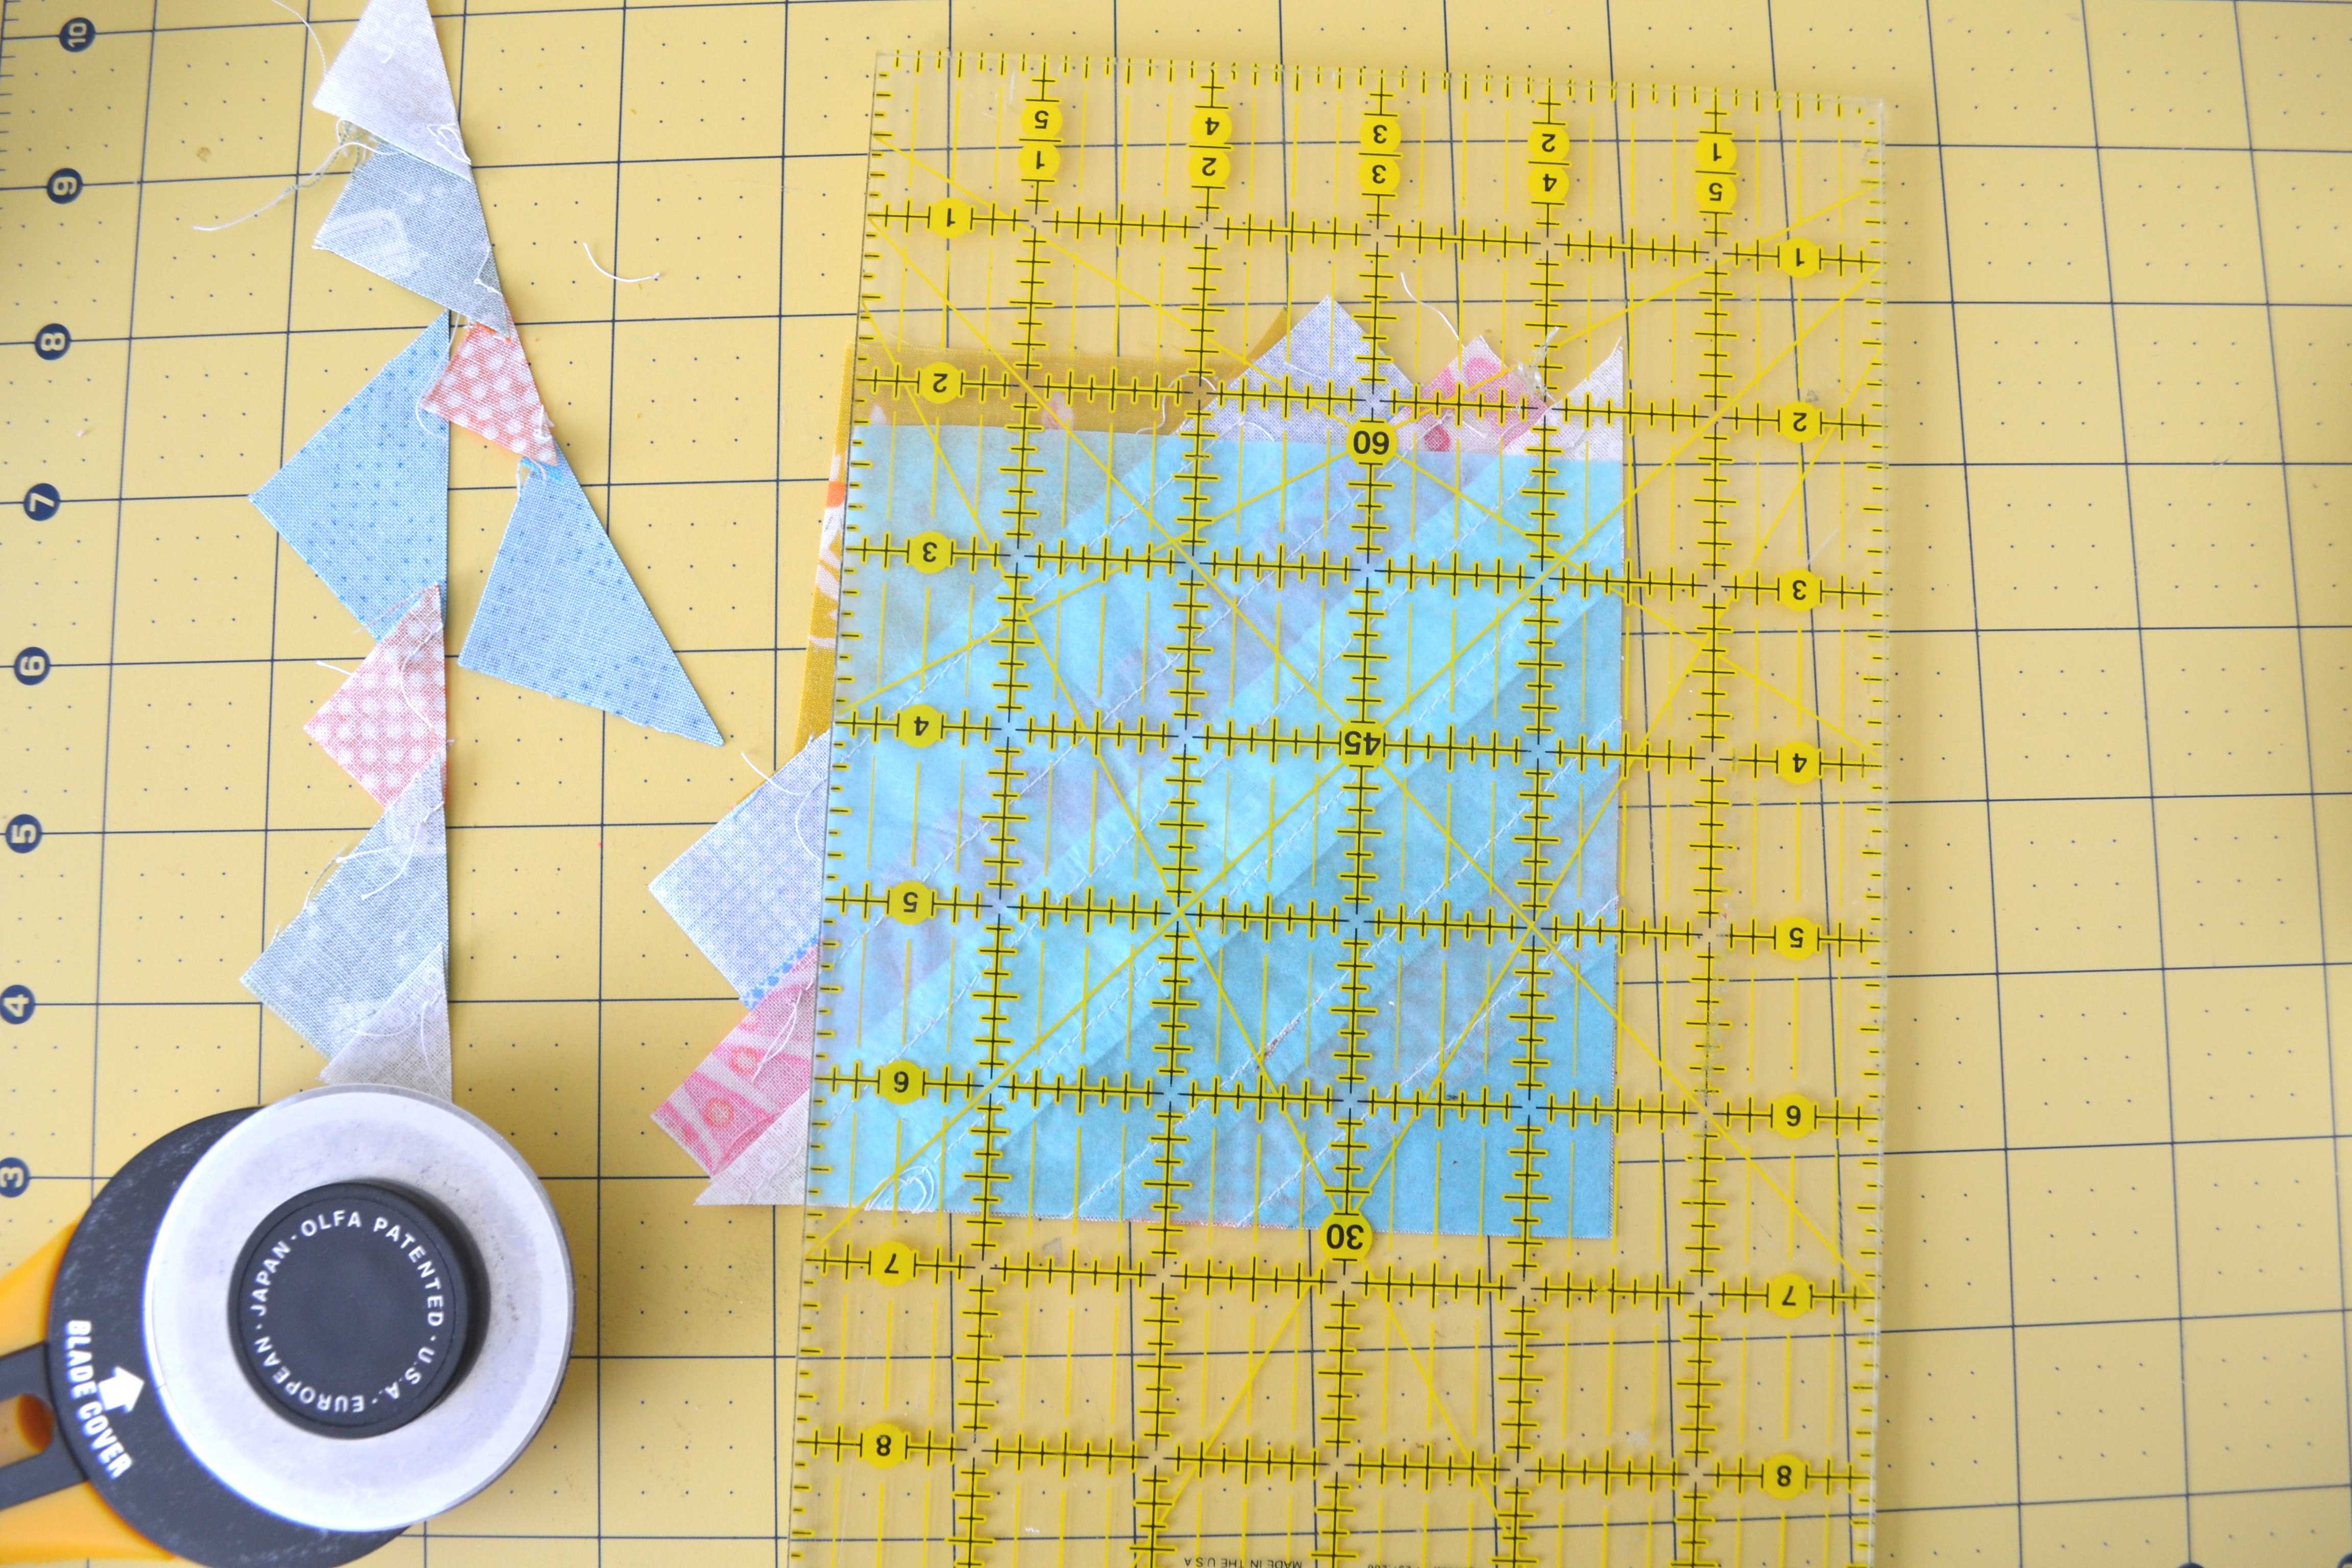
1. Fold both ends of the 1"x 7" white strip in half. Match the folded line to the opposite corners of the tissue paper. 2. Lay the printed scrap strip on top of the white strip. I used pins to keep them aligned and the corners matched. 3. Sew them together onto the paper with 1/4" seam, open the seam and press with iron. 4. Repeat the process and do the same with the opposite side as well. 5. Lay the pieced fabric side down on the cutting mat. Trim the excess fabrics using the tissue paper as a guide. 6. Peel the tissue paper off. Tada! A block is done. Isn't this so fun? 7. When you are done making the rest of the blocks, play with them to decide on the layout and piece the blocks side by side to create the rows. 8. Then, piece those rows together. 9. I did simple rows of quilting on this. Degital Dual Feed foot is one of my most favorite accesorries for my Babylock Aria. It feeds the fabric evenly and consistently. I felt the big difference on finished projects especially when working on larger items. Trim the excess around the quilted square. 10. Take a 11"x 16 1/2" piece and fold one side of 16 1/2" twice (1/2" each time)and sew. Leave the other side row edge. Do the same with the other 11"x 16 1/2". Lay them on top of the quilted square right side down. Center part will overlap by 4". Pin and sew around the edge. I used zigzag stitches to finish the edges to prevent flaying. 11. Turn it inside out and press with iron. Time to enjoy! This is a simple project and a great way to use your strips of scraps. Also, this quick project will make a great gift. I created this pillow in one afternoon while I was half watching Korean dramas on my phone. I had so much fun doing it, so I decided to make a bonus project for you!
Bonus! Scrappy Strip Mini Halloween Pillow --- finished size 11"x 11"
*YOU WILL NEED
4 Pieces --- 6"x 6"tissue paper
4 kinds of 1 1/4" strips
1 kind of 2" strips for the corners
1 --- 12"x 12" batting
1 --- 12"x 12" backing (I used muslin. It will be hidden in the pillow)
1 --- 11 1/2"x 11 1/2" fabric for the back of the pillow
1 1/2 yard of pom-pom trim
*HOW TO
You can pretty much follow same steps as I provided above There are few differences between those pillows, which are:
* I used unified width of strips (except for both corners of the square).
* The each squares are larger and you only need 4 pieces
* The back is one piece, instead of two panels. When you are ready to make it in to a pillow, sew quilted top, pom-pom and the backing together leaving a few inches opening. Turn inside out. Stuff and stitch the opening to close.
Thank you for visiting. I hope you will enjoy making those projects! :)
Before you start, you want to Iron your tissue paper to smooth out any wrinkles and cut them to the size you want. I used cutting tools to do this and it went so fast. Also, sorting your scraps by color (if you already organized them that way you are good to go!) speeds things up while you are choosing and mixing colors as you are piecing.
Let's begin!
Scrappy Strip Pillow --- finished size 16"x 16" * YOU WILL NEED
12 pieces --- 4 1/2" x 4 1/2" tissue paper
12 pieces --- 1' x 7" (or longer if you prefer) white fabric strips
Various scrap strips
1 --- 18"x 18" Batting
1 --- 18"x 18" backing(I used muslin. It is going to be in hidden inside of the pillow)
2 --- 11"x 16 1/2" fabrics for the back panels to create the pillow
* HOW TO
1. Fold both ends of the 1"x 7" white strip in half. Match the folded line to the opposite corners of the tissue paper. 2. Lay the printed scrap strip on top of the white strip. I used pins to keep them aligned and the corners matched. 3. Sew them together onto the paper with 1/4" seam, open the seam and press with iron. 4. Repeat the process and do the same with the opposite side as well. 5. Lay the pieced fabric side down on the cutting mat. Trim the excess fabrics using the tissue paper as a guide. 6. Peel the tissue paper off. Tada! A block is done. Isn't this so fun? 7. When you are done making the rest of the blocks, play with them to decide on the layout and piece the blocks side by side to create the rows. 8. Then, piece those rows together. 9. I did simple rows of quilting on this. Degital Dual Feed foot is one of my most favorite accesorries for my Babylock Aria. It feeds the fabric evenly and consistently. I felt the big difference on finished projects especially when working on larger items. Trim the excess around the quilted square. 10. Take a 11"x 16 1/2" piece and fold one side of 16 1/2" twice (1/2" each time)and sew. Leave the other side row edge. Do the same with the other 11"x 16 1/2". Lay them on top of the quilted square right side down. Center part will overlap by 4". Pin and sew around the edge. I used zigzag stitches to finish the edges to prevent flaying. 11. Turn it inside out and press with iron. Time to enjoy! This is a simple project and a great way to use your strips of scraps. Also, this quick project will make a great gift. I created this pillow in one afternoon while I was half watching Korean dramas on my phone. I had so much fun doing it, so I decided to make a bonus project for you!
Bonus! Scrappy Strip Mini Halloween Pillow --- finished size 11"x 11"
*YOU WILL NEED
4 Pieces --- 6"x 6"tissue paper
4 kinds of 1 1/4" strips
1 kind of 2" strips for the corners
1 --- 12"x 12" batting
1 --- 12"x 12" backing (I used muslin. It will be hidden in the pillow)
1 --- 11 1/2"x 11 1/2" fabric for the back of the pillow
1 1/2 yard of pom-pom trim
*HOW TO
You can pretty much follow same steps as I provided above There are few differences between those pillows, which are:
* I used unified width of strips (except for both corners of the square).
* The each squares are larger and you only need 4 pieces
* The back is one piece, instead of two panels. When you are ready to make it in to a pillow, sew quilted top, pom-pom and the backing together leaving a few inches opening. Turn inside out. Stuff and stitch the opening to close.
Thank you for visiting. I hope you will enjoy making those projects! :)
Labels:
Baby Lock
,
baby lock ambassador
,
Babylock sewing
,
gift idea
,
Halloween
,
handmade
,
pillow
,
scrappy string quilt
,
scrappy strip quilt
Wednesday, March 31, 2021
Eyeglass Case Tutorial with Printable Pattern
The idea for this project came purely from my own need, but I thought there might be some of you going through the same thing and looking for an eyeglass case.
I always had good eyesight up until few years ago (darn aging! My teen daughter often say, "Is there anything good about getting old??"), but I started needing glasses to see far and it seems to be getting worse. Because I am not used to carrying glasses around, I always forget to take them with me and I won't even think about them until I need to see the menu on the far away wall at the restaurant and such. Also, the glass case that came with my glasses was a big, bulky plastic case. I don't like carrying a big purse, and there is no way that that glass case will fit in my small purse... I just wanted a small, minimal fabric case to prevent scratches. After I did a few sketches, I came up with this design.
For the closure, I designed it so that you can just fold the tab inside, kind of like tucking the opening of a pillowcase when you are making the bed. If you prefer to add snap button or Velcro you could totally do that.
*You will need
1 - Outer fabric (8" x 9")
1 - Lining fabric (8" x 9")
1 - Interfacing (8" x 9") I used Pellon 809 Decor Bond. I like the stiffness.
Matching thread
*How to
1. Print PDF pattern and cut out the template.
2. Trace the template onto the fabrics and interfacing and cut them out. You can do this one by one, but I like to layer all three material together, trace and cut. This is not only a short cut, it is easier to ensure which side of the material is suppose to be put together. You can look at the picture below to see what I mean.
3. Fuse the interfacing on the the wrong side of the outer fabric.
4. Put all three layers together perfectly. Leaving a 3" opening in the bottom, sew all the way around. Cut and snip the corners for a cleaner finish.
5. Turn it inside out and press with an iron.
6. Top stitch the portion of the case.
7. Fold in half vertically. Use clips to keep them in place while you sew. Sew one side all the way to the other side.
At this point, it might be difficult to stitch through all the layers with some machines. In that case, it might be helpful to use thicker needles and go slow. People often ask me what kind of machine I use and I always say "Baby Lock. and I LOVE IT!" Whether you are beginner or an advanced sewist, I highly recommend Baby Lock machines to everyone. They offer a variety of machines (beginner ones start around $150!) I know how frustrating it is to have a machine that keeps having problems, and that actually takes the fun out of sewing. I have been sewing with Baby Lock machines for the last 10 years or so, and they are sturdy and dependable; totally worth looking into it. :) 8. Enjoy!
Here are the images of the case"open" and "closed"...
I got carried away and made more, thinking that this will make a great gift for my friends.
The thick interfacing gives just the right amount of stiffness without being bulky. This eyeglass case will definitely protect my glasses from scratches and easily fit in my purse which is exactly what I wanted. Happy sewing everyone!
I always had good eyesight up until few years ago (darn aging! My teen daughter often say, "Is there anything good about getting old??"), but I started needing glasses to see far and it seems to be getting worse. Because I am not used to carrying glasses around, I always forget to take them with me and I won't even think about them until I need to see the menu on the far away wall at the restaurant and such. Also, the glass case that came with my glasses was a big, bulky plastic case. I don't like carrying a big purse, and there is no way that that glass case will fit in my small purse... I just wanted a small, minimal fabric case to prevent scratches. After I did a few sketches, I came up with this design.
For the closure, I designed it so that you can just fold the tab inside, kind of like tucking the opening of a pillowcase when you are making the bed. If you prefer to add snap button or Velcro you could totally do that.
*You will need
1 - Outer fabric (8" x 9")
1 - Lining fabric (8" x 9")
1 - Interfacing (8" x 9") I used Pellon 809 Decor Bond. I like the stiffness.
Matching thread
*How to
1. Print PDF pattern and cut out the template.
2. Trace the template onto the fabrics and interfacing and cut them out. You can do this one by one, but I like to layer all three material together, trace and cut. This is not only a short cut, it is easier to ensure which side of the material is suppose to be put together. You can look at the picture below to see what I mean.
3. Fuse the interfacing on the the wrong side of the outer fabric.
4. Put all three layers together perfectly. Leaving a 3" opening in the bottom, sew all the way around. Cut and snip the corners for a cleaner finish.
5. Turn it inside out and press with an iron.
6. Top stitch the portion of the case.
7. Fold in half vertically. Use clips to keep them in place while you sew. Sew one side all the way to the other side.
At this point, it might be difficult to stitch through all the layers with some machines. In that case, it might be helpful to use thicker needles and go slow. People often ask me what kind of machine I use and I always say "Baby Lock. and I LOVE IT!" Whether you are beginner or an advanced sewist, I highly recommend Baby Lock machines to everyone. They offer a variety of machines (beginner ones start around $150!) I know how frustrating it is to have a machine that keeps having problems, and that actually takes the fun out of sewing. I have been sewing with Baby Lock machines for the last 10 years or so, and they are sturdy and dependable; totally worth looking into it. :) 8. Enjoy!
Here are the images of the case"open" and "closed"...
I got carried away and made more, thinking that this will make a great gift for my friends.
The thick interfacing gives just the right amount of stiffness without being bulky. This eyeglass case will definitely protect my glasses from scratches and easily fit in my purse which is exactly what I wanted. Happy sewing everyone!
Labels:
Babylock sewing
,
eyeglass case
,
fabric
,
gift
,
handmade
,
sewing
,
tutorial
Subscribe to:
Posts
(
Atom
)
My Tutorials
- Baby Blanket with Self Binding Method
- Bias Tape
- Black Apple Doll Quilt
- Coin Wallet
- Colorful Flip Flops
- Cordury Skirt
- Dark Green Shirt
- Eclectic Flower Bouquet Wreath
- Fabric Coverd Bead Bracelet
- Fabric Flower
- Fall & Winter earrings
- Felt Banner
- Five Fat Quarters Scarf
- Five Kitchen Towels Dress
- Framed Fabric
- Homespun Mannequin
- How to Make Yo-Yos
- Instapocket Skirt
- JCrew Inspired Dress
- Jean Corsage
- Lavender shirt
- Light Beige Shirt
- Linen Scarf
- Little Girl's Leg Warmers
- Little Girls Tunic with Tank
- Modern Square Garden Quilt
- Navy Shirt
- No Sew Felt Pot Sticker
- Place Mat Cafe Apron
- Pleated Pretty Shirt
- Pom-pom scarf
- Reversible Handbag
- Ring Display Case
- Romantic Cardigaan
- Ruffle Shirt
- Ruffle Shirt 2
- Ruffle Shirt ~Why Not Vertical~
- Ruffle Top for a Baby
- Scarf Headband
- Scrappy Corsage
- Sew Stylish Pincushion
- She Carries Flowers / Bag
- She Carries Flowres/ Key Holder
- She Wears Flowers
- Square-in-square quilt
- Sunkissed Tunic
- Sweater to Make Believe Tweed Jacket
- Sweet Scarf for Little Girl
- T-Shirt Makeover
- Tiny Tin Bedroom
- Topiary
- Tunic Dress for Little Girl
- Tutu