Showing posts with label Moda. Show all posts

Friday, August 26, 2016

Craftsy Class by Amy of Diary of a Quilter and Layer Cake Giveaway!


If you are a quilter, you probably already know my dear friend Amy from her wildly popular blog Diary of a Quilter. She is a pattern designer, instructor and author of the book Fabulously Fast Quilts. Just before the summer, she debuted on Craftsy with her fabulous class Pre-Cut Shortcuts ~ Quilt Top in No Time! She did such a wonderful job on sharing her skills and knowledge and I felt so giddy while watching her class. Today, I have a special treat for you ladies... 50% off of her class AND, one layer cake giveaway!!


In her classes, she shared a few fun time saving quilt designs using pre-cuts and different color variations. I want to make them all!

I want to make Bricks and Sticks with my 11 year old daughter. Wouldn't that be fun for her to make a quilt top that is simple enough but a more interesting design than just squares?

I also LOVE to try Crosshatch quilt. I love the look of it and watching how Amy makes it appear effortless made me want to whip one up.

I usually don't buy pre-cuts, but watching her classes makes me want to run to the store, so I can make those quilts! The last one is my absolute favorite: meet "Gumball Block". I loved the different color combinations she showed during the class and they inspire me for other color possibilities.


Aren't they so adorable?? You will find more tips and trick in her course: from fabric care to binding a quilt. Head over to Craftsy to get 50% off her class.

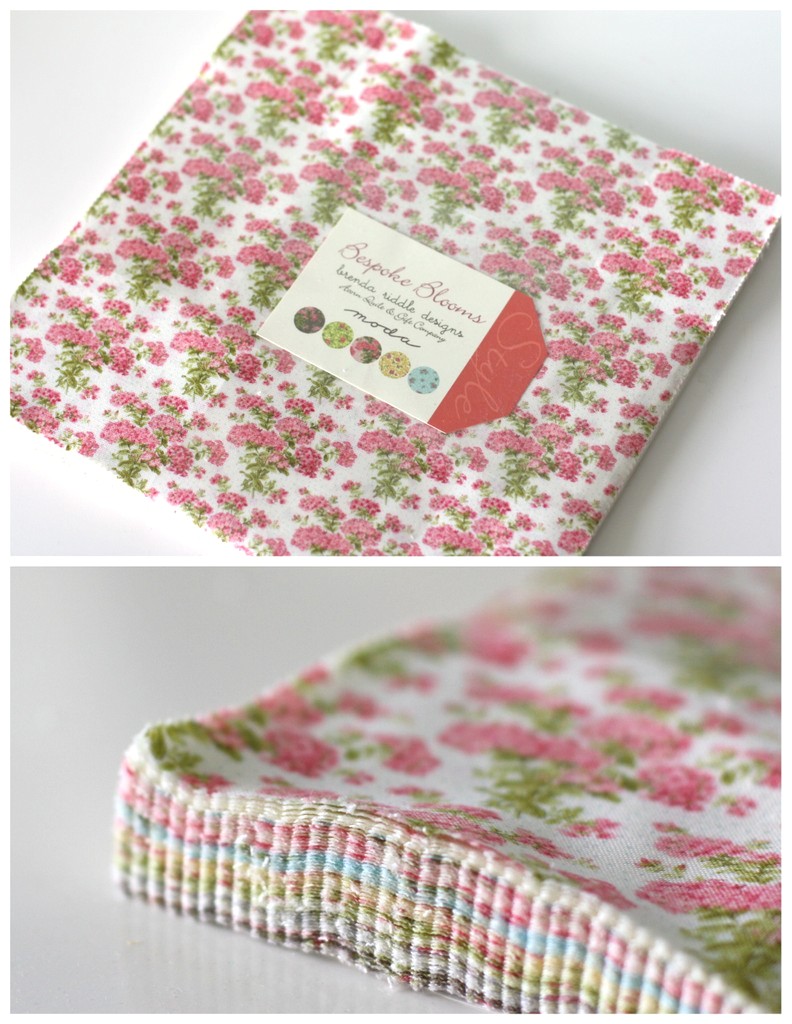
Are you ready to enter the layer cake giveaway? She is giving away Bespoke Blooms by Moda! Look at the pretty prints, I think this will be perfect material when you are going to make one of Amy's quilt, wouldn't you agree? Good luck everyone!


a Rafflecopter giveaway


Thursday, October 22, 2015

Big Reveal of Small Sewing Room! Part 1

Do you remember these photos? I started working on putting together a small sewing room a while ago.

I painted the wooden suite case...

Then put up wall paper and hard wood floors... (they are just scrap book paper. I LOVE the texture on the paper!)

I am so happy to finally share the finished sewing room today! I couldn't decide on the furniture arrangement at first. When that was done, I started making all sorts of decorations. Lots and lots of ideas with many possibilities flooded my mind and I really had to pick and choose what to do. I felt like the whole process was just like trying to decorate a real room; except everything I was working on was much smaller.

Welcome everyone to my small sewing room tour!

First up is this cupboard with spool and fabric bolts. I love, LOVE how this turned out!

In the sewing room, I needed a big table for cutting and putting the sewing machine on, and of course a place for treats every now and then. Can you believe I found this table at a dollar store a while ago? It was unfinished but I painted it white. I went back to buy more for future projects, but they don't carry them anymore (sob!).

This drawer chest is also a dollar store find. You can use your imagination of what's in the drawers... more fabrics, findings, yarns, books? Who knows. I made the cork board to pin up some pretty cutouts from a magazines.

One of my favorite things in this sewing room is this mannequin. I had several idea for the dress, but this is what my mind settled on. Wouldn't it be fun to make a live-sized one?

Fabric bolts in a tin. Sometimes I wish I could buy a bolt of fabrics when I find something I really love: here is my chance to have a "bolt" of fabric. Can you spot fabrics from Riley Blake, Art Gallery Fabric, Moda and Cotton + Steel?

The room is a mix of store bought items and things I made. In my next post, I will talk about what I made and how, so stay tuned!

Monday, March 1, 2010

One Down, How Many More to Go?


Near the beginning of last year, I pieced this quilt using a charm pack from Moda. In between my other projects, I hand quilted this throughout the year. I hardly ever sit and quilt at home anymore. When I am home I have other things I need to do, and besides, if I have anytime left, I do something that requires cutting and sewing by machine.

I usually have some kind of project with me all the time, so when I find a little bit of time here and there, I can make some progress. I quilted this at my sons' martial arts studio, while waiting in the carpool lane at my sons' school, and other places. (If you see someone with a gigantic quilt in public and she looks little out of place, that could be me...)

It is finally done!! This quilt is called: "Snow Ball Quilt", I am so glad that I finished it before another Spring came.

The blocks for this quilt were so easy to do, I would love to make one in a different color theme... but I have many other quilt tops that need to be quilted, I don't think it is a good idea to start a new one just yet. I guess I should baste a quilt top to take along with me.

Friday, September 11, 2009

Tutorial--Sweet Scarf for Little Girl--


Well, its tutorial time! Have you noticed in the morning and at night, the air is getting cooler? I created this for my little girl using the Honey Bun from Moda. Don't worry, just in case you want to make this with your fabric stash, I included the measurements.

You will need:

1 Honey Bun (you only need five strips from this)
3 1/2" x 50 1/2" minky strips
Lace (optional)

How to make:

1. First pick out your favorite fabric strips from the Honey Bun.


2. Lay them on the cutting mat and cut into 5 1/2" strips. The Honey Bun is 1 1/2" wide, so the each strip will be, 1 1/2" x 5 1/2".

3. The top and bottom strips will be assembled from 11 pieces. The middle strip will be assemble from 10 pieces. Lay them out and keep arranging until you like what you see. Remember to slide each row, like a brick wall, so that the seams do not line up. Look at picture to see what I mean. Sew each row first, then sew the long strips together.


5. I used a small bowl to draw a half circle then gave the scarf ends a round edge.


6. Right sides together, lay the pieced top and the minky. Minky is very tricky fabric it moves and slides easily, so use lots of pins to secure it.


7. Leaving 4-5 inches opening sew all around it.

8. Turn the fabric inside out then press with an Iron. Fold the fabric at the opening inside and pin it, sew all around the edges to secure the fabrics. If you would like to add lace like I did, you can do it at this stage.


9. All done! Enjoy the fall.


I came up with this after I did a Five Fat Quater Scarf for myself. Since I only used a little bit of the Honey Bun, I am now making a small quilt with the rest of it. You can make several of these scarves out of one Honey Bun... Perhaps, that would be a perfect Christmas gift if you have several daughters, grand daughters, and nieces.

I hope you enjoy this. Have a great weekend everyone!

Wednesday, July 8, 2009

Red and White Polka Dot Bag


I found this oil cloth(by Moda... of couse) at a local quilt store. Ohh...
how it made me jump with joy!! Red and white is one of my favorite combinations and on top of that... Polka dots!? You can't beat that. I decided to make a market bag!

I used this floral fabric for liner.


I made a flower clip to go with it.

I am ready for summer adventures!( well, within reason...)

Friday, June 12, 2009

Fun day at the Carnival and Scrap bag project

I am not really good at planning activities, but this year I made a special calendar for the whole summer. The calendar contains kids activities and many attractions going on where we live.

Yesterday, we went to a carnival and it was lots of fun.


Eventhough it rained a little, we still had a blast! After the rain, we saw a gorgeous rainbow in the sky!


Tomorrow we plan to go see hot air baloons in the morning and fire works at night. I use to miss how I spend summers growing up in Japan, but I have been here long enough that there are things I look forward to doing in the summer. Fire works, barbeque, picnics, etc...

I also started working on a new quilt top. Do you remember this scrap bag from Moda?


A design idea came to my mind a couple days ago, so I started this. I might be able to post the complete quilt top next week.


Part of me is wanting to sew all night, but I also rented a movie for my hubby and I to watch. There are so many things I want to do and sometimes I am torn between them. I might relax a little tonight...

Monday, May 25, 2009

Tutorial--Modern square garden quilt--


Ok, I gave a fancy name to my simple square quilt. This is very easy to do, but I wanted a different look, so I chose ginghum check fabric for the sashing and the borders.
* You will need
1 charm pack (I used some for another project, so I only had 35 pieces left. That's what we will use for this quilt).
2 yards ginghum check fabric (for sashing, borders, and bias tape)

* Note--Always cut big pieces first and work your way down to small pieces. I cut all the long pieces from length of fabric.

* Cutting:
25P-- 2 1/2"x 5" (sashing for between the squares)
6P--- 2 1/2"x 31" (sashing for between the rows)
2P--- 4"x 38 1/2" (top borders)
2P--- 4"x 44 1/2" (sides borders)

* How to assemble the quilt:
1. Lay out the squares and decide where you want the fabrics to go.
2. Using a quarter inch seam allowance; sew 2 1/2" x 5" sashing between the squares. Then, press the seam towards the sashing. Repeat the process and make seven rows.


3. Join each row with 2 1/2" x 31" sashing to make the center of the quilt. Press the seams.


4. Add 4" x 44 1/2" borders on both sides. Press. Then, Attach 4" x 38 1/2" borders to top and bottom. Press.


Now you have the quilt top! The finished size is 38 1/2" x 51 1/2".

I like the batting and backing to have an extra 3" around the egde. So, when you baste them, they have enough room to move a little.

For the bias tape, check out my tutorial.

I basted my quilt and haven't decide what to do. I am still new to machine quilting. I am so tempted to hand quilt this one, but I have been hand quilting another quilt I started a few years ago. I need to finish that one first before I can commit myself to do another quilt by hand. I will post the quilt when I finish it.
Blog Widget by LinkWithin