It was bitter sweet waving the kids good-by when they were off to school this last Monday. We made a lots of fun memories together during the summer but I could tell they were ready to go back to school. I have been spending lots of time with them more than sitting in my sewing room, and I am glad I did. In the last couple weeks when I had downtime I made some jewelries for my etsy shop and one for my self.
Do you remember this post? I posted some cute findings at a local gift shop a while ago.
I used the vintage buttons and things I already had to create this green themed necklace. I don't know why, but I have been drawn to green lately.
I love how it turned out and I know it will be a great addition to my wardrobe.
and Yes! I am already wearing it!
Here are some jewelries that I created for my shop...
Flower patch bracelet; this is one of my favorite pieces. I love looking at all the different flowers on the bracelet, So cute and different.
Vanilla Rose necklace; I love the simplicity of this necklace. I told you that I have been drawn to green. :)
Bee Keeper necklace. I am actually creating another one with different colors too. The combination of black and gold gives this necklace a more sophisticated look.
Flower Bouquet Ring: It is a fun statement ring you can wear daily.
Date Night bracelet; I LOVE THIS bracelet. Simple theme with a grown-up look. This bracelet can go with casual outfits as well as more dressed up outfits.
Was there anything that caught your eye? I will be adding them to my etsy shop soon!
Showing posts with label bracelet. Show all posts
Wednesday, August 20, 2014
Monday, June 17, 2013
Tutorial~ One Direction Bracelet
Today I am going share a very simple way to make a fabric bracelet, which looks good for guys too. With the directions I am providing, you can create two. It is so fun to mix and match many different colors, or just do simple two tones. Since it is so easy to make, it will be a great Christmas gift for your friends too, if you are thinking that far ahead! :)
Here are the things you need to in order to make two:
Several different fabrics 1/8 yard each
Matching thread for your machine
Four sets of snap buttons
{How to}
1. Trim off the sides of the fabrics. Cut 4 1/4" wide strips.
2. Use the 45 degree line on your cutting ruler, cut 1 1/2" wide angle strips from several different fabrics.


3. Line them up to decide what color combination you want. Sew them together.
4. Trim both sides and cut 2 pieces of 1 1/4" wide strips.
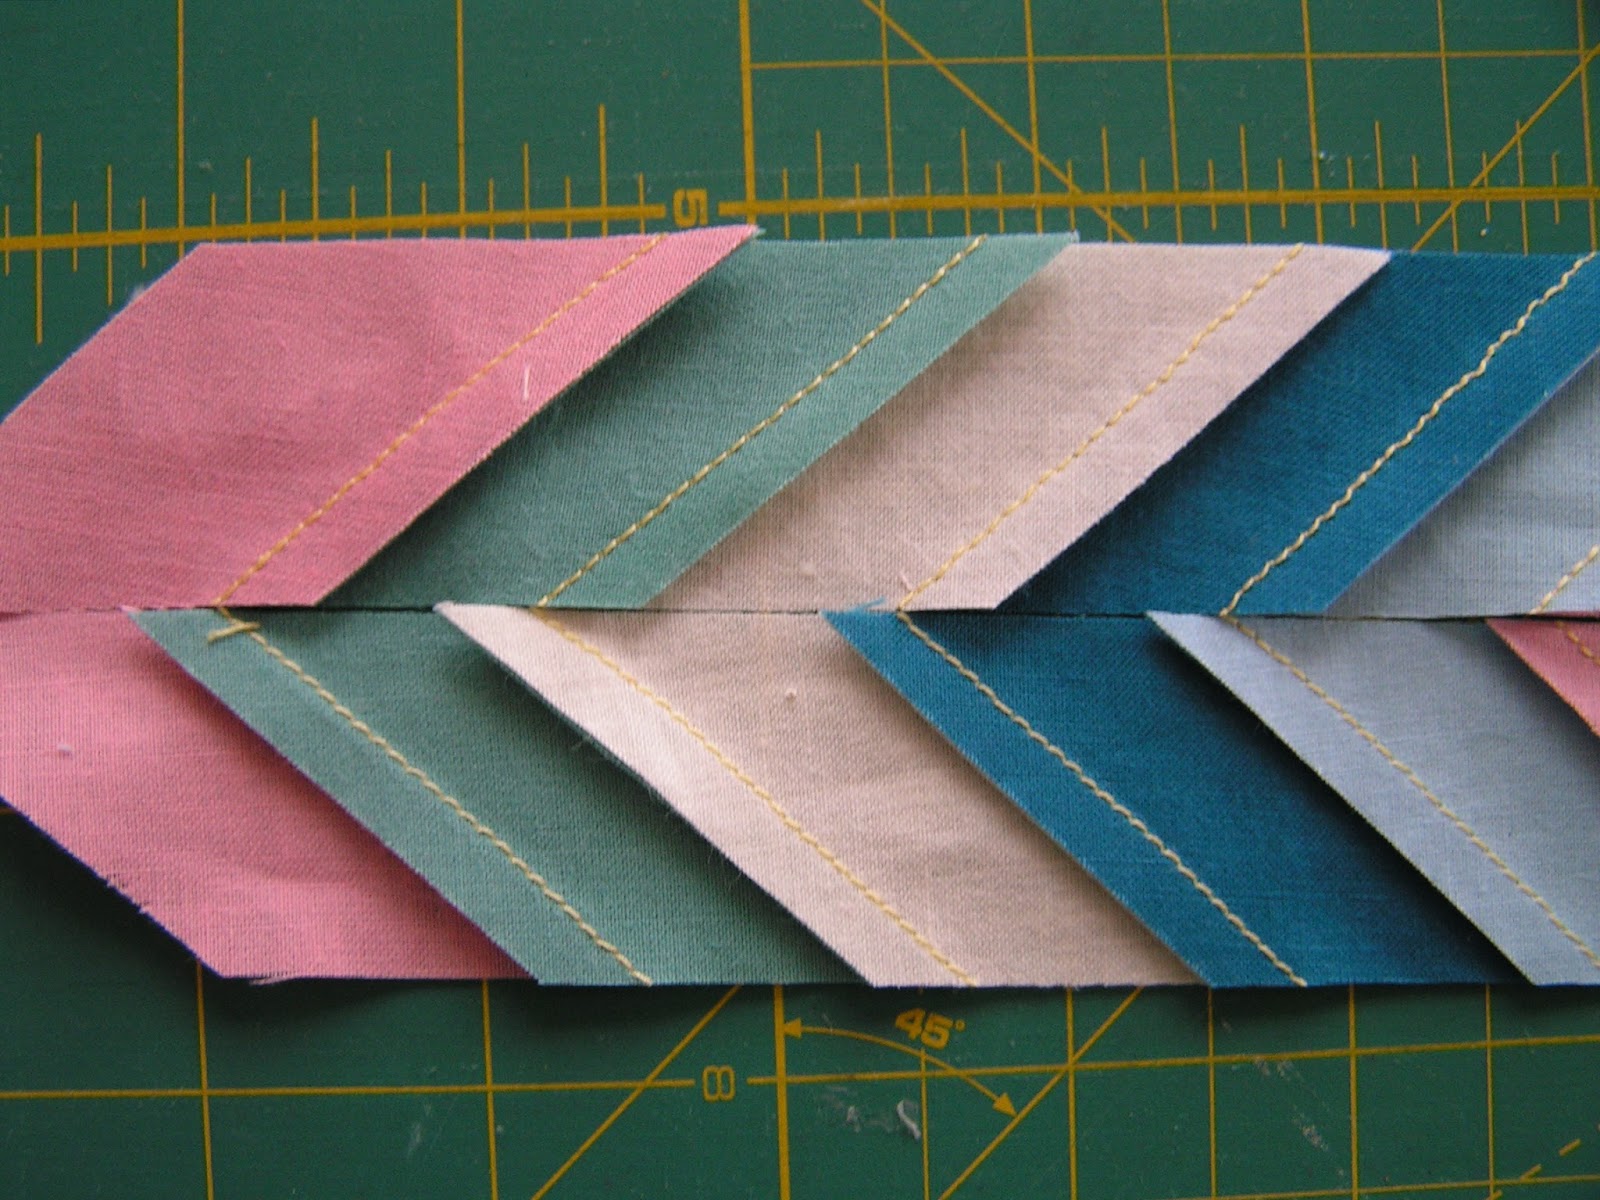
5. Sew another set of strips for the opposite side. Make sure that the direction of the fabrics will form a "V" with the opposite side of the strip you already have sewn.
6. Now you have two sets of bracelet strips.
7. When you sew them together, make sure that the seams are going in opposite directions. That way the seam will sit flat.
8. Cut a fabrics strip for the back. 2" by whatever the length of your bracelet. Leaving a 3" opening and sew around the edges.
9. Snip off the corners for a cleaner finish.
10. Turn the fabric inside out. Press with an iron and top stitch around it.
11. Mark where you want the snap buttons to go.
12. Follow manufacturer’s directions provided on the package to add the snaps to the bracelet and it is ready to wear it!
I made several different color combinations of bracelets.
Here are some tips....
If you would like to have more colors shown closer, you can cut your strips narrower during step 2. Depending on the measurement of the wristband you are making, you can always add or take away the strips to adjust it.
I hope you will have fun with it.
Happy sewing!
Here are the things you need to in order to make two:
Several different fabrics 1/8 yard each
Matching thread for your machine
Four sets of snap buttons
{How to}
1. Trim off the sides of the fabrics. Cut 4 1/4" wide strips.
2. Use the 45 degree line on your cutting ruler, cut 1 1/2" wide angle strips from several different fabrics.
4. Trim both sides and cut 2 pieces of 1 1/4" wide strips.
5. Sew another set of strips for the opposite side. Make sure that the direction of the fabrics will form a "V" with the opposite side of the strip you already have sewn.
6. Now you have two sets of bracelet strips.
7. When you sew them together, make sure that the seams are going in opposite directions. That way the seam will sit flat.
8. Cut a fabrics strip for the back. 2" by whatever the length of your bracelet. Leaving a 3" opening and sew around the edges.
9. Snip off the corners for a cleaner finish.
10. Turn the fabric inside out. Press with an iron and top stitch around it.
11. Mark where you want the snap buttons to go.
12. Follow manufacturer’s directions provided on the package to add the snaps to the bracelet and it is ready to wear it!
I made several different color combinations of bracelets.
Here are some tips....
If you would like to have more colors shown closer, you can cut your strips narrower during step 2. Depending on the measurement of the wristband you are making, you can always add or take away the strips to adjust it.
I hope you will have fun with it.
Happy sewing!
Friday, March 9, 2012
Bracelet. Made.
Ever since I bought flower cabochons, there are so many ideas for jewelries swarming around in my head.

I have made some simple necklaces and currently am working on a necklace with lots going on, and I LOVE how it is coming along. I am so excited about it, and I can't wait to share the picture when I am finished... in the meantime can you check out the bracelet I made?

Ahh... I am longing for warm weather, so my wrists are not hiding underneath a sweater or coat.
I have made some simple necklaces and currently am working on a necklace with lots going on, and I LOVE how it is coming along. I am so excited about it, and I can't wait to share the picture when I am finished... in the meantime can you check out the bracelet I made?
Ahh... I am longing for warm weather, so my wrists are not hiding underneath a sweater or coat.
Wednesday, September 21, 2011
Liberty of London Button Bracelet
I shared how I found some Liberty of London fabrics in my stash and how I used them to make fabric covered buttons several posts ago...
Well, I keep finding good uses for these fabrics. I will share what I’ve done and the tutorial for it next week. Meanwhile, I am sharing some pictures of bracelets today.
I wanted some eclectic, fun, and slightly chunkier bracelets for myself. I decided to mix oversized buttons and beads with the fabric covered buttons that I made with my beloved Liberty of London fabrics.
All I did was to use elastic for jewelry making, threaded the buttons and beads. Tie the ends and apply some super glue... that is it! Isn't it so easy? I bet this will be a fun gift exchange idea for Christmas too!
Here are the lancelets...

I like them all; it is so much fun to think about what you can wear with them. I feel like a plain t-shirt could even look interesting with these bracelets.
Red & Orange,


Mauve & Blue,


Green & Brown,


Which one do you like best?

My favorite? I must say the red one.

I feel like I put the covered buttons to good use, and the best part is, if I ever change my mind, I can cut the elastic anytime I want and use them for something else, isn't that awesome? :)
Well, I keep finding good uses for these fabrics. I will share what I’ve done and the tutorial for it next week. Meanwhile, I am sharing some pictures of bracelets today.
I wanted some eclectic, fun, and slightly chunkier bracelets for myself. I decided to mix oversized buttons and beads with the fabric covered buttons that I made with my beloved Liberty of London fabrics.
All I did was to use elastic for jewelry making, threaded the buttons and beads. Tie the ends and apply some super glue... that is it! Isn't it so easy? I bet this will be a fun gift exchange idea for Christmas too!
Here are the lancelets...
I like them all; it is so much fun to think about what you can wear with them. I feel like a plain t-shirt could even look interesting with these bracelets.
Red & Orange,
Mauve & Blue,
Green & Brown,
Which one do you like best?
My favorite? I must say the red one.
I feel like I put the covered buttons to good use, and the best part is, if I ever change my mind, I can cut the elastic anytime I want and use them for something else, isn't that awesome? :)
Subscribe to:
Posts
(
Atom
)